> ## Documentation Index
> Fetch the complete documentation index at: https://docs.echoauth.dev/llms.txt
> Use this file to discover all available pages before exploring further.
# AI Agent setup guide
> Go from a license key to an AI agent answering your Discord tickets.
Setting up takes about 15 minutes. You need four things:
* An EchoAuth AI Agent **license key**. [Buy one in the shop](https://shop.echoauth.dev/product/echos-ai-agent-hosted) if you don't have one yet.
* A **Discord server** where you can add bots and manage roles.
* An **[OpenRouter](https://openrouter.ai) API key**. One OpenRouter key covers everything the agent needs: answers, screenshots and search.
* Optionally, a **docs site** or some written documentation for the agent to answer from.
We host your agent and keep it running. You set it up from the dashboard at [agent.echoauth.dev](https://agent.echoauth.dev).
**Recommended setup.** Long-term testing was done with OpenRouter only, using these three models:
| Role | Model |
| - | - |
| Chat / Agent | `deepseek/deepseek-v4-flash-0731` |
| Embedding | `qwen/qwen3-embedding-8b` |
| Vision (image detection) | `nvidia/nemotron-3-nano-omni-30b-a3b-reasoning:free` |
Other providers (NVIDIA, OpenAI, Anthropic) are available in the dashboard, but this is the combination we've tested over time.
## 1. Create your account
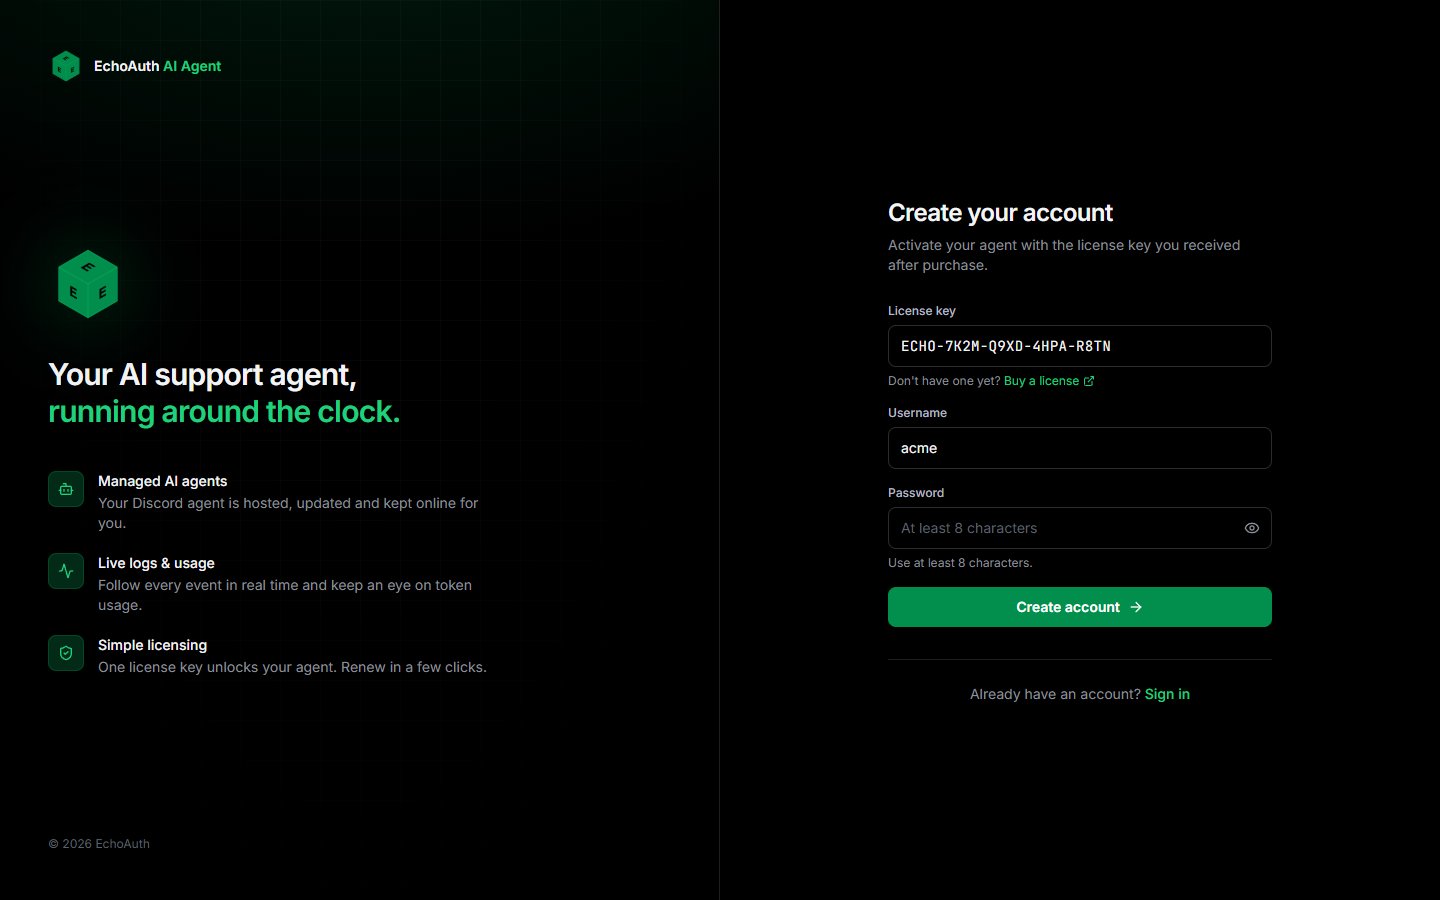
Go to [agent.echoauth.dev/register](https://agent.echoauth.dev/register).
Paste the key from your purchase email. It looks like `ECHO-XXXX-XXXX-XXXX-XXXX`.
Your password needs at least 8 characters. Click **Create account**.
 Once your license is active, your agent is created for you. You land on the dashboard, where you'll see the agent, your license and usage stats.
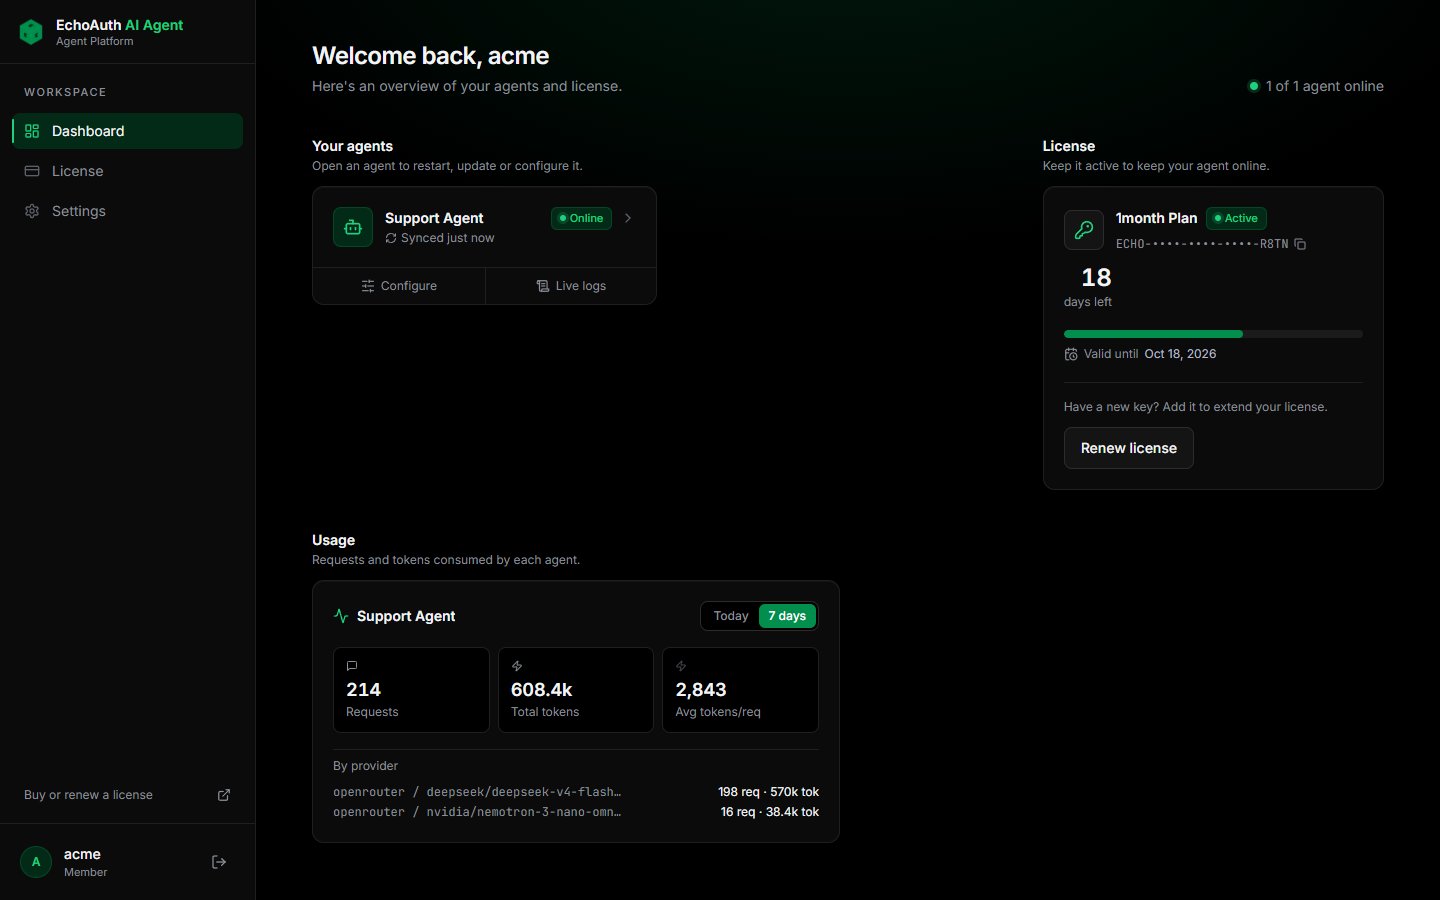 If **No agents yet** is showing, open **License** in the sidebar and check that your license is active.
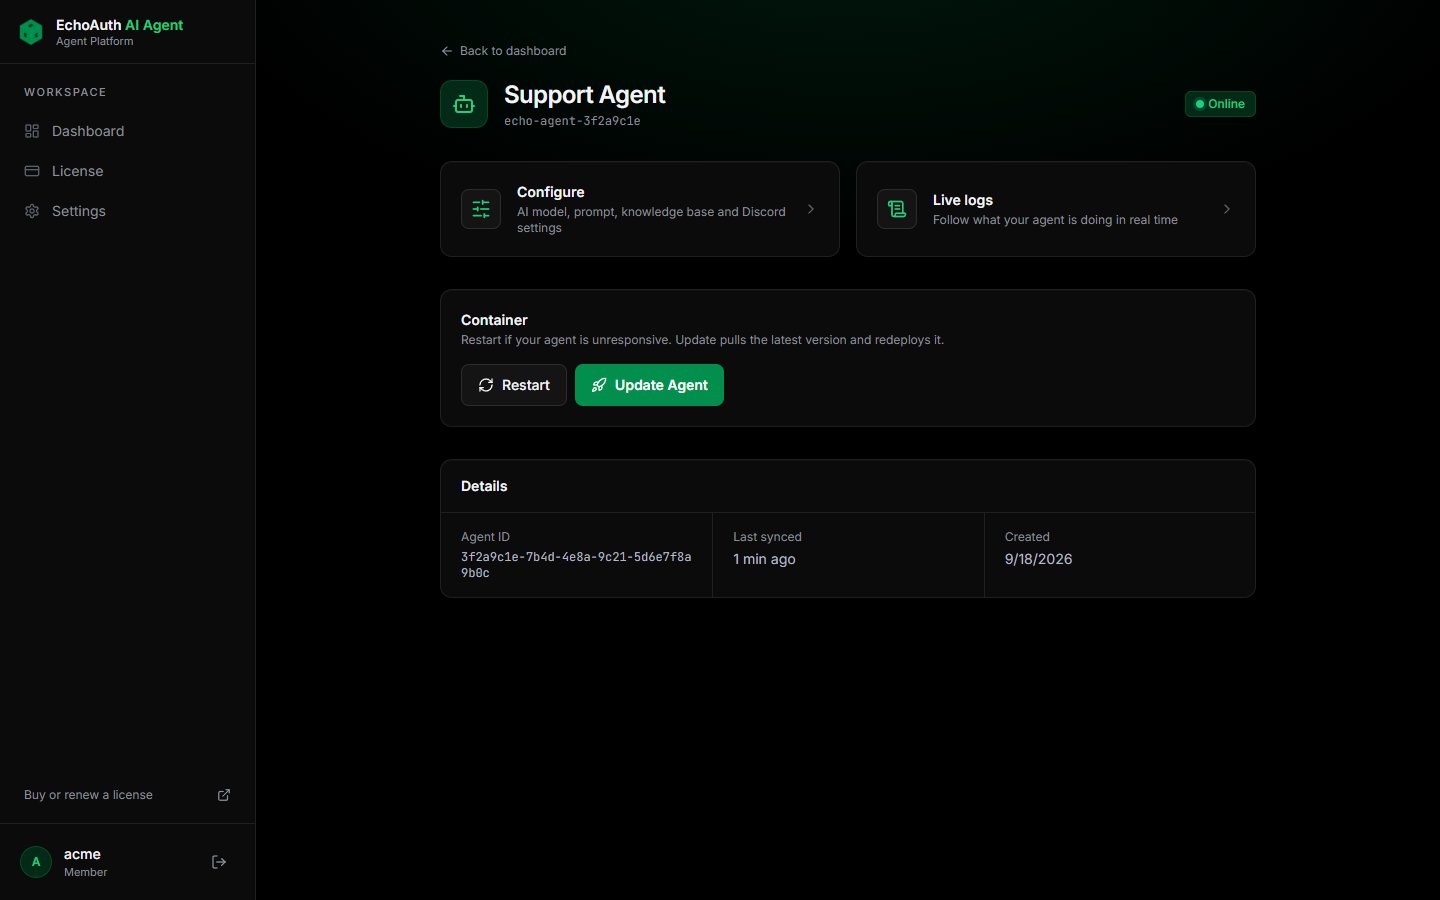
Click your agent to open its page. Everything else in this guide starts from here: **Configure** opens the settings, **Live logs** shows what the agent is doing, and **Update Agent** applies settings that need a redeploy.
If **No agents yet** is showing, open **License** in the sidebar and check that your license is active.
Click your agent to open its page. Everything else in this guide starts from here: **Configure** opens the settings, **Live logs** shows what the agent is doing, and **Update Agent** applies settings that need a redeploy.
 ## 2. Create your Discord bot
Your agent answers through a Discord bot that belongs to you. Create one in the Discord Developer Portal.
Open the [Discord Developer Portal](https://discord.com/developers/applications) and click **New Application**. Name it after your support agent, for example "Acme Support".
Go to **Bot**. Under **Privileged Gateway Intents**, turn on **Message Content Intent** and save.
Without this intent, the bot receives empty messages and never replies.
Still on **Bot**, click **Reset Token** and copy the token. You'll paste it into the dashboard in the next section. Keep it private: anyone with the token can control your bot.
Go to **OAuth2** → **URL Generator**. Tick the scopes `bot` and `applications.commands`, then these bot permissions:
* View Channels
* Send Messages
* Read Message History
* Embed Links
* Attach Files
Open the generated URL and add the bot to your server.
Make sure the bot's role can see the category your ticket channels are created in. If it can't see the channel, it can't answer.
## 3. Add your keys
Create an API key at [openrouter.ai/keys](https://openrouter.ai/keys) and add some credit to your OpenRouter account. The vision model is free, but the chat and embedding models are paid per use.
Then, on your agent page, click **Configure** and open the **API Keys** tab.
## 2. Create your Discord bot
Your agent answers through a Discord bot that belongs to you. Create one in the Discord Developer Portal.
Open the [Discord Developer Portal](https://discord.com/developers/applications) and click **New Application**. Name it after your support agent, for example "Acme Support".
Go to **Bot**. Under **Privileged Gateway Intents**, turn on **Message Content Intent** and save.
Without this intent, the bot receives empty messages and never replies.
Still on **Bot**, click **Reset Token** and copy the token. You'll paste it into the dashboard in the next section. Keep it private: anyone with the token can control your bot.
Go to **OAuth2** → **URL Generator**. Tick the scopes `bot` and `applications.commands`, then these bot permissions:
* View Channels
* Send Messages
* Read Message History
* Embed Links
* Attach Files
Open the generated URL and add the bot to your server.
Make sure the bot's role can see the category your ticket channels are created in. If it can't see the channel, it can't answer.
## 3. Add your keys
Create an API key at [openrouter.ai/keys](https://openrouter.ai/keys) and add some credit to your OpenRouter account. The vision model is free, but the chat and embedding models are paid per use.
Then, on your agent page, click **Configure** and open the **API Keys** tab.
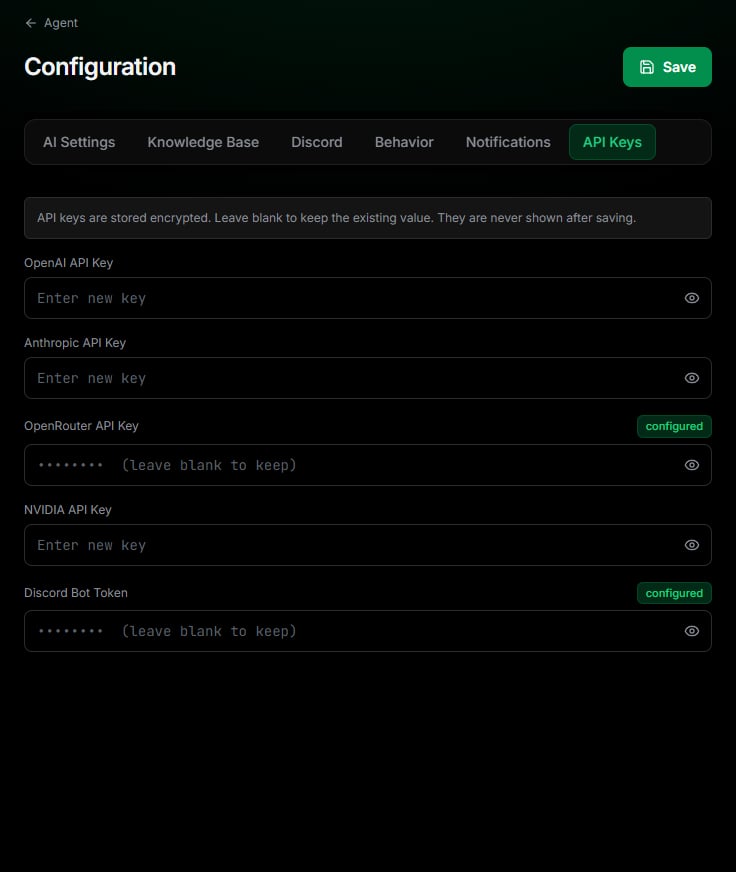 1. Paste your key into **OpenRouter API Key**.
2. Paste your **Discord Bot Token**.
3. Click **Save**.
You can leave the OpenAI, Anthropic and NVIDIA fields empty. Keys are stored encrypted and are never shown again after saving. A **configured** badge confirms that a key is set.
## 4. Choose your AI models
Open the **AI Settings** tab. The agent uses three models. Set all three to **OpenRouter** and pick the recommended models:
| Setting | What it does | Provider | Model |
| - | - | - | - |
| **Chat / Agent Model** | Writes the answers and decides what to look up in your docs. | OpenRouter | `deepseek/deepseek-v4-flash-0731` |
| **Vision Model** | Reads screenshots that customers attach to tickets. | OpenRouter | `nvidia/nemotron-3-nano-omni-30b-a3b-reasoning:free` |
| **Embedding Model** | Indexes your documentation and searches it. | OpenRouter | `qwen/qwen3-embedding-8b` |
1. Paste your key into **OpenRouter API Key**.
2. Paste your **Discord Bot Token**.
3. Click **Save**.
You can leave the OpenAI, Anthropic and NVIDIA fields empty. Keys are stored encrypted and are never shown again after saving. A **configured** badge confirms that a key is set.
## 4. Choose your AI models
Open the **AI Settings** tab. The agent uses three models. Set all three to **OpenRouter** and pick the recommended models:
| Setting | What it does | Provider | Model |
| - | - | - | - |
| **Chat / Agent Model** | Writes the answers and decides what to look up in your docs. | OpenRouter | `deepseek/deepseek-v4-flash-0731` |
| **Vision Model** | Reads screenshots that customers attach to tickets. | OpenRouter | `nvidia/nemotron-3-nano-omni-30b-a3b-reasoning:free` |
| **Embedding Model** | Indexes your documentation and searches it. | OpenRouter | `qwen/qwen3-embedding-8b` |
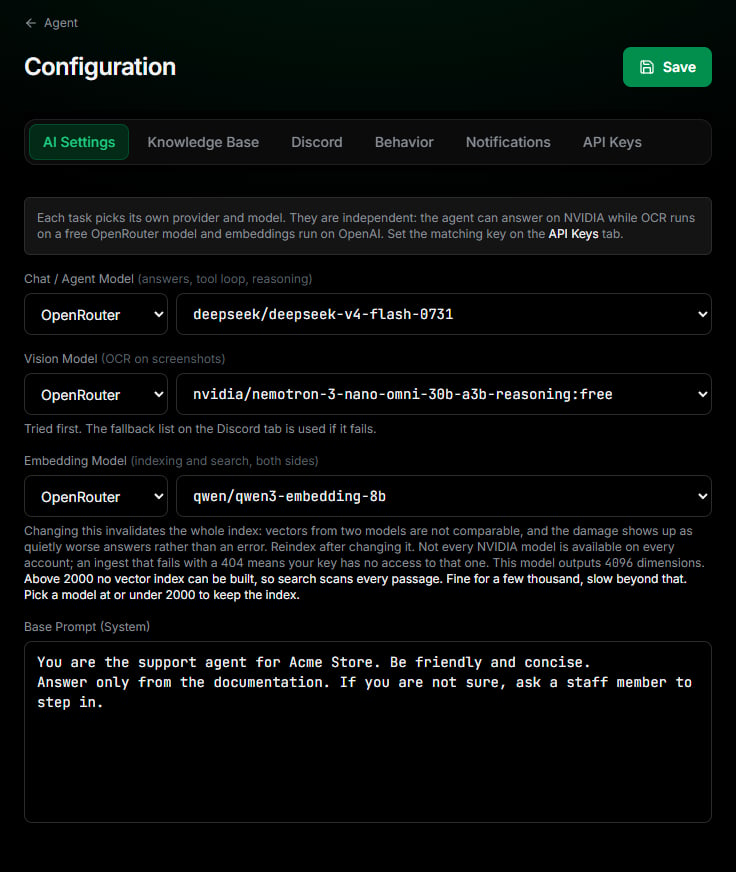 Under the embedding model, the dashboard warns that it's above 2000 dimensions. That's expected for `qwen/qwen3-embedding-8b`. Search still works: it checks every passage instead of using an index, which stays fast for a knowledge base of a few thousand passages.
Then write your **Base Prompt**. This is the agent's standing instructions: who it works for, the tone to use, and what it should never do. For example:
```text theme={null}
You are the support agent for Acme Store. Be friendly and concise.
Answer only from the documentation. If you are not sure, ask a staff member to step in.
```
Pick your embedding model before you index anything. Changing it later makes the existing index unusable until you rebuild it.
## 5. Connect it to your tickets
Open the **Discord** tab. These settings tell the agent where to answer and who counts as staff.
Under the embedding model, the dashboard warns that it's above 2000 dimensions. That's expected for `qwen/qwen3-embedding-8b`. Search still works: it checks every passage instead of using an index, which stays fast for a knowledge base of a few thousand passages.
Then write your **Base Prompt**. This is the agent's standing instructions: who it works for, the tone to use, and what it should never do. For example:
```text theme={null}
You are the support agent for Acme Store. Be friendly and concise.
Answer only from the documentation. If you are not sure, ask a staff member to step in.
```
Pick your embedding model before you index anything. Changing it later makes the existing index unusable until you rebuild it.
## 5. Connect it to your tickets
Open the **Discord** tab. These settings tell the agent where to answer and who counts as staff.
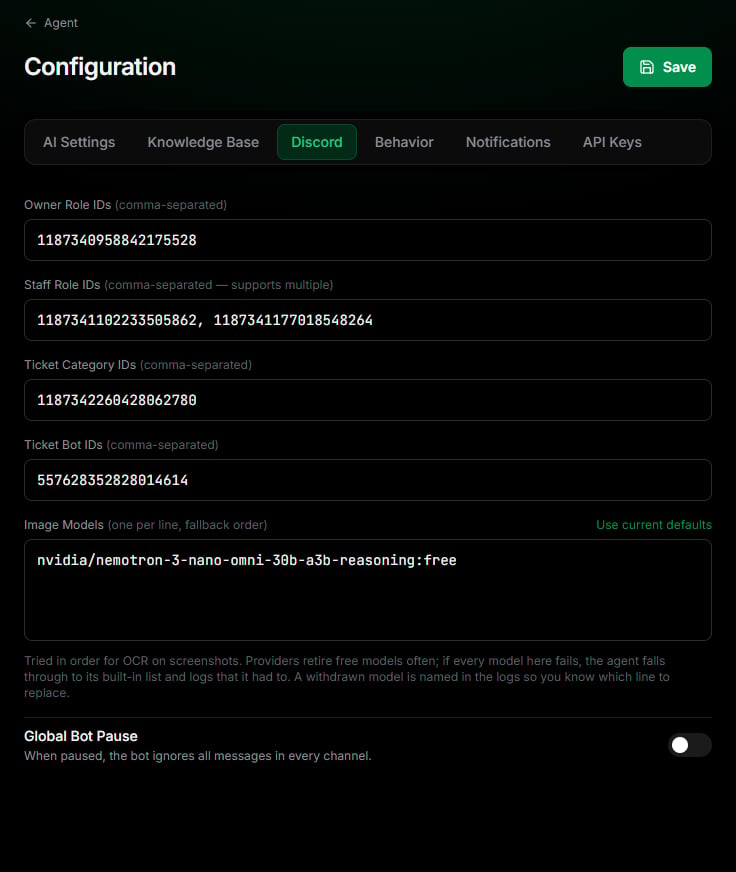 To copy IDs, turn on **Developer Mode** in Discord under **User Settings** → **Advanced**. Then right-click a role, category or user and choose **Copy ID**.
Roles that can use every slash command, including `/pause_bot` and `/edit_base`. Separate several IDs with commas.
Your support team's roles. When a staff member writes in a ticket, the agent steps back and stays quiet in that ticket. To bring it back, mention the bot in the ticket or use `/restart` there.
The categories your ticket channels are created in. The agent only answers inside these categories.
The user ID of your ticket bot, such as Ticket Tool or SellAuth Tickets. The agent ignores other bots, so add yours here to let the agent read the ticket's opening message.
Backup vision models, one per line, tried in order if the vision model from AI Settings fails. Put this fallbacks:
To copy IDs, turn on **Developer Mode** in Discord under **User Settings** → **Advanced**. Then right-click a role, category or user and choose **Copy ID**.
Roles that can use every slash command, including `/pause_bot` and `/edit_base`. Separate several IDs with commas.
Your support team's roles. When a staff member writes in a ticket, the agent steps back and stays quiet in that ticket. To bring it back, mention the bot in the ticket or use `/restart` there.
The categories your ticket channels are created in. The agent only answers inside these categories.
The user ID of your ticket bot, such as Ticket Tool or SellAuth Tickets. The agent ignores other bots, so add yours here to let the agent read the ticket's opening message.
Backup vision models, one per line, tried in order if the vision model from AI Settings fails. Put this fallbacks:
`nvidia/nemotron-3-nano-omni-30b-a3b-reasoning:free`
`google/gemma-4-31b-it:free`
`google/gemma-4-26b-a4b-it:free`
`thinkingmachines/inkling-small:free`
`dots-studio/dots-3-note-preview:free`
Click **Save**.
## 6. Give the agent your documentation
Open the **Knowledge Base** tab. The agent answers from two sources, and you can use either or both.
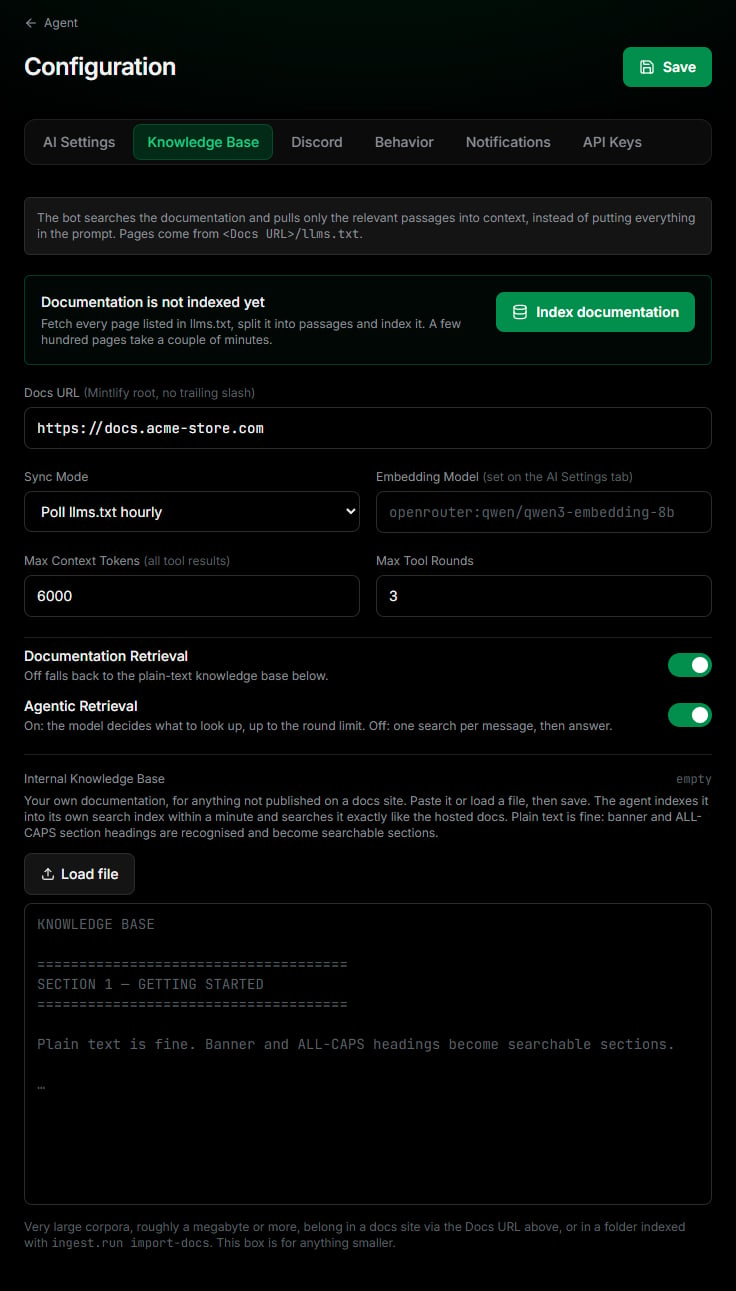 Use this if your documentation is published on Mintlify.
1. Enter your **Docs URL**, for example `https://docs.acme-store.com`, without a trailing slash. The site must serve `/llms.txt`, which Mintlify does automatically.
2. Click **Save**, then go to your agent page and click **Update Agent**.
3. Back on this tab, click **Index documentation**. A few hundred pages take a couple of minutes, and you can leave the page while it runs.
With **Sync Mode** set to **Poll llms.txt hourly**, the agent checks your docs every hour and re-indexes only the pages that changed.
Use this for anything not on a docs site: FAQs, policies, error codes.
1. Scroll to **Internal Knowledge Base**.
2. Paste your text, or click **Load file** and choose a `.txt` or `.md` file.
3. Click **Save**.
The agent indexes it within about a minute. Plain text is fine: headings in ALL CAPS or between lines of `=====` become searchable sections.
Leave **Documentation Retrieval** and **Agentic Retrieval** on. With retrieval on, the agent looks up only the passages relevant to each question instead of reading everything every time.
## 7. Set reply timing and escalation
Open the **Behavior** tab.
Use this if your documentation is published on Mintlify.
1. Enter your **Docs URL**, for example `https://docs.acme-store.com`, without a trailing slash. The site must serve `/llms.txt`, which Mintlify does automatically.
2. Click **Save**, then go to your agent page and click **Update Agent**.
3. Back on this tab, click **Index documentation**. A few hundred pages take a couple of minutes, and you can leave the page while it runs.
With **Sync Mode** set to **Poll llms.txt hourly**, the agent checks your docs every hour and re-indexes only the pages that changed.
Use this for anything not on a docs site: FAQs, policies, error codes.
1. Scroll to **Internal Knowledge Base**.
2. Paste your text, or click **Load file** and choose a `.txt` or `.md` file.
3. Click **Save**.
The agent indexes it within about a minute. Plain text is fine: headings in ALL CAPS or between lines of `=====` become searchable sections.
Leave **Documentation Retrieval** and **Agentic Retrieval** on. With retrieval on, the agent looks up only the passages relevant to each question instead of reading everything every time.
## 7. Set reply timing and escalation
Open the **Behavior** tab.
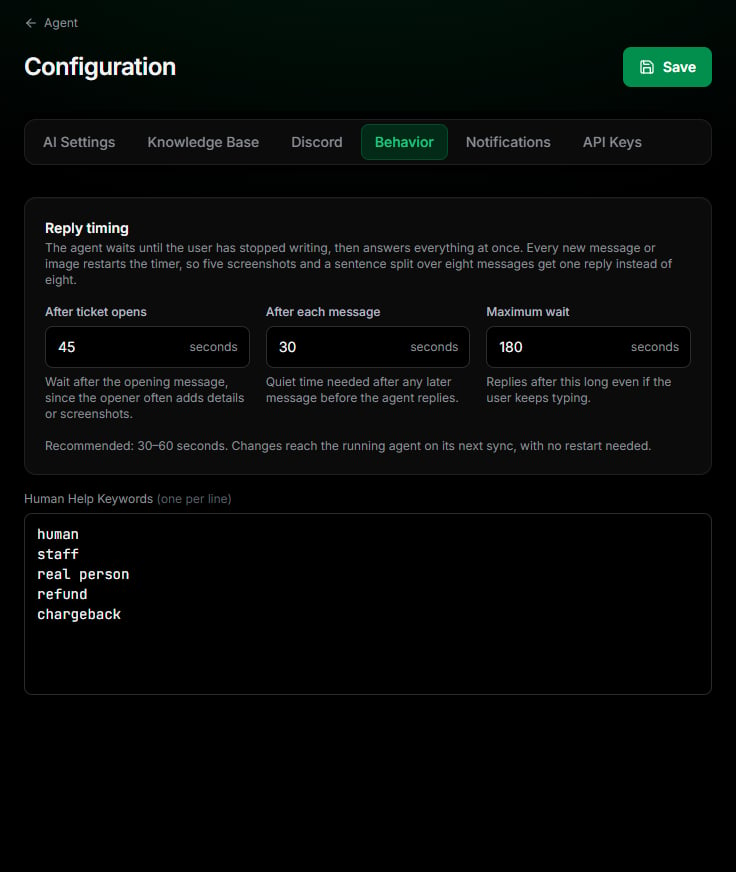 The agent waits until the customer has stopped typing, then answers everything in one reply. Each new message restarts the timer.
| Setting | Default | Meaning |
| - | - | - |
| After ticket opens | 45 s | Wait after the first message, since customers often add details or screenshots. |
| After each message | 30 s | Quiet time needed after later messages before replying. |
| Maximum wait | 180 s | Reply after this long even if the customer keeps typing. |
Under **Human Help Keywords**, list words that should hand the ticket to your team, one per line. For example `refund`, `chargeback` or `real person`.
## 8. Get alerts (optional)
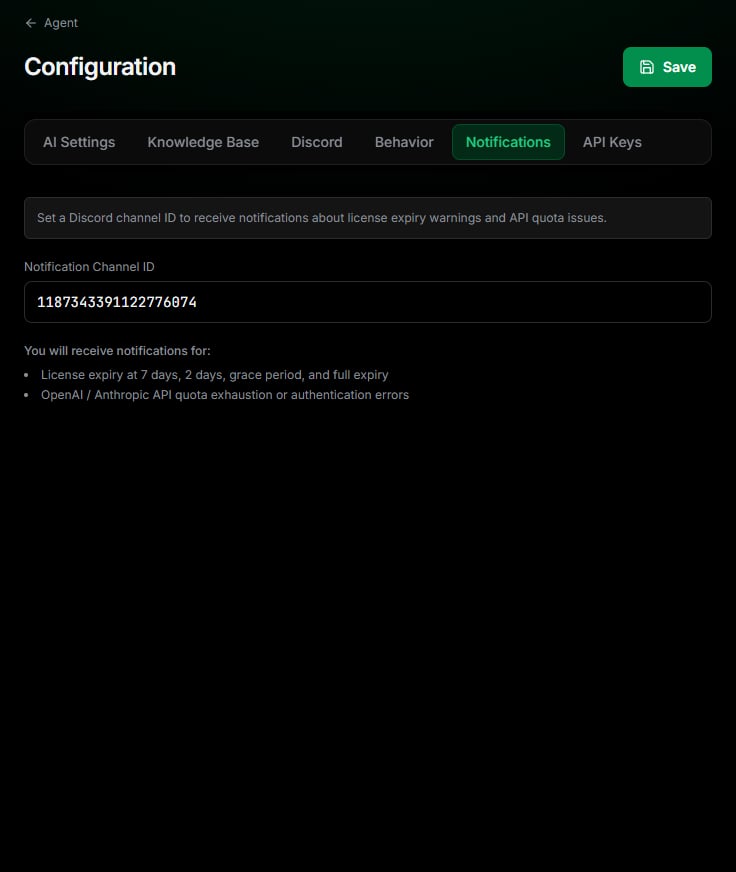
Open the **Notifications** tab and paste the ID of a private staff channel. The agent posts there when your license is about to expire and when an AI provider rejects your key or runs out of quota.
The agent waits until the customer has stopped typing, then answers everything in one reply. Each new message restarts the timer.
| Setting | Default | Meaning |
| - | - | - |
| After ticket opens | 45 s | Wait after the first message, since customers often add details or screenshots. |
| After each message | 30 s | Quiet time needed after later messages before replying. |
| Maximum wait | 180 s | Reply after this long even if the customer keeps typing. |
Under **Human Help Keywords**, list words that should hand the ticket to your team, one per line. For example `refund`, `chargeback` or `real person`.
## 8. Get alerts (optional)
Open the **Notifications** tab and paste the ID of a private staff channel. The agent posts there when your license is about to expire and when an AI provider rejects your key or runs out of quota.
 ## 9. Start the agent
Go back to your agent page and click **Update Agent**. This redeploys the agent with your bot token, docs URL and embedding model. The output appears below the button while it runs.
Most settings reach the running agent within about a minute, with no redeploy. You only need **Update Agent** after changing the **Discord Bot Token**, **Docs URL**, **Embedding Model** or **Sync Mode**.
To check that everything works:
1. Open a test ticket in your server and ask a question your docs answer.
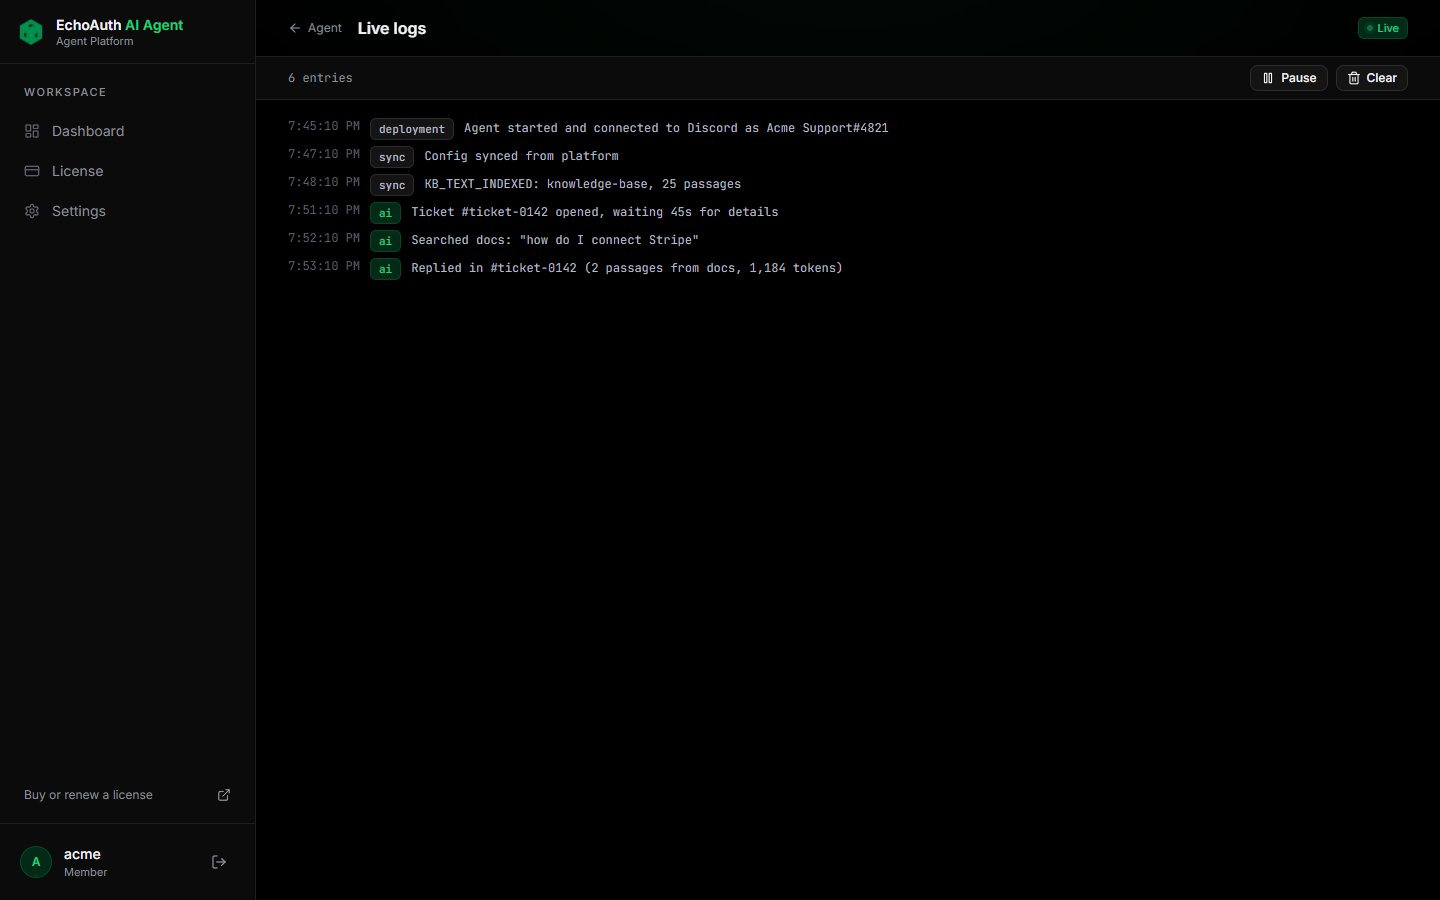
2. Open **Live logs** on your agent page and watch the agent receive the message, search your docs and reply.
## 9. Start the agent
Go back to your agent page and click **Update Agent**. This redeploys the agent with your bot token, docs URL and embedding model. The output appears below the button while it runs.
Most settings reach the running agent within about a minute, with no redeploy. You only need **Update Agent** after changing the **Discord Bot Token**, **Docs URL**, **Embedding Model** or **Sync Mode**.
To check that everything works:
1. Open a test ticket in your server and ask a question your docs answer.
2. Open **Live logs** on your agent page and watch the agent receive the message, search your docs and reply.
 The status badge on your agent reads **Online** when it is running.
## Slash commands
Once the agent is in your server, owners and staff can control it from Discord.
| Command | Who | What it does |
| - | - | - |
| `/stop` | Owner, staff | Stop the agent replying in this channel. |
| `/restart` | Owner, staff | Let the agent reply in this channel again. |
| `/mute_existing` | Owner, staff | Stop the agent in every ticket that is already open. |
| `/pause_bot` | Owner | Pause the agent everywhere. |
| `/resume_bot` | Owner | Resume the agent everywhere. |
| `/edit_base` | Owner | Edit the base prompt. |
| `/chat_model` | Owner | Change the chat model. |
You can also pause the agent from the dashboard with **Global Bot Pause** on the **Discord** tab.
## Keep your license active
Your agent stays online while your license is active. The **License** page shows the days left and your expiry date.
The status badge on your agent reads **Online** when it is running.
## Slash commands
Once the agent is in your server, owners and staff can control it from Discord.
| Command | Who | What it does |
| - | - | - |
| `/stop` | Owner, staff | Stop the agent replying in this channel. |
| `/restart` | Owner, staff | Let the agent reply in this channel again. |
| `/mute_existing` | Owner, staff | Stop the agent in every ticket that is already open. |
| `/pause_bot` | Owner | Pause the agent everywhere. |
| `/resume_bot` | Owner | Resume the agent everywhere. |
| `/edit_base` | Owner | Edit the base prompt. |
| `/chat_model` | Owner | Change the chat model. |
You can also pause the agent from the dashboard with **Global Bot Pause** on the **Discord** tab.
## Keep your license active
Your agent stays online while your license is active. The **License** page shows the days left and your expiry date.
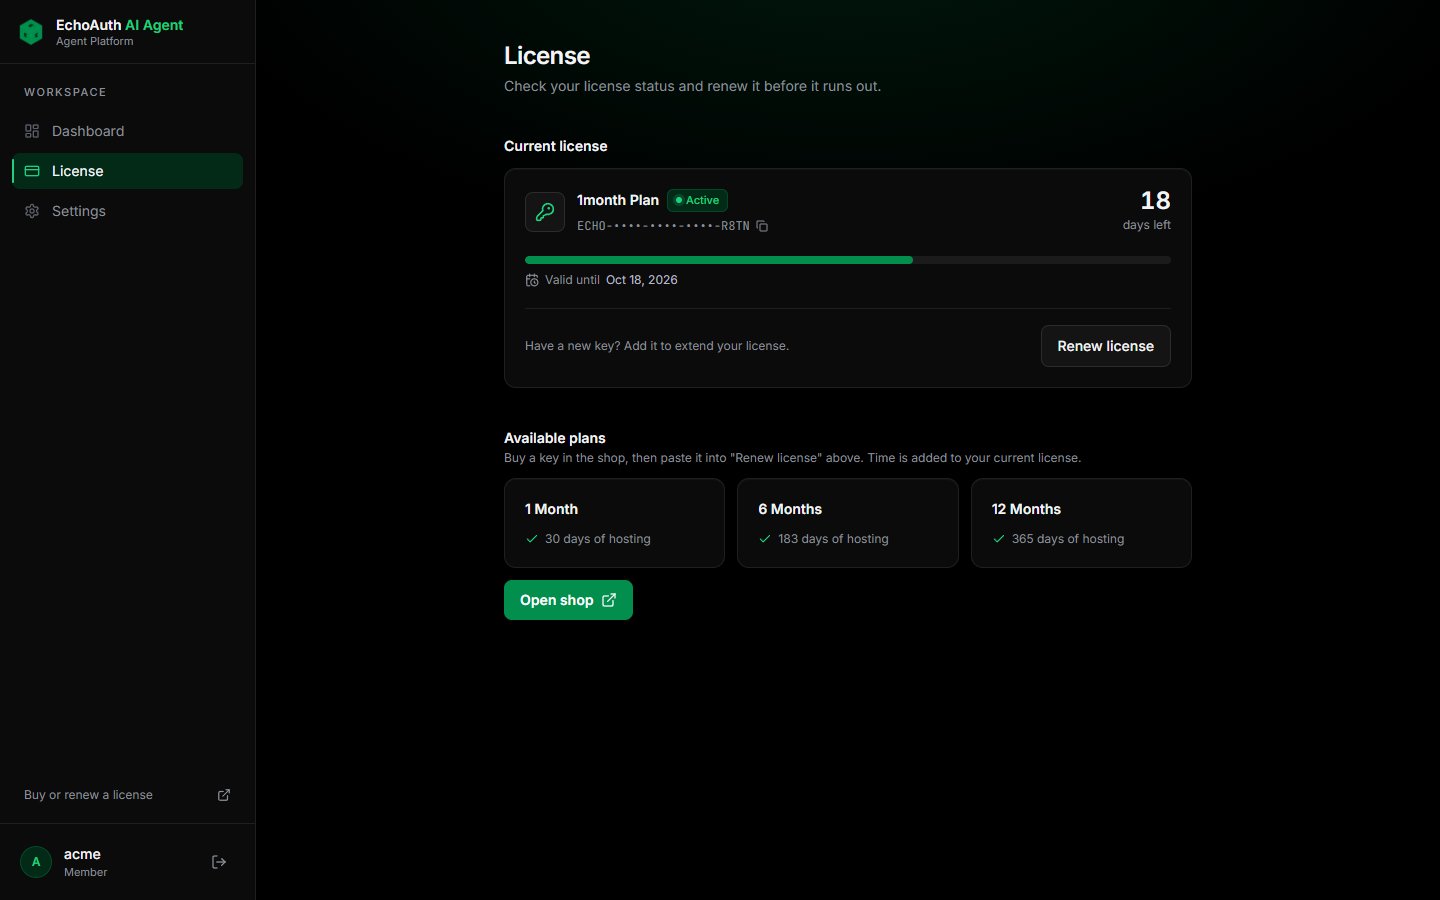 To renew, buy a new key in the [shop](https://shop.echoauth.dev/product/echos-ai-agent-hosted), click **Renew license** and paste the key. The time is added to your current license.
## Troubleshooting
* Check that **Message Content Intent** is on in the Discord Developer Portal.
* Check that the ticket's category ID is in **Ticket Category IDs**.
* Check that the bot can see and send messages in that category.
* Check that a staff member hasn't already written in the ticket. Mention the bot or use `/restart` to bring it back.
* Check that **Global Bot Pause** is off.
Add your ticket bot's user ID to **Ticket Bot IDs** on the **Discord** tab.
Open the **Knowledge Base** tab. If it says **Documentation is not indexed yet**, click **Index documentation**. If it says **The index does not match the embedding model**, click **Clear and rebuild the index**, or set the embedding model back to the one shown and save.
Check that your OpenRouter account has credit and that the key on the **API Keys** tab is still valid. Free models such as the vision model can be rate-limited at busy times; the agent then falls back to the next model in **Image Models**.
Open **Live logs** and look for errors, for example an invalid key or exhausted credit. Then click **Restart** on the agent page. If that doesn't help, click **Update Agent**.
To renew, buy a new key in the [shop](https://shop.echoauth.dev/product/echos-ai-agent-hosted), click **Renew license** and paste the key. The time is added to your current license.
## Troubleshooting
* Check that **Message Content Intent** is on in the Discord Developer Portal.
* Check that the ticket's category ID is in **Ticket Category IDs**.
* Check that the bot can see and send messages in that category.
* Check that a staff member hasn't already written in the ticket. Mention the bot or use `/restart` to bring it back.
* Check that **Global Bot Pause** is off.
Add your ticket bot's user ID to **Ticket Bot IDs** on the **Discord** tab.
Open the **Knowledge Base** tab. If it says **Documentation is not indexed yet**, click **Index documentation**. If it says **The index does not match the embedding model**, click **Clear and rebuild the index**, or set the embedding model back to the one shown and save.
Check that your OpenRouter account has credit and that the key on the **API Keys** tab is still valid. Free models such as the vision model can be rate-limited at busy times; the agent then falls back to the next model in **Image Models**.
Open **Live logs** and look for errors, for example an invalid key or exhausted credit. Then click **Restart** on the agent page. If that doesn't help, click **Update Agent**.