> ## Documentation Index
> Fetch the complete documentation index at: https://docs.echoauth.dev/llms.txt
> Use this file to discover all available pages before exploring further.
# Ticket bot setup guide
> Go from license key to a live Discord ticket bot in about 10 minutes.
EchoAuth Tickets hosts your Discord ticket bot for you. You create an account with your license key, set up the bot in your browser and deploy it with one click. You don't need a server or any coding.
**Before you start, have these ready:**
* The license key from your SellAuth invoice (it looks like `ECHO-XXXXX-XXXXX-XXXXX-XXXXX`)
* Admin access to your Discord server
* A Discord account that can create applications in the [Discord Developer Portal](https://discord.com/developers/applications)
## 1. Create your account
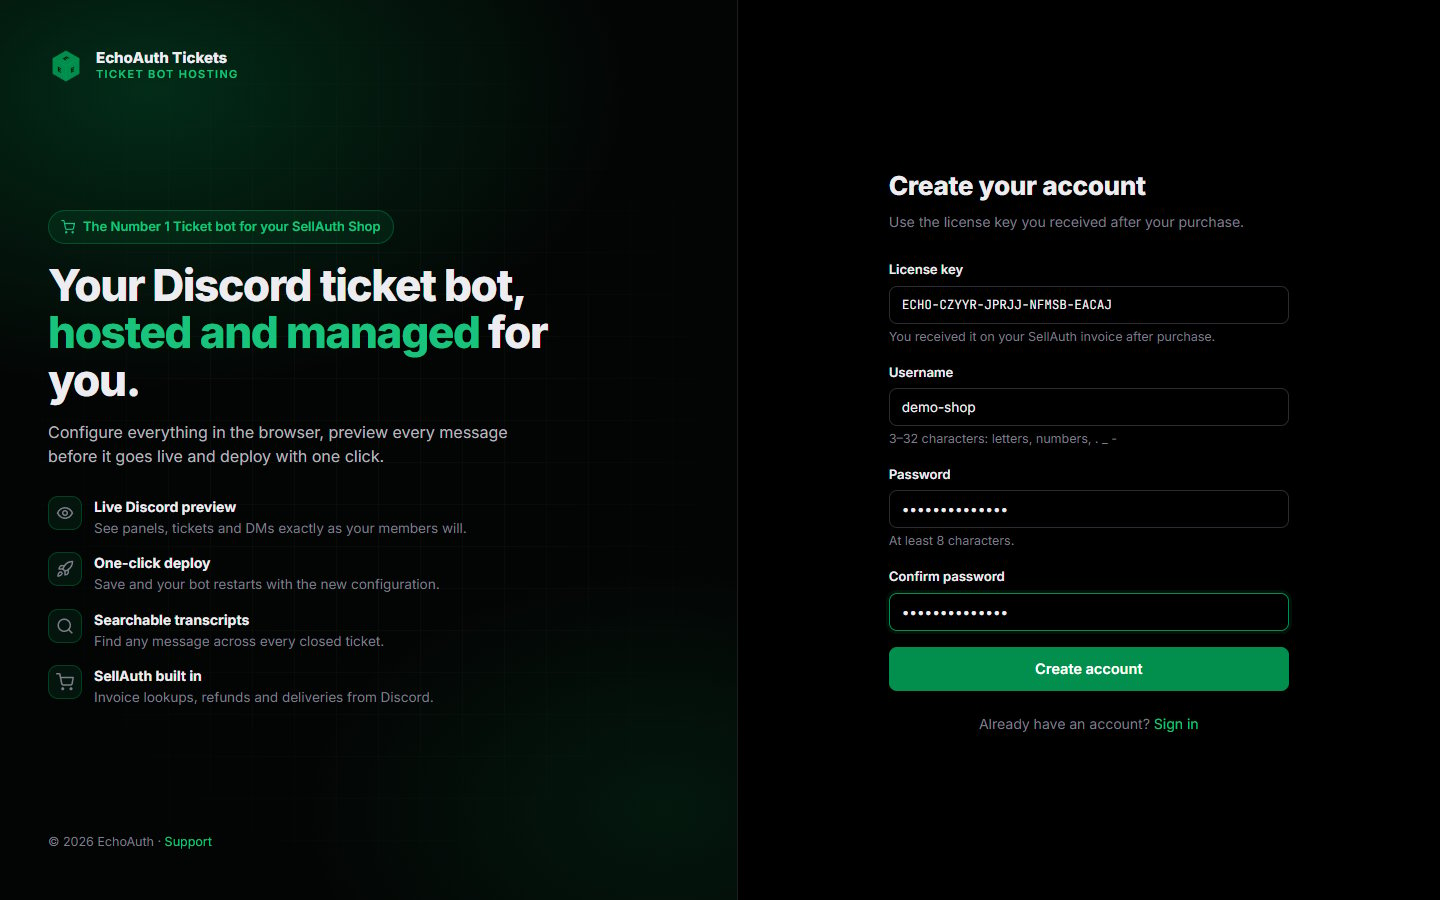
Open the EchoAuth Tickets panel and click **Create an account** below the sign-in form. If you used the link from your invoice, your license key is already filled in.
Paste your **license key**, choose a **username** (3 to 32 characters: letters, numbers, `.`, `_` and `-`) and a **password** with at least 8 characters. Then click **Create account**.
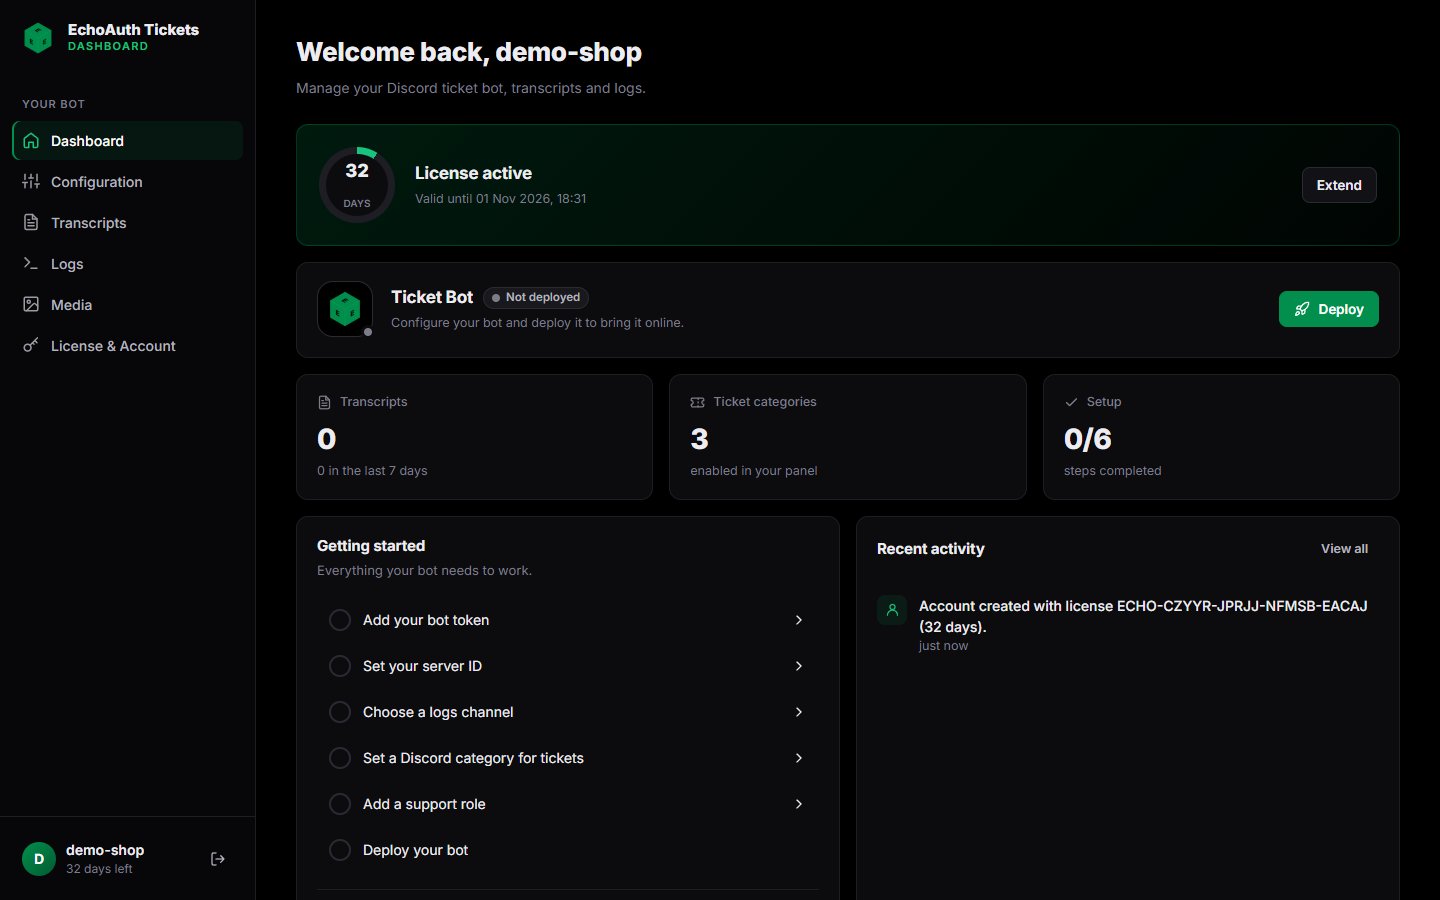
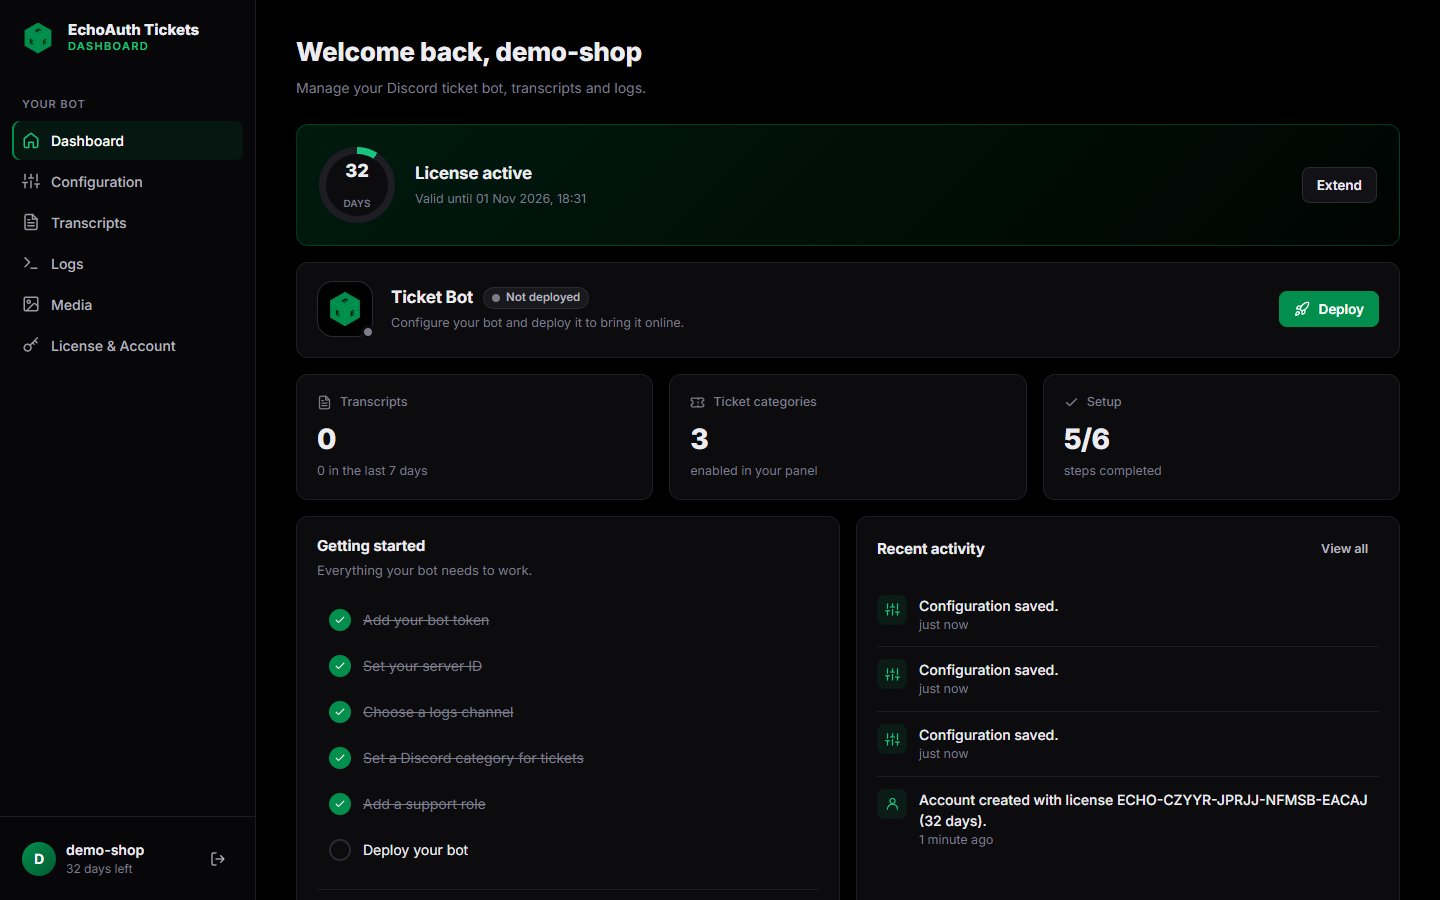
 You land on the dashboard. It shows how many days your license has left, your bot's status and a **Getting started** checklist. Each item in the checklist opens the setting it needs.
 ## 2. Create your Discord bot
Your ticket bot runs on your own Discord application. You create it once in the Discord Developer Portal.
Go to the [Discord Developer Portal](https://discord.com/developers/applications), click **New Application**, give it a name (for example your shop name) and create it.
Open the **Bot** tab. Under **Privileged Gateway Intents**, turn on all three:
* **Presence Intent**
* **Server Members Intent**
* **Message Content Intent**
Click **Save Changes**.
If these intents are off, the bot can't start or can't read messages in tickets.
Still on the **Bot** tab, click **Reset Token** and copy the token. You paste it into the panel in the next section.
Your bot token works like a password. Don't share it or post it anywhere. If it leaks, reset it here and paste the new one into the panel.
Open **OAuth2 → URL Generator**. Select the `bot` and `applications.commands` scopes, then select the **Administrator** permission. Open the generated URL and add the bot to your server.
In Discord, go to **User Settings → Advanced** and turn on **Developer Mode**. Now you can right-click servers, channels, categories and roles and choose **Copy ID**. You need these IDs in the next steps.
## 3. Configure your bot
Click **Configuration** in the sidebar. Settings are grouped into tabs. The **Live preview** on the right shows how your messages will look in Discord as you type.
Whenever you change something, a bar appears at the bottom of the page. Click **Save** to keep your changes, or **Save & Deploy** to save and restart the bot with the new settings right away.
On the **General** tab, fill in:
* **Bot Token**: the token from the Developer Portal
* **Server ID**: right-click your server icon and choose **Copy Server ID**
* **Owner User ID** (optional): your own Discord user ID. This user always has access to the SellAuth admin commands.
* **Owner Role ID** (optional): a role that may use `/refund`, `/remove_password`, `/add_customer_balance`, `/redo_delivery` and `/replace`
## 2. Create your Discord bot
Your ticket bot runs on your own Discord application. You create it once in the Discord Developer Portal.
Go to the [Discord Developer Portal](https://discord.com/developers/applications), click **New Application**, give it a name (for example your shop name) and create it.
Open the **Bot** tab. Under **Privileged Gateway Intents**, turn on all three:
* **Presence Intent**
* **Server Members Intent**
* **Message Content Intent**
Click **Save Changes**.
If these intents are off, the bot can't start or can't read messages in tickets.
Still on the **Bot** tab, click **Reset Token** and copy the token. You paste it into the panel in the next section.
Your bot token works like a password. Don't share it or post it anywhere. If it leaks, reset it here and paste the new one into the panel.
Open **OAuth2 → URL Generator**. Select the `bot` and `applications.commands` scopes, then select the **Administrator** permission. Open the generated URL and add the bot to your server.
In Discord, go to **User Settings → Advanced** and turn on **Developer Mode**. Now you can right-click servers, channels, categories and roles and choose **Copy ID**. You need these IDs in the next steps.
## 3. Configure your bot
Click **Configuration** in the sidebar. Settings are grouped into tabs. The **Live preview** on the right shows how your messages will look in Discord as you type.
Whenever you change something, a bar appears at the bottom of the page. Click **Save** to keep your changes, or **Save & Deploy** to save and restart the bot with the new settings right away.
On the **General** tab, fill in:
* **Bot Token**: the token from the Developer Portal
* **Server ID**: right-click your server icon and choose **Copy Server ID**
* **Owner User ID** (optional): your own Discord user ID. This user always has access to the SellAuth admin commands.
* **Owner Role ID** (optional): a role that may use `/refund`, `/remove_password`, `/add_customer_balance`, `/redo_delivery` and `/replace`
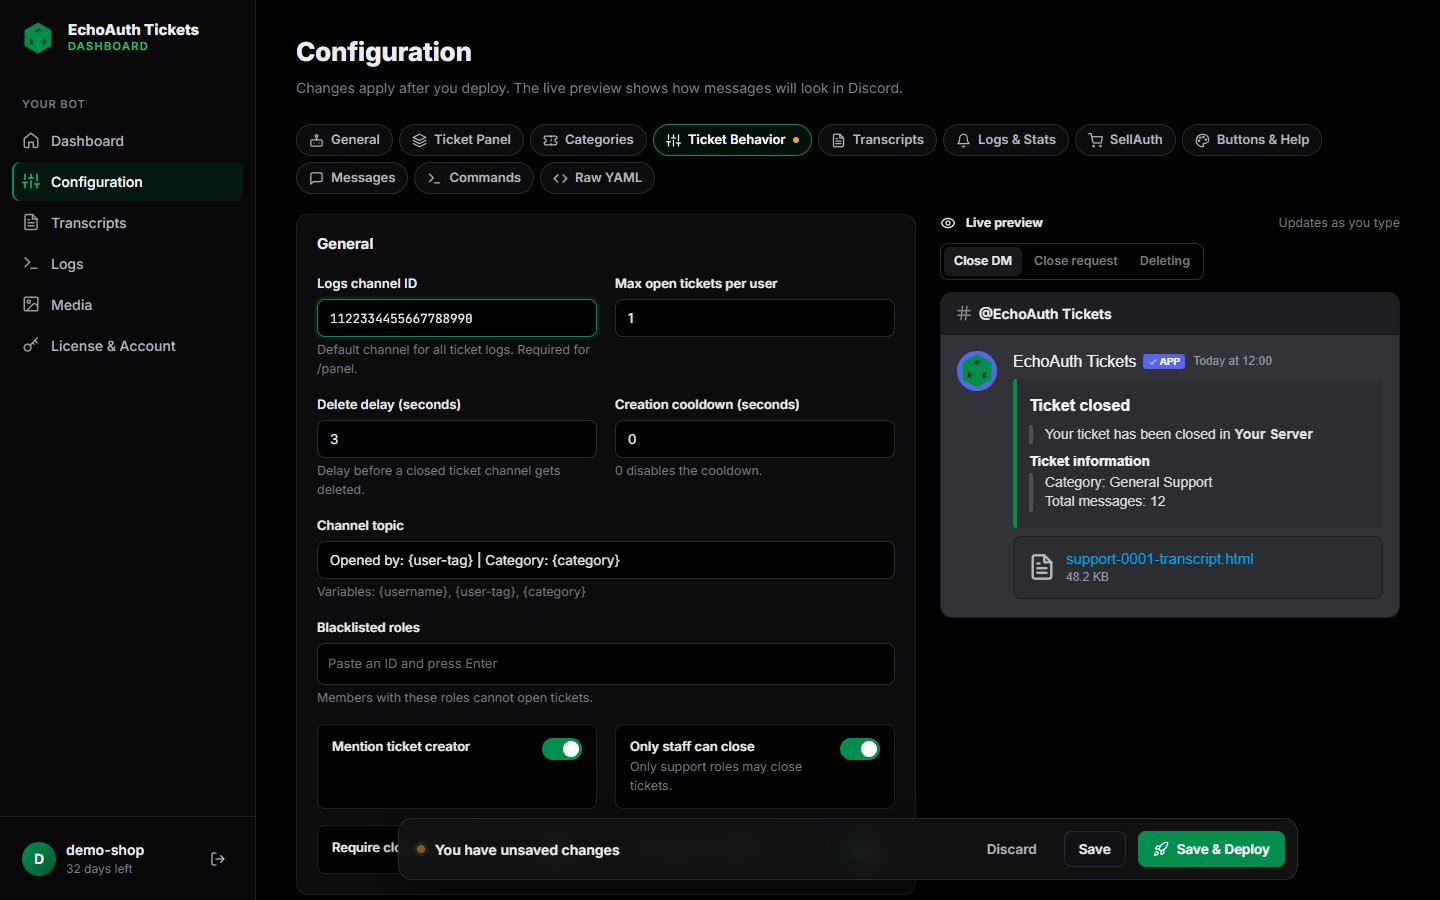
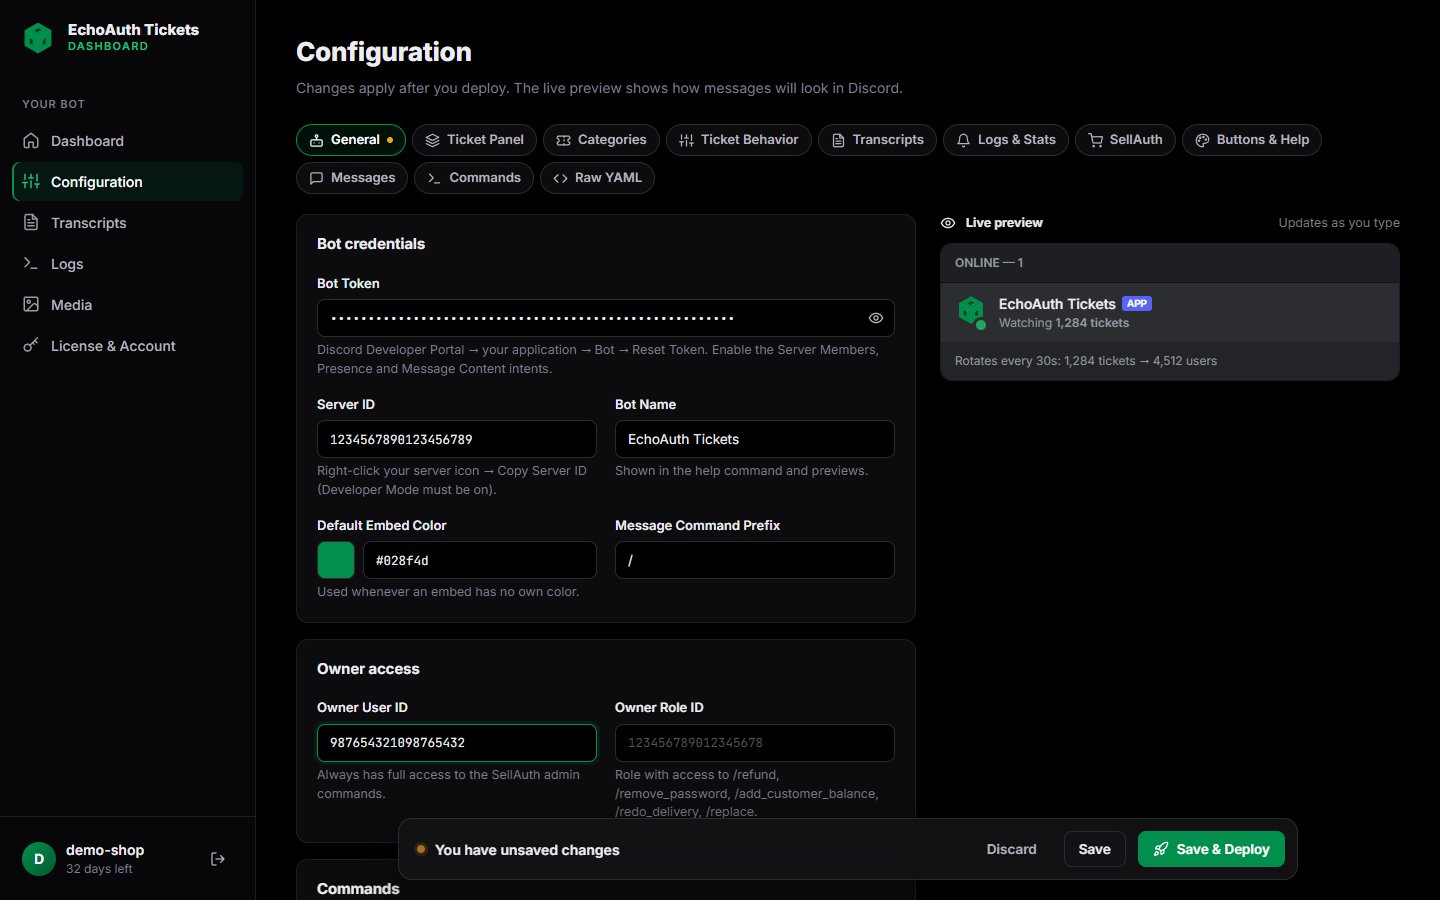 On the **Ticket Behavior** tab, set the **Logs channel ID**. The bot posts ticket logs here, and `/panel` doesn't work without it. Right-click the channel in Discord and choose **Copy Channel ID**.
You can also set how many tickets a user may have open, a cooldown, whether only staff may close tickets, and whether closed tickets are archived instead of deleted.
On the **Ticket Behavior** tab, set the **Logs channel ID**. The bot posts ticket logs here, and `/panel` doesn't work without it. Right-click the channel in Discord and choose **Copy Channel ID**.
You can also set how many tickets a user may have open, a cooldown, whether only staff may close tickets, and whether closed tickets are archived instead of deleted.
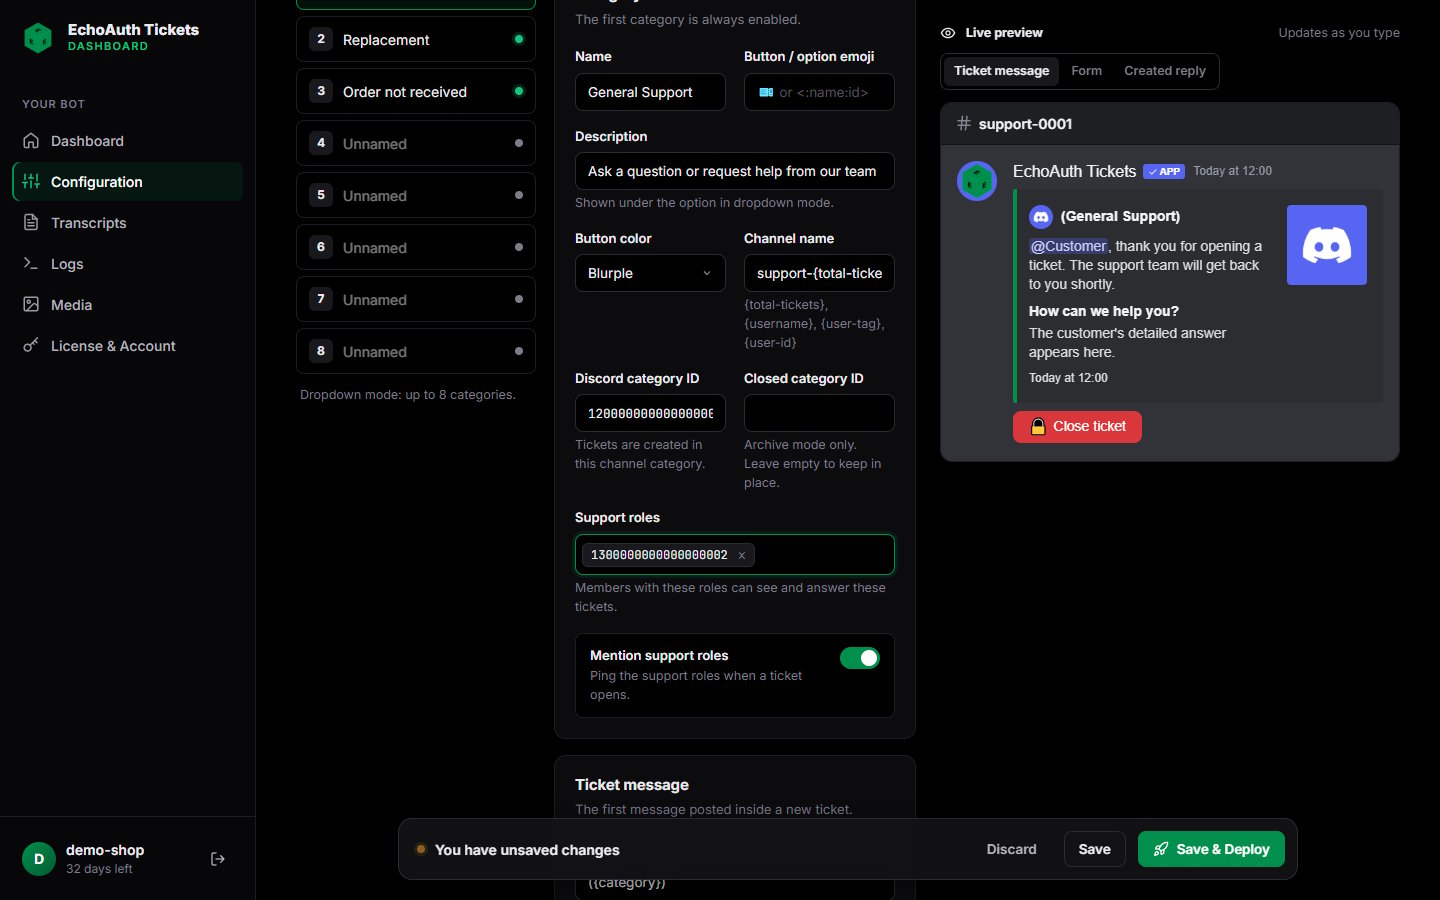
 On the **Categories** tab, select a category on the left (for example **General Support**) and fill in:
* **Discord category ID**: the channel category where new tickets are created. Right-click the category in Discord and choose **Copy Category ID**.
* **Support roles**: paste a role ID and press **Enter**. Members with these roles can see and answer tickets in this category.
Repeat this for every category you use. To use more categories, open one and turn on **Enabled**. Button mode shows up to 5 categories and dropdown mode up to 8. Under **Form** you can add up to 5 questions that users answer before the ticket opens.
On the **Categories** tab, select a category on the left (for example **General Support**) and fill in:
* **Discord category ID**: the channel category where new tickets are created. Right-click the category in Discord and choose **Copy Category ID**.
* **Support roles**: paste a role ID and press **Enter**. Members with these roles can see and answer tickets in this category.
Repeat this for every category you use. To use more categories, open one and turn on **Enabled**. Button mode shows up to 5 categories and dropdown mode up to 8. Under **Form** you can add up to 5 questions that users answer before the ticket opens.
 Set the form field **Function** to **SellAuth invoice lookup** to have the bot look up the order automatically when a customer enters their invoice ID.
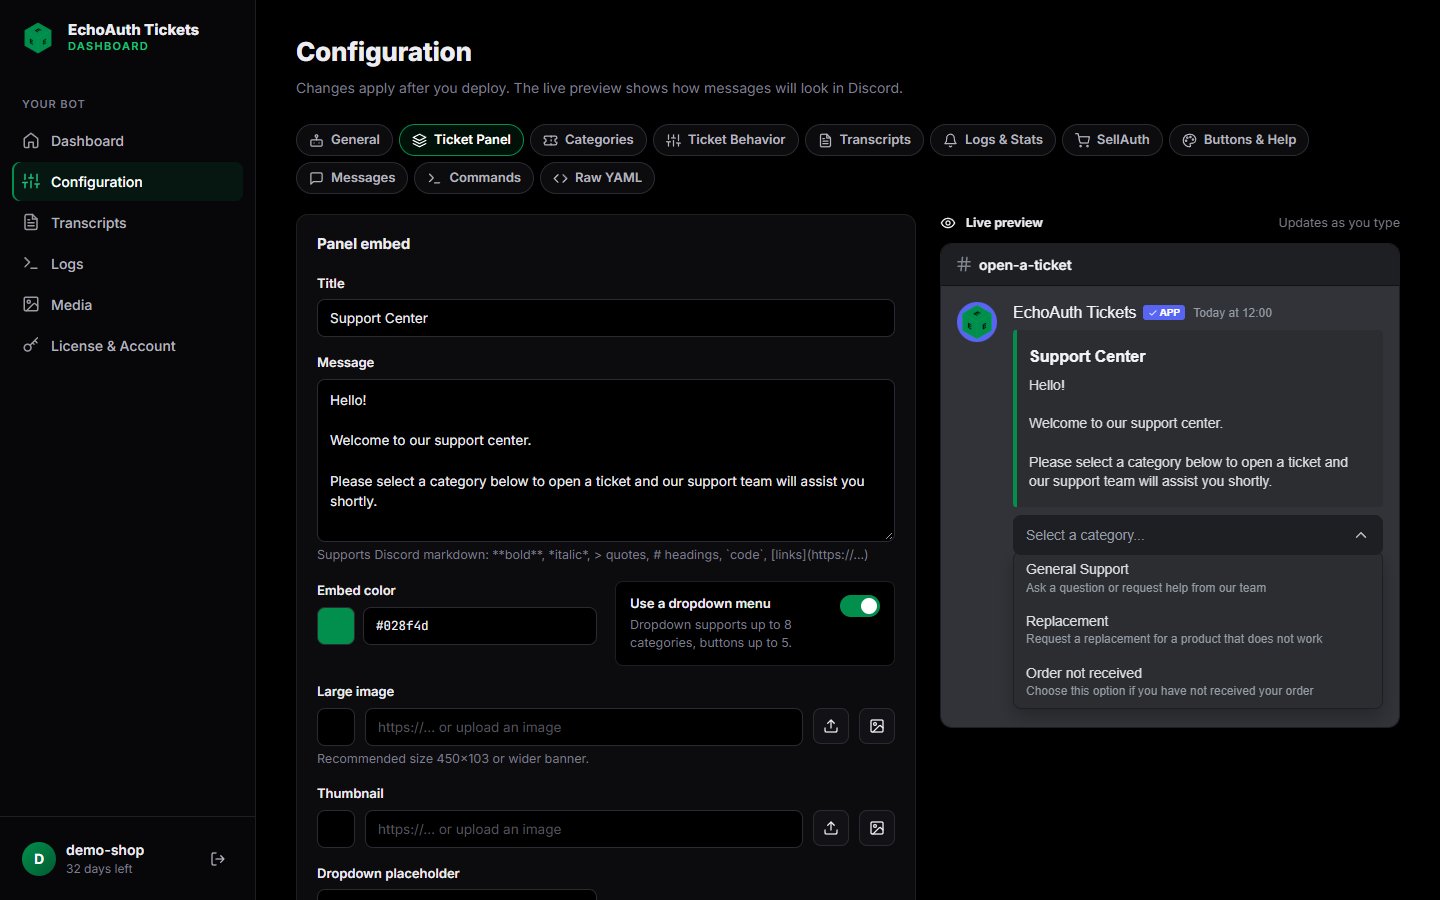
On the **Ticket Panel** tab, edit the title, message, color, images and footer of the panel. Turn on **Use a dropdown menu** to show categories in a dropdown instead of buttons. The preview updates as you type.
Set the form field **Function** to **SellAuth invoice lookup** to have the bot look up the order automatically when a customer enters their invoice ID.
On the **Ticket Panel** tab, edit the title, message, color, images and footer of the panel. Turn on **Use a dropdown menu** to show categories in a dropdown instead of buttons. The preview updates as you type.
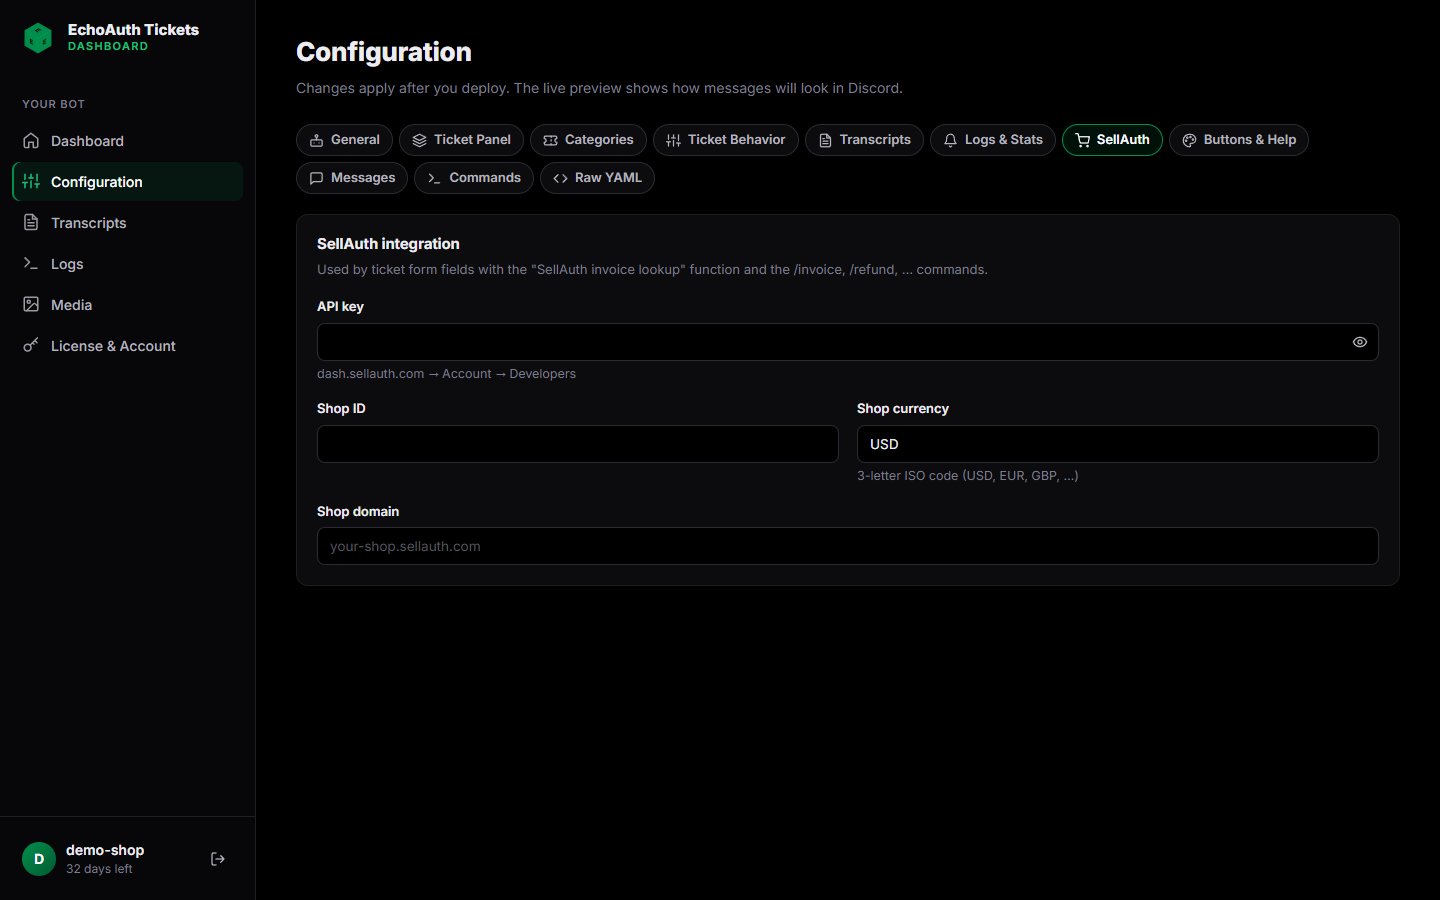
 To use the SellAuth commands (`/invoice`, `/refund`, `/replace` and more) and invoice lookups, open the **SellAuth** tab and enter your **API key** (dash.sellauth.com → Account → Developers), **Shop ID**, **Shop currency** and **Shop domain**.
 ## 4. Deploy your bot
Go back to the **Dashboard**. When the first five checklist items have a check mark, click **Deploy**. Your bot starts in a few seconds and comes online in your server.
## 4. Deploy your bot
Go back to the **Dashboard**. When the first five checklist items have a check mark, click **Deploy**. Your bot starts in a few seconds and comes online in your server.
 After the first deploy, use **Save & Deploy** on the Configuration page to apply later changes.
If the deploy fails, open **Logs** in the sidebar. The most common causes are a wrong bot token or intents that are turned off in the Developer Portal.
## 5. Post the ticket panel in Discord
In your Discord server, go to the channel where members should open tickets and run:
```
/panel
```
You need the **Administrator** permission to run this command. The bot posts the panel in that channel. Members now pick a category, answer the form, and a private ticket channel opens for them and your support roles.
## Renew or extend your license
Open **License & Account** in the sidebar. Paste a new key under **Redeem a license key** and click **Redeem**. The time is added on top of your current expiry date, so you can extend early without losing days. You can also change your password on this page.
After the first deploy, use **Save & Deploy** on the Configuration page to apply later changes.
If the deploy fails, open **Logs** in the sidebar. The most common causes are a wrong bot token or intents that are turned off in the Developer Portal.
## 5. Post the ticket panel in Discord
In your Discord server, go to the channel where members should open tickets and run:
```
/panel
```
You need the **Administrator** permission to run this command. The bot posts the panel in that channel. Members now pick a category, answer the form, and a private ticket channel opens for them and your support roles.
## Renew or extend your license
Open **License & Account** in the sidebar. Paste a new key under **Redeem a license key** and click **Redeem**. The time is added on top of your current expiry date, so you can extend early without losing days. You can also change your password on this page.
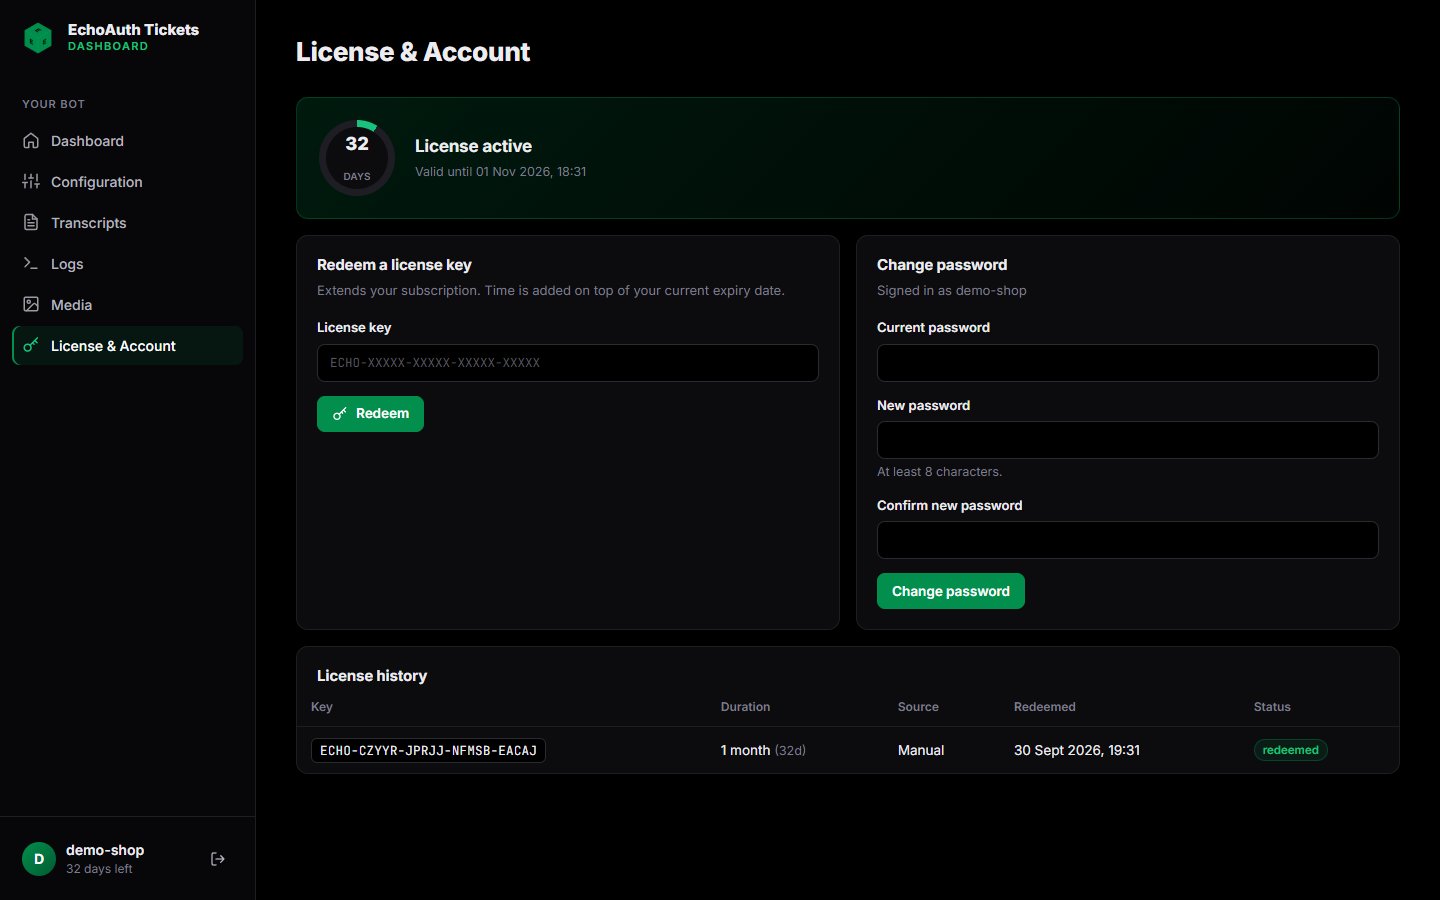 When your license expires, your bot is stopped. Your configuration and transcripts are kept. Redeem a new key and deploy again to bring the bot back online.
## Troubleshooting
Make sure you invited the bot with the `applications.commands` scope and that **Slash commands** is turned on in **Configuration → General → Commands**. Discord can take a few minutes to show new commands. Restarting Discord often helps.
Check that **Logs channel ID** on the **Ticket Behavior** tab is set to a channel that exists in your server, and that you have the Administrator permission.
Check the **Discord category ID** and **Support roles** of that category on the **Categories** tab. Each category has its own settings. Make sure the bot's role has permission to manage channels in that category.
Copy the key exactly as it appears on your invoice. Each key can be used only once. If you already have an account, sign in and redeem the key under **License & Account** instead.
Still stuck? Open a ticket in our [support server](https://discord.echoauth.dev).
When your license expires, your bot is stopped. Your configuration and transcripts are kept. Redeem a new key and deploy again to bring the bot back online.
## Troubleshooting
Make sure you invited the bot with the `applications.commands` scope and that **Slash commands** is turned on in **Configuration → General → Commands**. Discord can take a few minutes to show new commands. Restarting Discord often helps.
Check that **Logs channel ID** on the **Ticket Behavior** tab is set to a channel that exists in your server, and that you have the Administrator permission.
Check the **Discord category ID** and **Support roles** of that category on the **Categories** tab. Each category has its own settings. Make sure the bot's role has permission to manage channels in that category.
Copy the key exactly as it appears on your invoice. Each key can be used only once. If you already have an account, sign in and redeem the key under **License & Account** instead.
Still stuck? Open a ticket in our [support server](https://discord.echoauth.dev).