Accept more crypto coins with your SellAuth shop in about 5 minutes with NowPayments, Heleket or Cryptomus.
Want to take more crypto payments in your SellAuth shop? You can set it up yourself in about 5 minutes. You don’t need a server and you don’t write any code. You fill in one short form, and I run your checkout and keep it online.
A crypto checkout page for your SellAuth shop
Your choice of Heleket, Cryptomus or NowPayments
One processor at a time. Switch to another one whenever you like.
A simple dashboard with your status and live logs
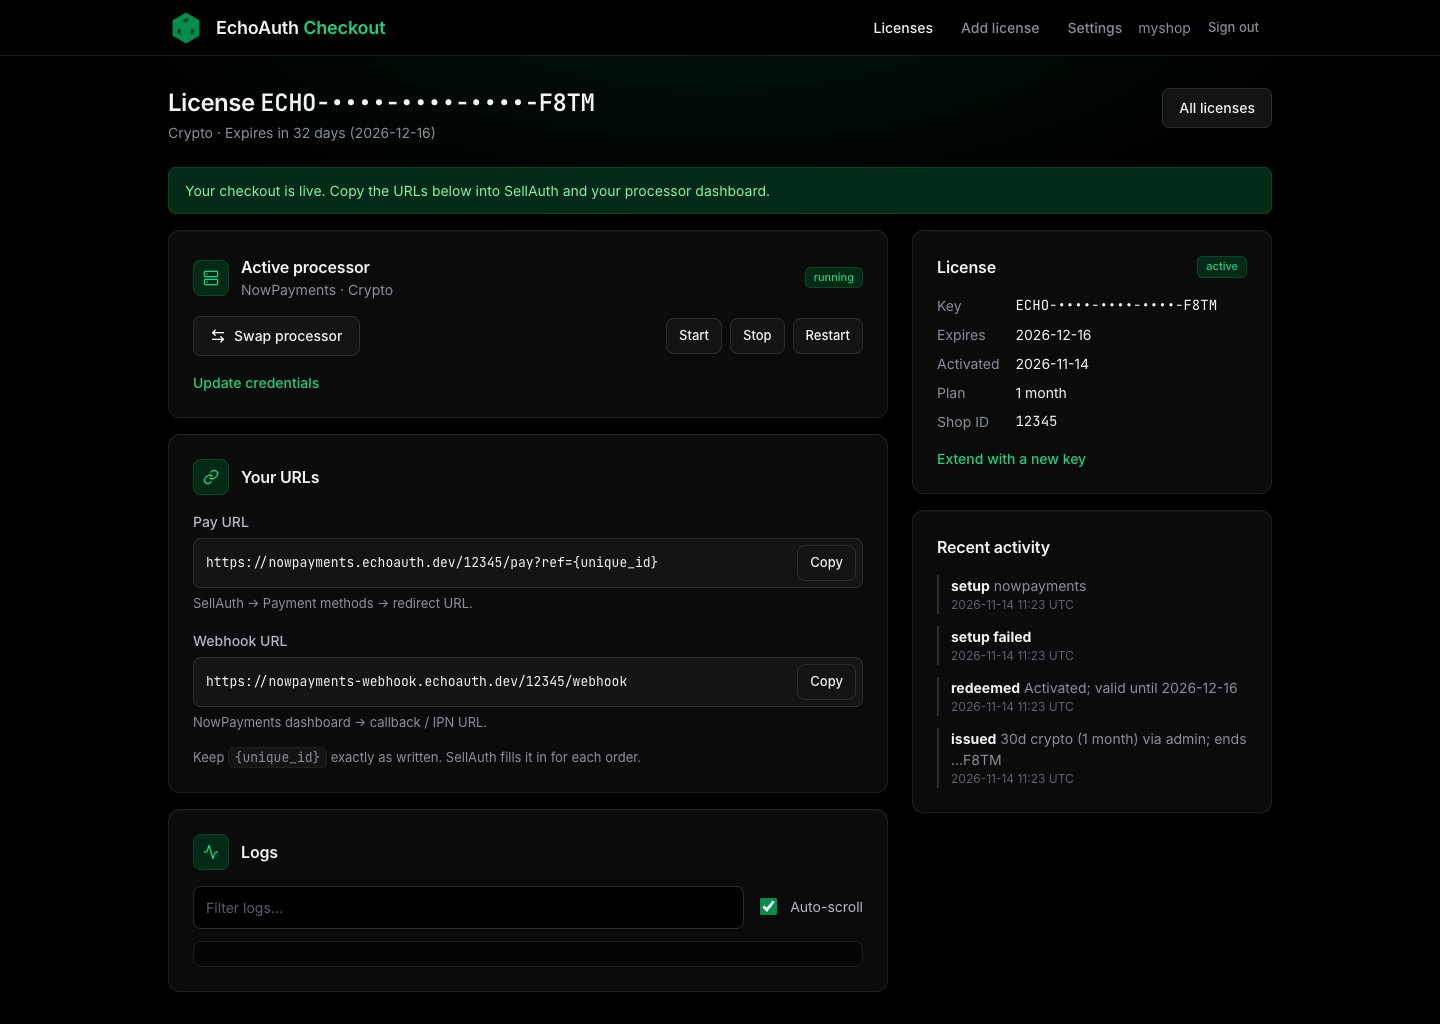
Your checkout is live: running status and your two URLs
It takes 3 steps
1
Get your license
Buy a license. You receive a key that looks like ECHO-XXXX-XXXX-XXXX-XXXX.
2
Create your account and connect a processor
Register with your key, pick a processor and fill in one form.
3
Paste 2 URLs. Done.
Copy your pay URL into SellAuth and your webhook URL into your processor. Your shop now accepts crypto.
An account at Heleket, Cryptomus or NowPayments, with its API credentials
The screenshots use fake example data (shop ID 12345, keys like test-api-key-xxxx). Use your own values and never share them.
1. Create your account
1
Open the register page
Open the register page of your dashboard. Already registered? Click Sign in instead.
2
Fill in the form
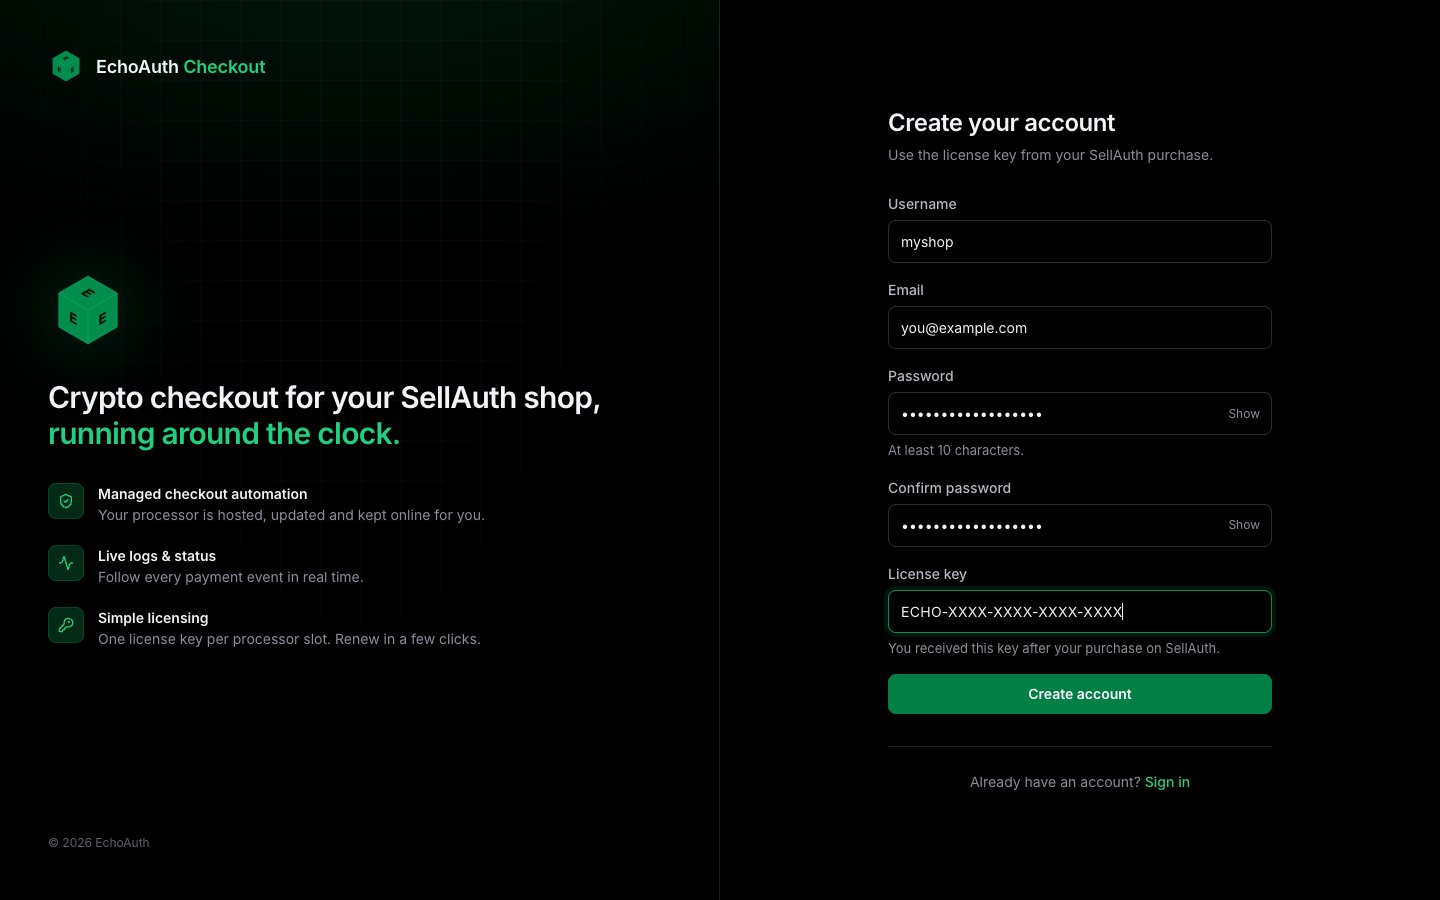
Choose a username, add your email and pick a password with at least 10 characters. Paste your license key at the bottom, then click Create account.
Register with your license key (the key shown here is a placeholder)
3
You are in
You are signed in right away. Your license is active and your time starts now.
Each key works only once. If you see “This license key is invalid or has already been used”, check the key for typos. If it still fails, ask support. Keep your key private.
2. Connect a processor
A processor is the service that handles the crypto payment. Pick one. You can switch later.
1
Open your license
Click Licenses at the top, then your license, then Set up processor.
2
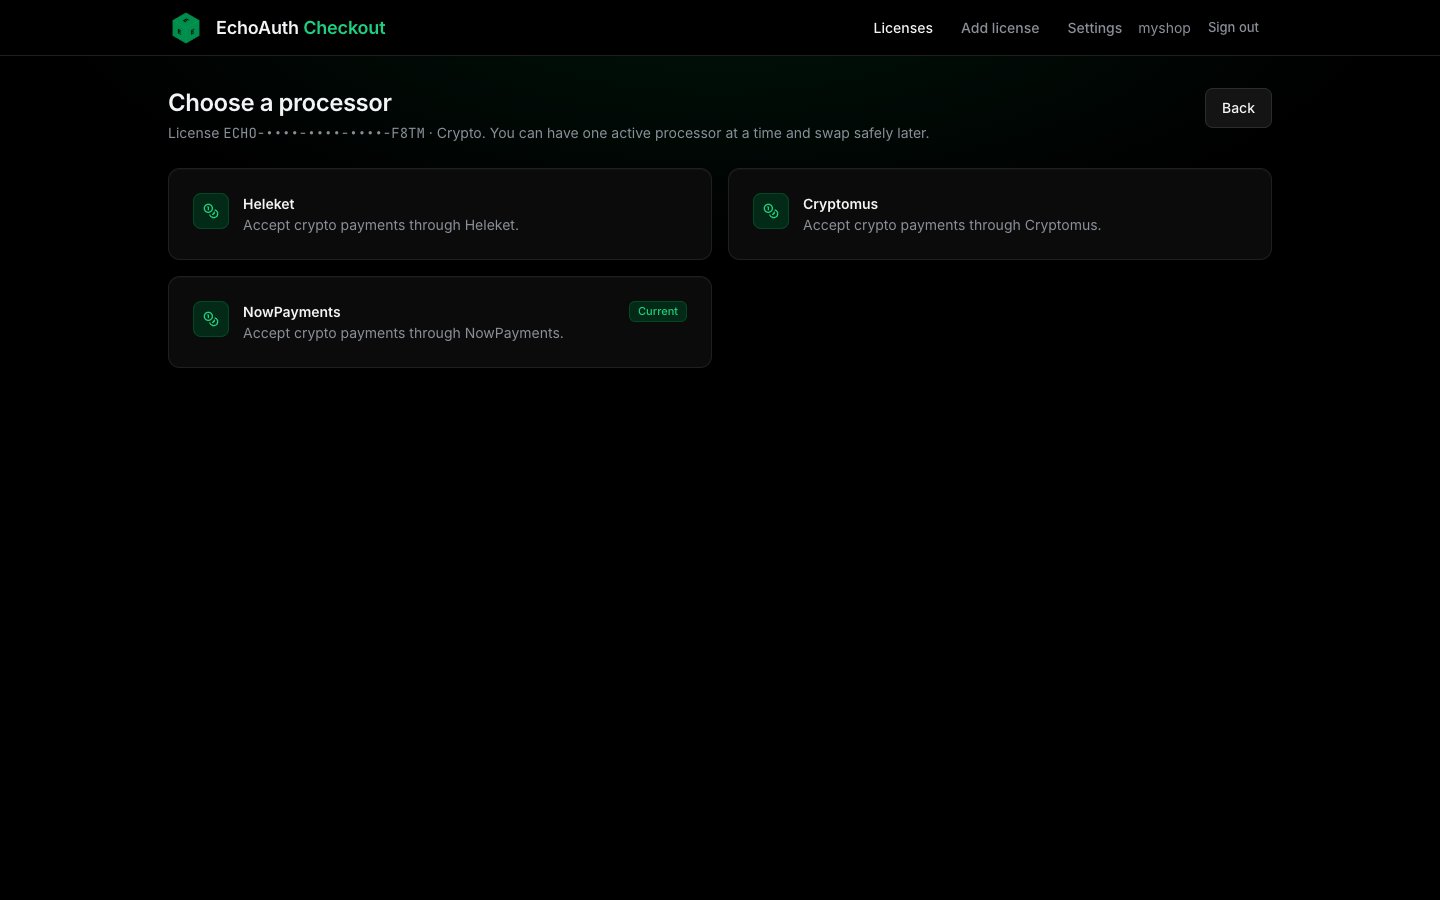
Choose a processor
Pick NowPayments, Heleket or Cryptomus
3
Fill in the form
Every form asks for your SellAuth shop ID, your SellAuth API key (Required Scopes: Invoice Read, Update, Process)** **and the credentials of your processor. See the tab below.
4
Click the green button
Setup takes up to a minute. Keep the page open until it finishes. Then you see your status and your two URLs.
NowPayments
Heleket
Cryptomus
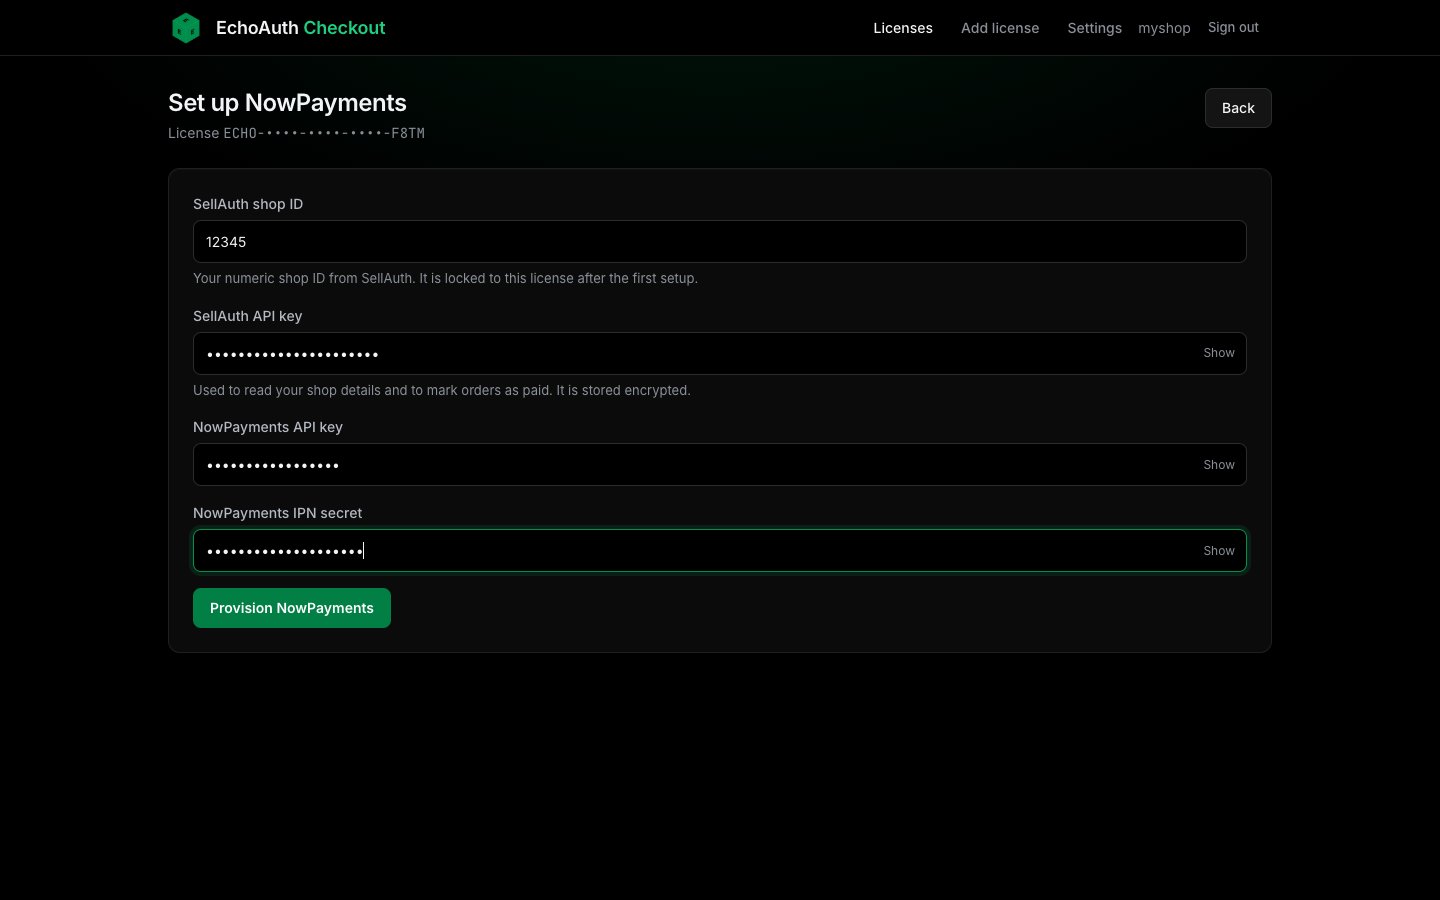
You need your NowPayments API key and NowPayments IPN secret.
NowPayments setup form
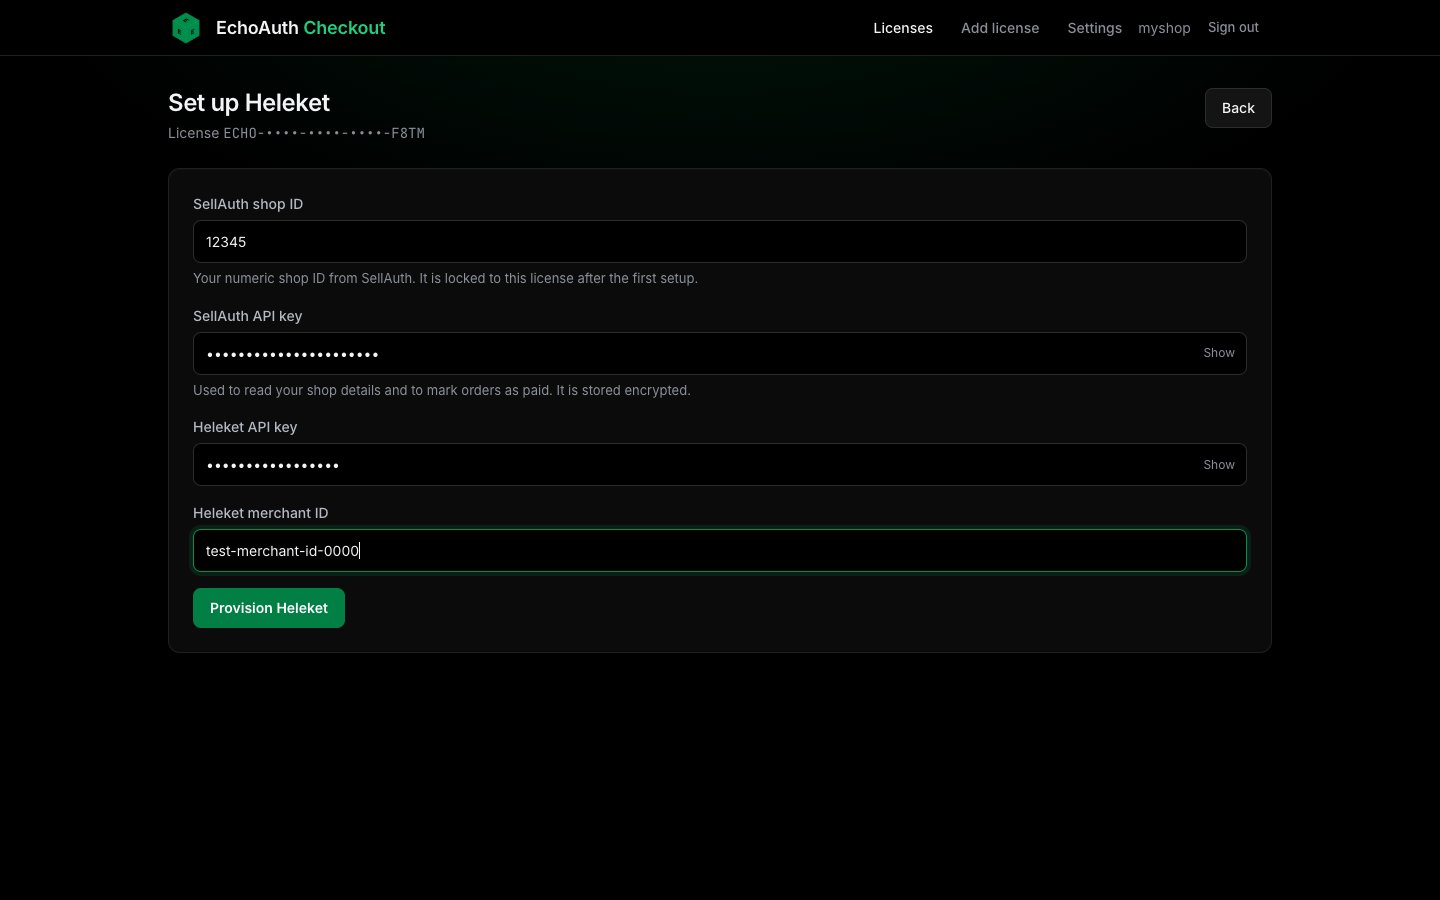
You need your Heleket API key and Heleket merchant ID.
Heleket setup form
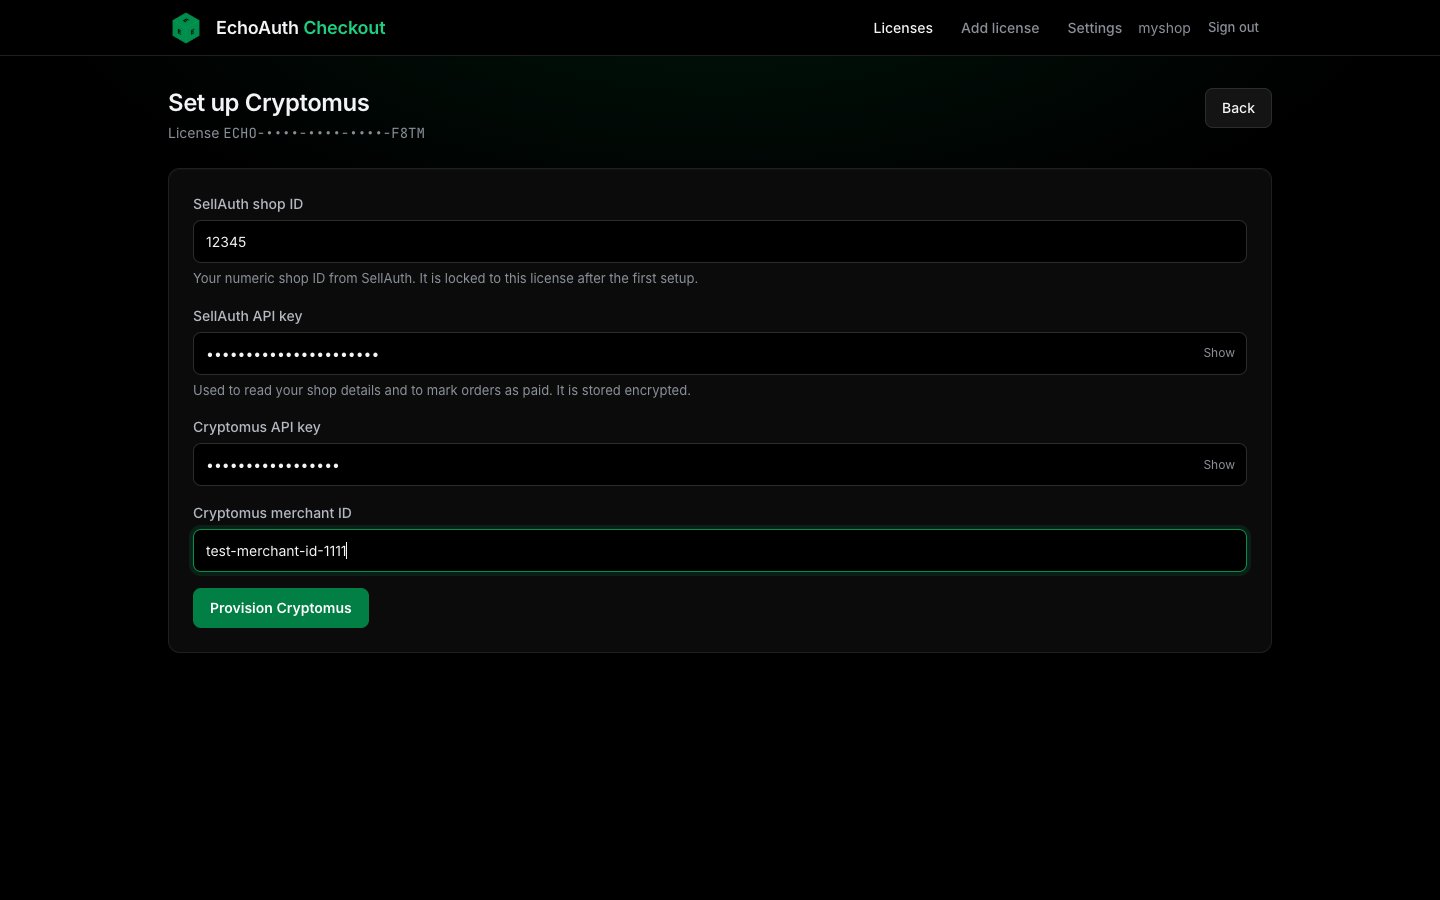
You need your Cryptomus API key and Cryptomus merchant ID.
Cryptomus setup form
Find your API credentials in your processor’s own dashboard. Menu names can look different from time to time. The SellAuth shop ID is locked to your license after the first setup, so use the shop you really want to sell on.
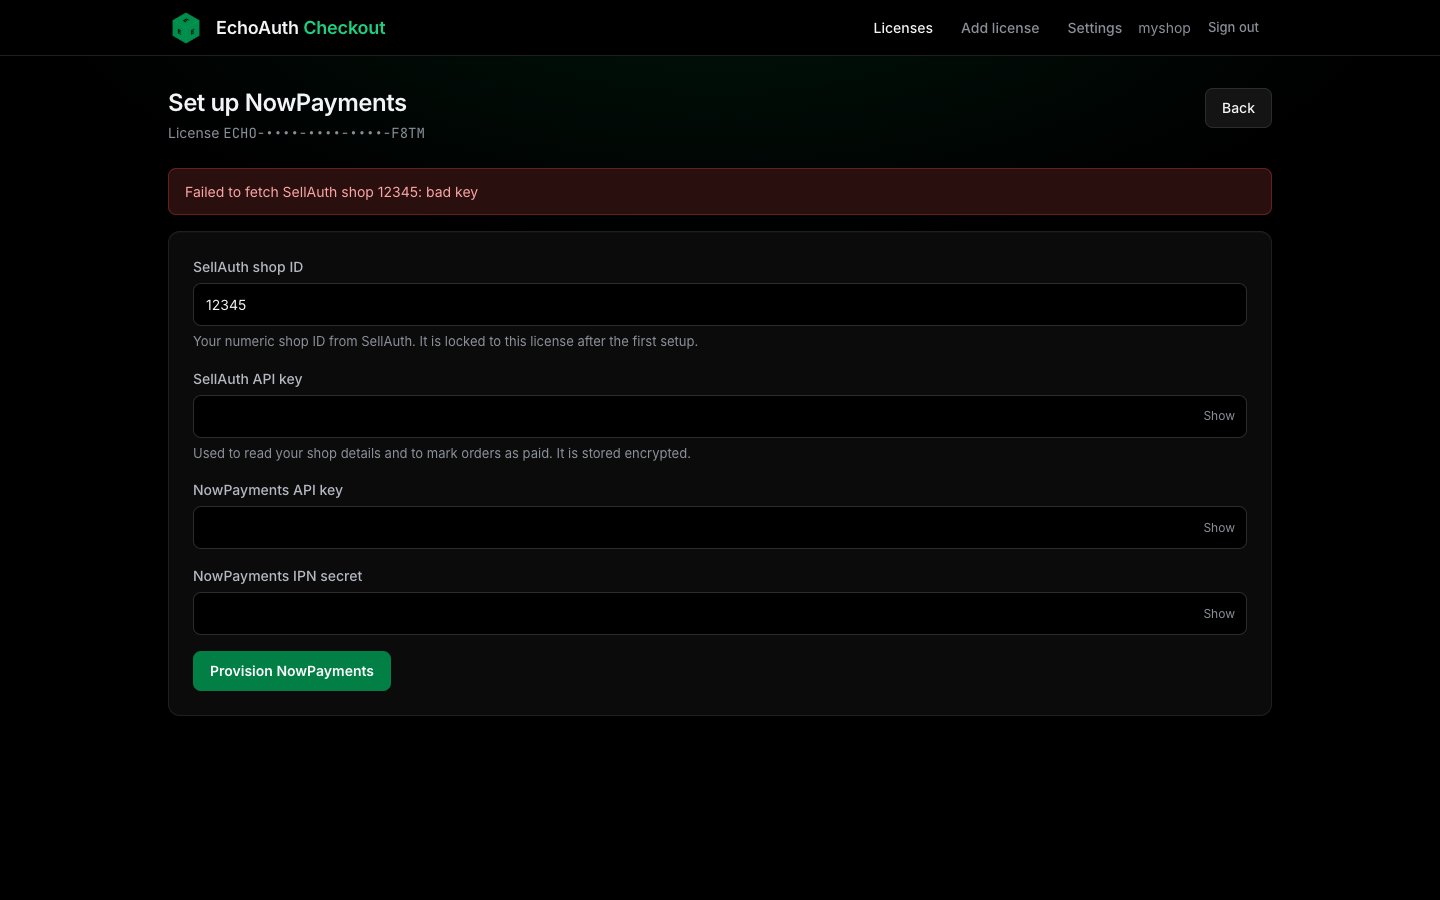
Common mistakes: a typo in the SellAuth API key or shop ID, mixing up the API key and the merchant ID (or IPN secret), and spaces copied at the start or end of a key. If setup fails you see a red message and the form keeps what you typed. Enter your secret keys again.
Example error: the SellAuth key was wrong
3. Your two URLs and test payment
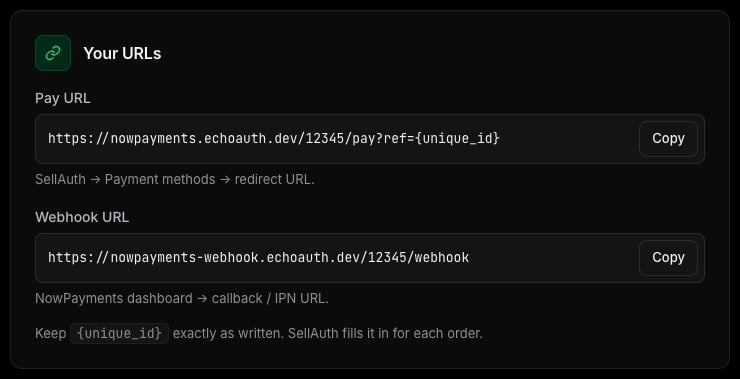
This is the last step. Your license page shows two URLs. Each one goes in a different place.
Use the Copy buttons
URL
What it does
Where to paste it
Pay URL
Sends your buyer to the crypto checkout.
SellAuth, as the redirect URL of the payment method
Webhook URL
Tells the processor when a payment is done, so the order is marked as paid.
Your processor’s dashboard, as the callback or IPN URL
1
Paste the pay URL into SellAuth
Click Copy next to Pay URL. In SellAuth, open your payment methods and set the redirect URL to it. Your dashboard says: SellAuth, Payment methods, redirect URL.
2
Paste the webhook URL into your processor
Click Copy next to Webhook URL. In your processor’s dashboard, set the callback or IPN URL to it. Your dashboard says for example: NowPayments dashboard, callback / IPN URL.
3
Check the status
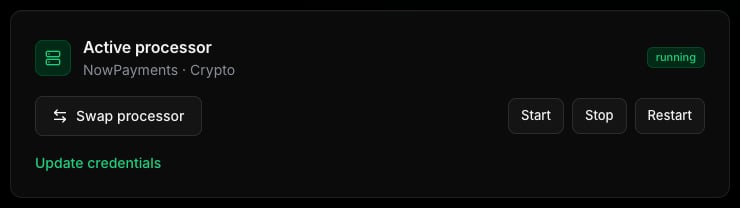
The processor card on your license page shows a green running badge.
A running processor
4
Make a small test order
Buy one of your own products with crypto, with a small amount. Scroll to Logs on your license page. New lines appear live when a payment request comes in. After the payment is confirmed, the order is marked as paid and delivered.
Menu names in SellAuth and in your processor’s dashboard may look slightly different from what is written here. Look for the redirect URL and the callback or IPN URL.
Keep {unique_id}exactly as written in the pay URL. SellAuth fills it in for every order.
If something seems stuck, try Restart on your license page first.
4. Switch processor
You can use one processor at a time per license and switch whenever you want, for example from NowPayments to Heleket.
Stays the same: your license, your expiry date, your SellAuth shop ID and key.
Changes: you enter the credentials of the new processor, and you get new URLs to paste again.
1
Click Swap processor
Open your license, click Swap processor and pick the new one.
2
Fill in the new form
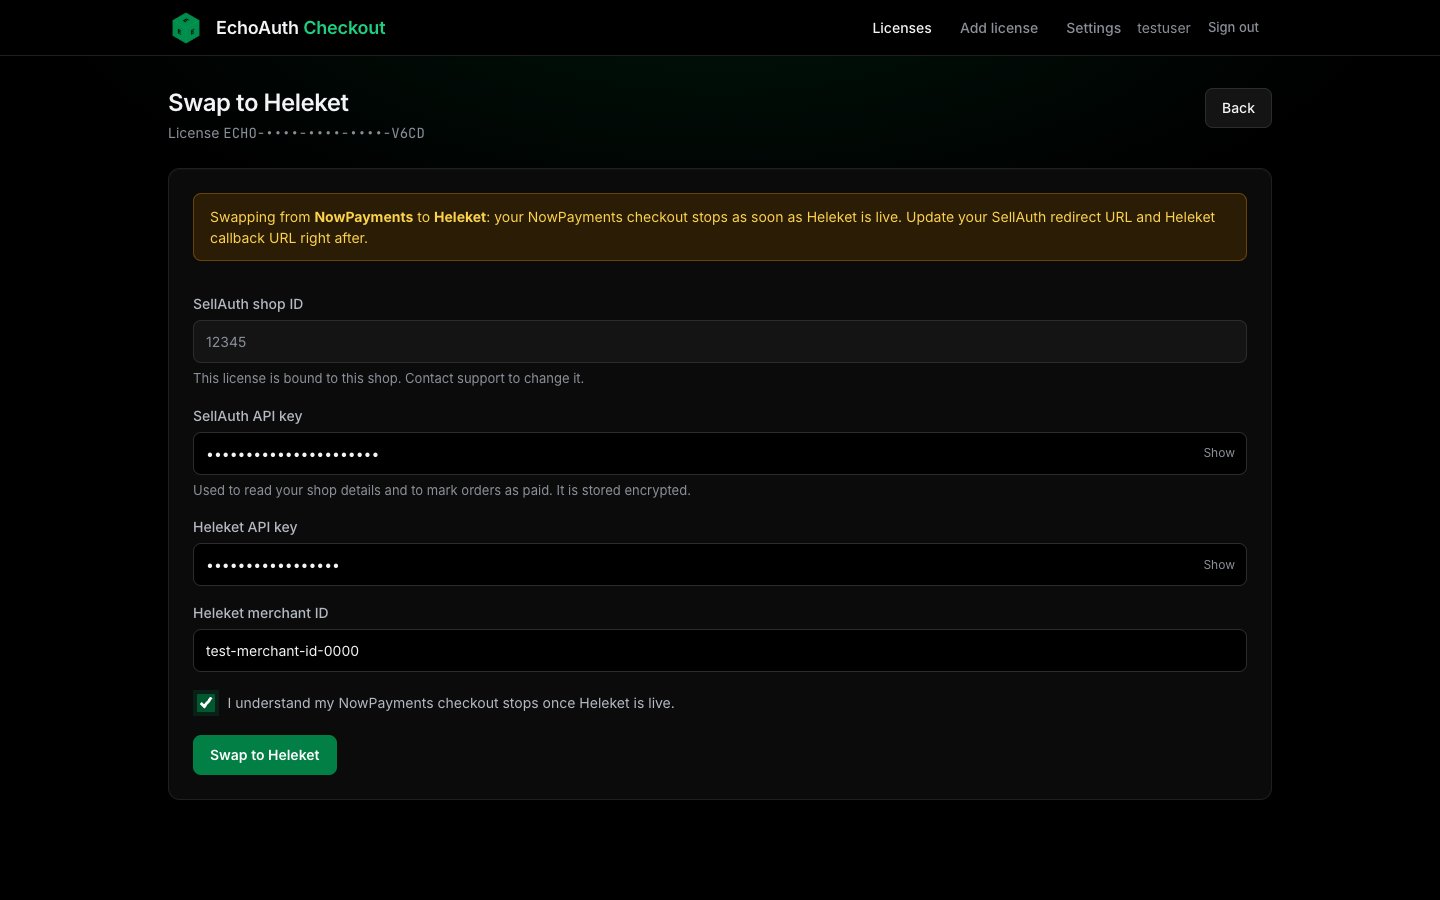
The form warns you that your current checkout stops when the new one is live. Enter the new credentials and tick the box to confirm.
Swapping from NowPayments to Heleket
3
Paste the new URLs
You see Swap complete. Update the redirect URL in SellAuth and the callback or IPN URL in the new processor.
After a swap, the old URLs stop working right away. Update SellAuth quickly so buyers do not hit a dead link.
It is safe. The new checkout starts first and has to work before anything changes. If the swap fails, you see a message that your old checkout is still active. Nothing is lost. Fix the problem and try again.
5. Add another license
Each license gives you one processor slot. Add another license for a second SellAuth shop or a second processor at the same time.
1
Click Add license
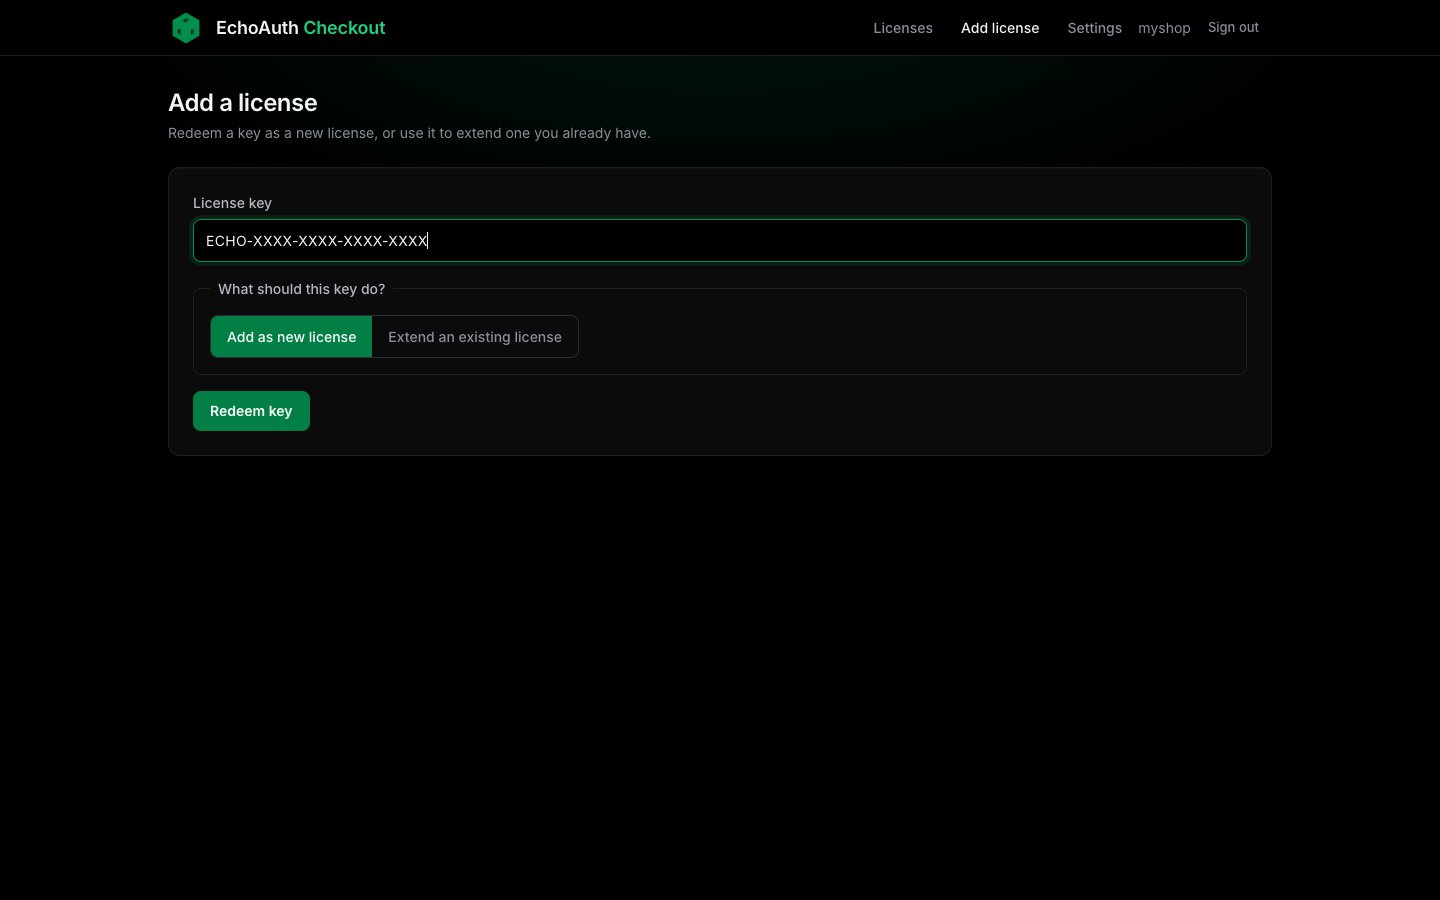
Use Add license in the top menu. Paste the new key and choose Add as new license.
Add a license (placeholder key)
2
Set it up
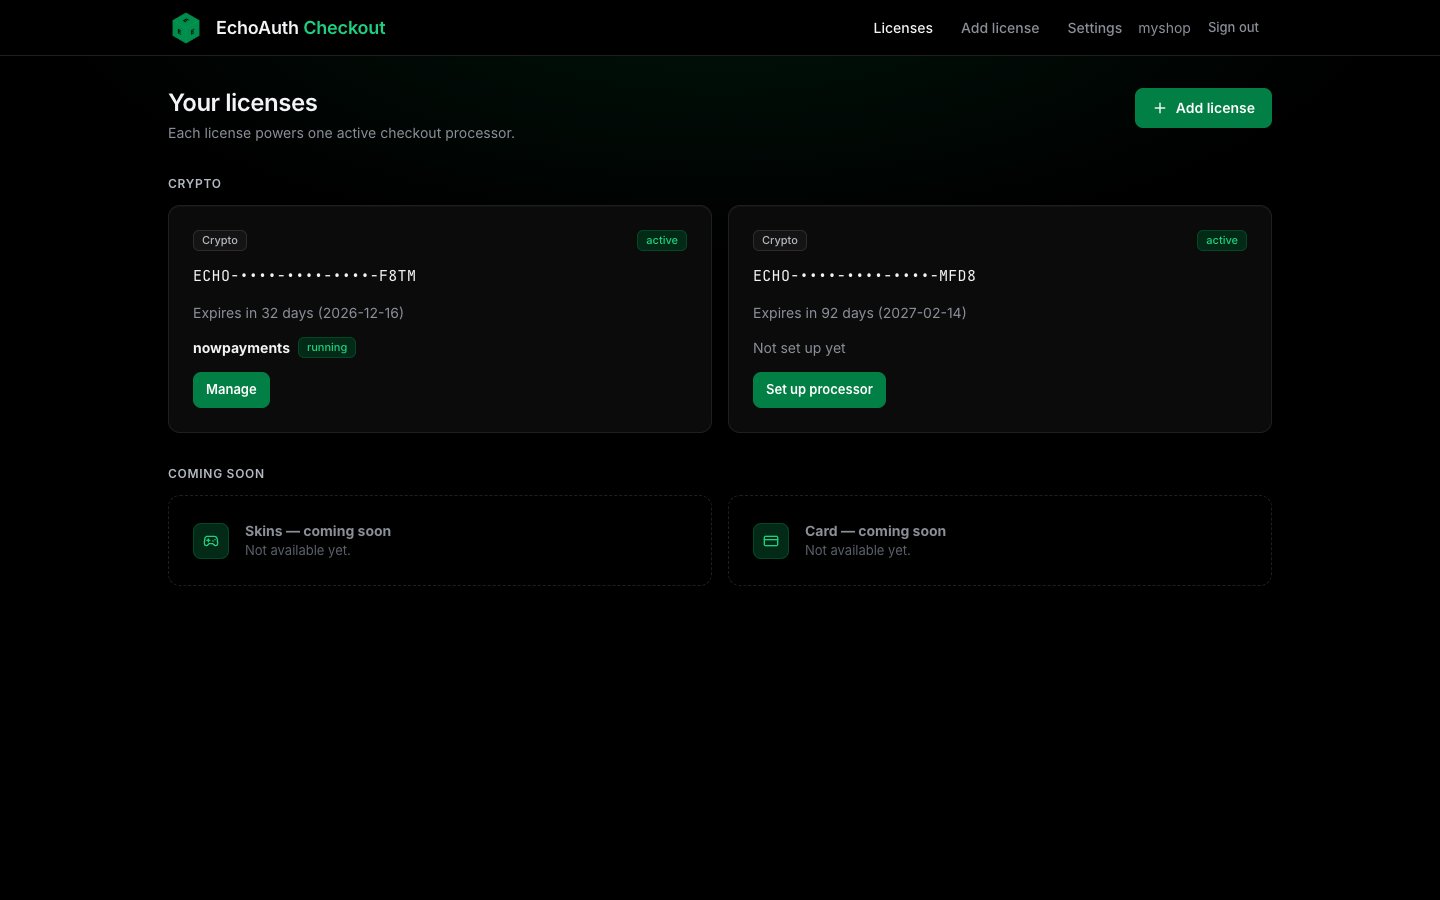
Your dashboard lists every license with its own status and expiry date. Open the new one and connect a processor. Each license has its own shop and its own URLs.
Dashboard with several licenses
Today licenses are for crypto payments. Other categories, like skins and card payments, are shown as coming soon and can’t be used yet.
6. Renewals and expiry
Licenses come in 1, 3, 6 or 12 months. The time starts when you register or redeem the key, not when you buy it. You get 2 bonus days on top of every redemption, for setup and testing. Your expiry date is shown at the top of your license page and in your dashboard.When a license expires:
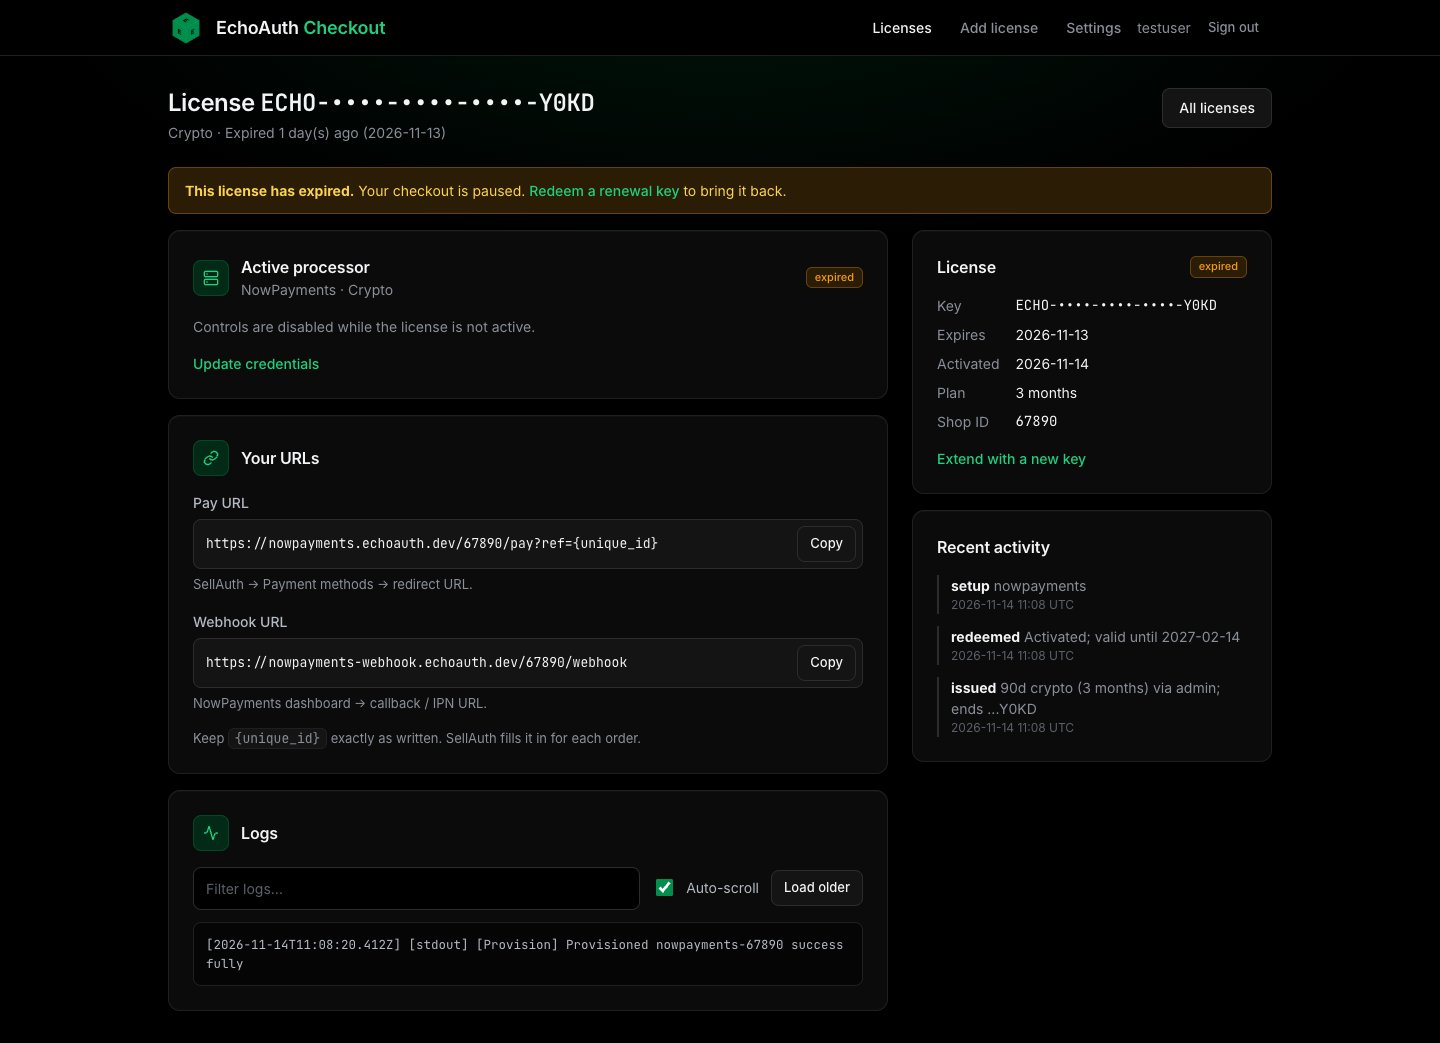
Your checkout pauses. Buyers can’t pay with crypto until you renew.
Nothing is deleted. Your settings and logs are kept.
An expired license with a renewal prompt
1
Get a renewal key
Buy a new license key.
2
Redeem it
Click Redeem a renewal key, or Extend with a new key on your license page, and paste the key.
3
Done
Your license is active again and your checkout starts again. Your URLs stay the same.
You can renew before it expires. The new time is added to your current end date, so you lose nothing.
Treat a license key like a password. Don’t post it in public. Your dashboard shows only the last 4 characters. You can change your password under Settings.
FAQ
My license key is invalid or already used
Check for typos and extra spaces. Each key works once. If you already registered with it, sign in instead. If you are sure it is new, ask Echo.
Setup shows a red error
Most often a wrong SellAuth API key, shop ID or processor credentials. Check each field, remove spaces and try again. The form shows the last log lines of the failed attempt to help.
The order stays unpaid after the buyer paid
Check the webhook URL in your processor’s dashboard. It must be exactly the one on your license page. Then look at the Logs on your license page for errors.
Buyers land on an error page at checkout
Check the redirect URL in SellAuth. It must be your pay URL, with {unique_id} kept as written. Also check that your license is active and the badge says running.
I switched processors and checkout stopped
Paste the new URLs after a swap. The old ones stop working.
My swap failed
Your old setup is kept and still active. Read the red message, fix the credentials and try again.
I can't sign in
After several wrong passwords you are blocked for a while. Wait about 15 minutes and try again. Check your username or email.
I see a message to try again later
There is a limit on how often you can set up, swap or change credentials per hour. Wait a bit and try again.
I want to change my SellAuth shop
The shop is locked to the license after the first setup. Ask support to change it, or use another license for the other shop.
I forgot my password
No email is sent. Ask support for a password reset. You can change your password later in Settings.
My license expired
Your checkout is paused and nothing is lost. Redeem a renewal key. See Renewals and expiry.
{"docsConfig":{"theme":"mint","$schema":"https://mintlify.com/docs.json","name":"EchoAuth","description":"Setup guides and help for EchoAuth's SellAuth automation products.","colors":{"primary":"#16A34A","light":"#07C983","dark":"#15803D"},"logo":{"light":"https://mintcdn.com/echoauth/lwHXnAPLdMSP1I-Q/logo/echoauth-light.svg?fit=max\u0026auto=format\u0026n=lwHXnAPLdMSP1I-Q\u0026q=85\u0026s=10210fced308dfc7415178a798ba0bd7","dark":"https://mintcdn.com/echoauth/lwHXnAPLdMSP1I-Q/logo/echoauth-dark.svg?fit=max\u0026auto=format\u0026n=lwHXnAPLdMSP1I-Q\u0026q=85\u0026s=99b2252641dae7614da0e336273e46fc","href":"/"},"favicon":{"light":"https://mintcdn.com/echoauth/EdnTbpsujDyTmL-j/images/echo-logo2.png?fit=max\u0026auto=format\u0026n=EdnTbpsujDyTmL-j\u0026q=85\u0026s=faddda363d55f6d6b25623f91473a23b","dark":"https://mintcdn.com/echoauth/EdnTbpsujDyTmL-j/images/echo-logo2.png?fit=max\u0026auto=format\u0026n=EdnTbpsujDyTmL-j\u0026q=85\u0026s=faddda363d55f6d6b25623f91473a23b"},"navbar":{"links":[{"href":"https://discord.echoauth.dev","label":"Support"}],"primary":{"type":"button","label":"Shop","href":"https://shop.echoauth.dev"}},"footer":{"socials":{"discord":"https://discord.echoauth.dev"}},"contextual":{"options":["copy","view","chatgpt","claude","perplexity","mcp","cursor","vscode"],"display":"header"},"styling":{"latex":false},"navigation":{"languages":[{"language":"en","default":true,"href":""},{"language":"de","href":"de"},{"language":"fr","href":"fr"},{"language":"es","href":"es"},{"language":"fi","href":"fi"},{"language":"nl","href":"nl"},{"language":"pt","href":"pt"},{"language":"ar","href":"ar"},{"language":"cn","href":"cn"},{"language":"jp","href":"jp"},{"language":"hi","href":"hi"}]}},"deployment":{"deploymentMetadataValue":{"subdomain":"echoauth","hasAudioNarration":false,"actualSubdomain":"echoauth","customDomains":["docs.echoauth.dev"],"gitSource":{"type":"github","owner":"mintlify-community","repo":"docs-echoauth-6b5e5240","deployBranch":"main","contentDirectory":"","isPrivate":true,"mountPath":"","label":""},"entitlements":{"AI_CHAT":{"status":"DISABLED"}},"buildId":"6afabca147e323061a481b28","clientVersion":"0.0.4143","searchFilterCounts":[{"language":"en","tag":"Getting Started","count":7},{"language":"ar","tag":"البدء","count":6},{"language":"cn","tag":"快速入门","count":6},{"language":"de","tag":"Erste Schritte","count":6},{"language":"es","tag":"Primeros pasos","count":6},{"language":"fi","tag":"Aloitus","count":6},{"language":"fr","tag":"Premiers pas","count":6},{"language":"hi","tag":"शुरुआत करें","count":6},{"language":"jp","tag":"はじめに","count":6},{"language":"nl","tag":"Aan de slag","count":6},{"language":"pt","tag":"Primeiros passos","count":6}]},"assistantConfig":{"enableAskAiButton":false,"enableStarterQuestions":false,"enableContextualStarterQuestions":false,"enableAskAiSearchBar":true},"basePath":"","hasChatPermissions":false,"hasWebMcpPermissions":false,"toggles":[{"name":"kill-isr","enabled":true,"variant":{"name":"disabled","enabled":false,"feature_enabled":true},"impressionData":false},{"name":"custom-rbac-roles","enabled":true,"variant":{"name":"disabled","enabled":false,"feature_enabled":true},"impressionData":false},{"name":"agent-mintlify-slack","enabled":true,"variant":{"name":"disabled","enabled":false,"feature_enabled":true},"impressionData":false},{"name":"agent-integrations-settings","enabled":true,"variant":{"name":"disabled","enabled":false,"feature_enabled":true},"impressionData":false},{"name":"rbac-expansion","enabled":true,"variant":{"name":"disabled","enabled":false,"feature_enabled":true},"impressionData":false},{"name":"automations-pr-grouping","enabled":true,"variant":{"name":"disabled","enabled":false,"feature_enabled":true},"impressionData":false},{"name":"custom-prefix","enabled":true,"variant":{"name":"disabled","enabled":false,"feature_enabled":true},"impressionData":false},{"name":"analytics-v7","enabled":true,"variant":{"name":"disabled","enabled":false,"feature_enabled":true},"impressionData":false},{"name":"user-flows-analytics","enabled":true,"variant":{"name":"disabled","enabled":false,"feature_enabled":true},"impressionData":false},{"name":"no-publish-flow","enabled":true,"variant":{"name":"disabled","enabled":false,"feature_enabled":true},"impressionData":false},{"name":"workos-onboarding","enabled":true,"variant":{"name":"disabled","enabled":false,"feature_enabled":true},"impressionData":false},{"name":"snapshot-serving-live","enabled":true,"variant":{"name":"disabled","enabled":false,"feature_enabled":true},"impressionData":false},{"name":"stripTemperatureMiddleware","enabled":true,"variant":{"name":"disabled","enabled":false,"feature_enabled":true},"impressionData":false},{"name":"support-platform-pylon-zendesk","enabled":true,"variant":{"name":"disabled","enabled":false,"feature_enabled":true},"impressionData":false},{"name":"snapshot-serving","enabled":true,"variant":{"name":"disabled","enabled":false,"feature_enabled":true},"impressionData":false},{"name":"instant-rollback","enabled":true,"variant":{"name":"disabled","enabled":false,"feature_enabled":true},"impressionData":false},{"name":"granular-notifications-server","enabled":true,"variant":{"name":"disabled","enabled":false,"feature_enabled":true},"impressionData":false},{"name":"granular-notifications","enabled":true,"variant":{"name":"disabled","enabled":false,"feature_enabled":true},"impressionData":false},{"name":"automations-fable","enabled":true,"variant":{"name":"disabled","enabled":false,"feature_enabled":true},"impressionData":false},{"name":"fixed-ai-action-pricing","enabled":true,"variant":{"name":"disabled","enabled":false,"feature_enabled":true},"impressionData":false},{"name":"automation-resolve-merge-conflict","enabled":true,"variant":{"name":"disabled","enabled":false,"feature_enabled":true},"impressionData":false},{"name":"scoped-publishing","enabled":true,"variant":{"name":"disabled","enabled":false,"feature_enabled":true},"impressionData":false},{"name":"mintql","enabled":true,"variant":{"name":"disabled","enabled":false,"feature_enabled":true},"impressionData":false},{"name":"page-level-analytics","enabled":true,"variant":{"name":"disabled","enabled":false,"feature_enabled":true},"impressionData":false},{"name":"editor-version-history-v2","enabled":true,"variant":{"name":"disabled","enabled":false,"feature_enabled":true},"impressionData":false},{"name":"billing-page-v2","enabled":true,"variant":{"name":"disabled","enabled":false,"feature_enabled":true},"impressionData":false},{"name":"full-page-search","enabled":true,"variant":{"name":"disabled","enabled":false,"feature_enabled":true},"impressionData":false},{"name":"workspace-projects","enabled":true,"variant":{"name":"disabled","enabled":false,"feature_enabled":true},"impressionData":false},{"name":"assistant-v5","enabled":true,"variant":{"name":"disabled","enabled":false,"feature_enabled":true},"impressionData":false},{"name":"fork-pr-previews","enabled":true,"variant":{"name":"disabled","enabled":false,"feature_enabled":true},"impressionData":false},{"name":"revalidation-jwt","enabled":true,"variant":{"name":"disabled","enabled":false,"feature_enabled":true},"impressionData":false},{"name":"workos-sso-scim","enabled":true,"variant":{"name":"disabled","enabled":false,"feature_enabled":true},"impressionData":false},{"name":"hobby-abuse-scan","enabled":true,"variant":{"name":"disabled","enabled":false,"feature_enabled":true},"impressionData":false},{"name":"dashboard-inbox","enabled":true,"variant":{"name":"disabled","enabled":false,"feature_enabled":true},"impressionData":false},{"name":"workos-signup","enabled":true,"variant":{"name":"disabled","enabled":false,"feature_enabled":true},"impressionData":false},{"name":"turbopuffer-dual-write","enabled":true,"variant":{"name":"disabled","enabled":false,"feature_enabled":true},"impressionData":false},{"name":"workos-enabled","enabled":true,"variant":{"name":"disabled","enabled":false,"feature_enabled":true},"impressionData":false},{"name":"approve-review-flow","enabled":true,"variant":{"name":"disabled","enabled":false,"feature_enabled":true},"impressionData":false},{"name":"editor-metadata","enabled":true,"variant":{"name":"disabled","enabled":false,"feature_enabled":true},"impressionData":false},{"name":"sso-setup-deadline-banner","enabled":true,"variant":{"name":"disabled","enabled":false,"feature_enabled":true},"impressionData":false},{"name":"turbopuffer-serve","enabled":true,"variant":{"name":"disabled","enabled":false,"feature_enabled":true},"impressionData":false},{"name":"live-agents","enabled":true,"variant":{"name":"disabled","enabled":false,"feature_enabled":true},"impressionData":false},{"name":"llms-txt-v2","enabled":true,"variant":{"name":"disabled","enabled":false,"feature_enabled":true},"impressionData":false}],"googleFontsInlined":false},"customCss":[],"page":{"pagePath":"sellauth-payment-automation","slug":"/sellauth-payment-automation","pageMetadata":{"title":"SellAuth Payment Automation","sidebarTitle":"SellAuth Payment Automation","description":"Accept more crypto coins with your SellAuth shop in about 5 minutes with NowPayments, Heleket or Cryptomus.","icon":"coins","keywords":["crypto payments","sellauth","nowpayments","heleket","cryptomus","license key"],"href":"/sellauth-payment-automation"},"description":{"compiledSource":"\"use strict\";\nconst {jsx: _jsx} = arguments[0];\nconst {useMDXComponents: _provideComponents} = arguments[0];\nfunction _createMdxContent(props) {\n const _components = {\n p: \"p\",\n ..._provideComponents(),\n ...props.components\n };\n return _jsx(_components.p, {\n children: \"Accept more crypto coins with your SellAuth shop in about 5 minutes with NowPayments, Heleket or Cryptomus.\"\n });\n}\nfunction MDXContent(props = {}) {\n const {wrapper: MDXLayout} = {\n ..._provideComponents(),\n ...props.components\n };\n return MDXLayout ? _jsx(MDXLayout, {\n ...props,\n children: _jsx(_createMdxContent, {\n ...props\n })\n }) : _createMdxContent(props);\n}\nreturn {\n default: MDXContent\n};\n","frontmatter":{},"scope":{}},"pageType":"default","mdx":{"mdxSource":{"compiledSource":"\"use strict\";const{Fragment:_Fragment,jsx:_jsx,jsxs:_jsxs}=arguments[0];const{useMDXComponents:_provideComponents}=arguments[0];function _createMdxContent(props){const _components={a:`a`,code:`code`,em:`em`,li:`li`,p:`p`,strong:`strong`,tbody:`tbody`,td:`td`,th:`th`,thead:`thead`,tr:`tr`,ul:`ul`,..._provideComponents(),...props.components},{Accordion,AccordionGroup,Check,Frame,Heading,Info,Note,OptimizedImage,Step,Steps,Tab,Table,Tabs,Tip,Warning}=_components;if(!Accordion)_missingMdxReference(`Accordion`,true);if(!AccordionGroup)_missingMdxReference(`AccordionGroup`,true);if(!Check)_missingMdxReference(`Check`,true);if(!Frame)_missingMdxReference(`Frame`,true);if(!Heading)_missingMdxReference(`Heading`,true);if(!Info)_missingMdxReference(`Info`,true);if(!Note)_missingMdxReference(`Note`,true);if(!OptimizedImage)_missingMdxReference(`OptimizedImage`,true);if(!Step)_missingMdxReference(`Step`,true);if(!Steps)_missingMdxReference(`Steps`,true);if(!Tab)_missingMdxReference(`Tab`,true);if(!Table)_missingMdxReference(`Table`,true);if(!Tabs)_missingMdxReference(`Tabs`,true);if(!Tip)_missingMdxReference(`Tip`,true);if(!Warning)_missingMdxReference(`Warning`,true);return _jsxs(_Fragment,{children:[_jsxs(_components.p,{children:[`Want to take more crypto payments in your SellAuth shop? You can set it up yourself in about `,_jsx(_components.strong,{children:`5 minutes`}),`. You don’t need a server and you don’t write any code. You fill in one short form, and I run your checkout and keep it online.`]}),`\n`,_jsxs(_components.ul,{children:[`\n`,_jsxs(_components.li,{children:[`A `,_jsx(_components.strong,{children:`crypto checkout page`}),` for your SellAuth shop`]}),`\n`,_jsxs(_components.li,{children:[`Your choice of `,_jsx(_components.strong,{children:`Heleket, Cryptomus or NowPayments`})]}),`\n`,_jsxs(_components.li,{children:[_jsx(_components.strong,{children:`One processor at a time`}),`. Switch to another one whenever you like.`]}),`\n`,_jsxs(_components.li,{children:[`A simple dashboard with your status and `,_jsx(_components.strong,{children:`live logs`})]}),`\n`]}),`\n`,_jsx(Frame,{caption:`Your checkout is live: running status and your two URLs`,children:_jsx(OptimizedImage,{src:`https://mintcdn.com/echoauth/e76GE4c5Q1nkWlMv/images/payment-provisioner/n-09-live.png?fit=max\u0026auto=format\u0026n=e76GE4c5Q1nkWlMv\u0026q=85\u0026s=777b90af5fca72a76d66882aeffa185c`,alt:`License page showing a running processor, the license details and the pay and webhook URLs`,\"data-og-width\":`1440`,width:`1440`,\"data-og-height\":`1024`,height:`1024`,\"data-path\":`images/payment-provisioner/n-09-live.png`,\"data-optimize\":`true`,\"data-opv\":`3`,srcset:`https://mintcdn.com/echoauth/e76GE4c5Q1nkWlMv/images/payment-provisioner/n-09-live.png?w=280\u0026fit=max\u0026auto=format\u0026n=e76GE4c5Q1nkWlMv\u0026q=85\u0026s=9a585d6e10f35b170798330be0f0f5e5 280w, https://mintcdn.com/echoauth/e76GE4c5Q1nkWlMv/images/payment-provisioner/n-09-live.png?w=560\u0026fit=max\u0026auto=format\u0026n=e76GE4c5Q1nkWlMv\u0026q=85\u0026s=995cb8017f82d66136c66700dfe78512 560w, https://mintcdn.com/echoauth/e76GE4c5Q1nkWlMv/images/payment-provisioner/n-09-live.png?w=840\u0026fit=max\u0026auto=format\u0026n=e76GE4c5Q1nkWlMv\u0026q=85\u0026s=fa0a7b233a093e3d47ca48152fc50f30 840w, https://mintcdn.com/echoauth/e76GE4c5Q1nkWlMv/images/payment-provisioner/n-09-live.png?w=1100\u0026fit=max\u0026auto=format\u0026n=e76GE4c5Q1nkWlMv\u0026q=85\u0026s=df64fd0e28699ce5273bfa70251789e8 1100w, https://mintcdn.com/echoauth/e76GE4c5Q1nkWlMv/images/payment-provisioner/n-09-live.png?w=1650\u0026fit=max\u0026auto=format\u0026n=e76GE4c5Q1nkWlMv\u0026q=85\u0026s=a550417f02ca5c0aa779cfd4f8e963f0 1650w, https://mintcdn.com/echoauth/e76GE4c5Q1nkWlMv/images/payment-provisioner/n-09-live.png?w=2500\u0026fit=max\u0026auto=format\u0026n=e76GE4c5Q1nkWlMv\u0026q=85\u0026s=875f964961ac88a4bd04e768c4c1eac7 2500w`})}),`\n`,_jsx(Heading,{level:`2`,id:`it-takes-3-steps`,children:`It takes 3 steps`}),`\n`,_jsxs(Steps,{children:[_jsx(Step,{title:`Get your license`,children:_jsxs(_components.p,{children:[`Buy a license. You receive a key that looks like `,_jsx(_components.code,{children:`ECHO-XXXX-XXXX-XXXX-XXXX`}),`.`]})}),_jsx(Step,{title:`Create your account and connect a processor`,children:_jsx(_components.p,{children:`Register with your key, pick a processor and fill in one form.`})}),_jsx(Step,{title:`Paste 2 URLs. Done.`,children:_jsx(_components.p,{children:`Copy your pay URL into SellAuth and your webhook URL into your processor. Your shop now accepts crypto.`})})]}),`\n`,_jsx(Tip,{children:_jsxs(_components.p,{children:[`Jump to: `,_jsx(_components.a,{href:`#1-create-your-account`,children:`Create your account`}),`, `,_jsx(_components.a,{href:`#2-connect-a-processor`,children:`Connect a processor`}),`, `,_jsx(_components.a,{href:`#3-your-two-urls-and-test-payment`,children:`Your two URLs`}),`, `,_jsx(_components.a,{href:`#4-switch-processor`,children:`Switch processor`}),`, `,_jsx(_components.a,{href:`#5-add-another-license`,children:`Add another license`}),`, `,_jsx(_components.a,{href:`#6-renewals-and-expiry`,children:`Renewals`}),`, `,_jsx(_components.a,{href:`#faq`,children:`FAQ`}),`.`]})}),`\n`,_jsx(Heading,{level:`2`,id:`what-you-need`,children:`What you need`}),`\n`,_jsxs(Info,{children:[_jsx(_components.p,{children:_jsx(_components.strong,{children:`Have these ready:`})}),_jsxs(_components.ul,{children:[`\n`,_jsxs(_components.li,{children:[`Your `,_jsx(_components.strong,{children:`license key`}),` from your purchase`]}),`\n`,_jsxs(_components.li,{children:[`Your `,_jsx(_components.strong,{children:`SellAuth shop ID`}),` and a `,_jsx(_components.strong,{children:`SellAuth API key`})]}),`\n`,_jsxs(_components.li,{children:[`An account at `,_jsx(_components.strong,{children:`Heleket, Cryptomus or NowPayments`}),`, with its API credentials`]}),`\n`]})]}),`\n`,_jsx(Note,{children:_jsxs(_components.p,{children:[`The screenshots use fake example data (shop ID `,_jsx(_components.code,{children:`12345`}),`, keys like `,_jsx(_components.code,{children:`test-api-key-xxxx`}),`). Use your own values and never share them.`]})}),`\n`,_jsx(Heading,{level:`2`,id:`1-create-your-account`,children:`1. Create your account`}),`\n`,_jsxs(Steps,{children:[_jsx(Step,{title:`Open the register page`,children:_jsxs(_components.p,{children:[`Open the register page of your dashboard. Already registered? Click `,_jsx(_components.strong,{children:`Sign in`}),` instead.`]})}),_jsxs(Step,{title:`Fill in the form`,children:[_jsxs(_components.p,{children:[`Choose a username, add your email and pick a password with at least 10 characters. Paste your license key at the bottom, then click `,_jsx(_components.strong,{children:`Create account`}),`.`]}),_jsx(Frame,{caption:`Register with your license key (the key shown here is a placeholder)`,children:_jsx(OptimizedImage,{src:`https://mintcdn.com/echoauth/e76GE4c5Q1nkWlMv/images/payment-provisioner/n-02-register.png?fit=max\u0026auto=format\u0026n=e76GE4c5Q1nkWlMv\u0026q=85\u0026s=de5d4ca59d962cf12845af6d8fb11f03`,alt:`Create your account form with username, email, password and a placeholder license key`,\"data-og-width\":`1440`,width:`1440`,\"data-og-height\":`900`,height:`900`,\"data-path\":`images/payment-provisioner/n-02-register.png`,\"data-optimize\":`true`,\"data-opv\":`3`,srcset:`https://mintcdn.com/echoauth/e76GE4c5Q1nkWlMv/images/payment-provisioner/n-02-register.png?w=280\u0026fit=max\u0026auto=format\u0026n=e76GE4c5Q1nkWlMv\u0026q=85\u0026s=c6c272dd0f5e7dc3982d1b1eaa71f39d 280w, https://mintcdn.com/echoauth/e76GE4c5Q1nkWlMv/images/payment-provisioner/n-02-register.png?w=560\u0026fit=max\u0026auto=format\u0026n=e76GE4c5Q1nkWlMv\u0026q=85\u0026s=e91308a0e998be0b1053380f222dfb5a 560w, https://mintcdn.com/echoauth/e76GE4c5Q1nkWlMv/images/payment-provisioner/n-02-register.png?w=840\u0026fit=max\u0026auto=format\u0026n=e76GE4c5Q1nkWlMv\u0026q=85\u0026s=033da07299fab7efb90e75f0e2b4c310 840w, https://mintcdn.com/echoauth/e76GE4c5Q1nkWlMv/images/payment-provisioner/n-02-register.png?w=1100\u0026fit=max\u0026auto=format\u0026n=e76GE4c5Q1nkWlMv\u0026q=85\u0026s=6c476477420ac4b083cc23e5216f6152 1100w, https://mintcdn.com/echoauth/e76GE4c5Q1nkWlMv/images/payment-provisioner/n-02-register.png?w=1650\u0026fit=max\u0026auto=format\u0026n=e76GE4c5Q1nkWlMv\u0026q=85\u0026s=07194616ec10c5da068ab4736b083c16 1650w, https://mintcdn.com/echoauth/e76GE4c5Q1nkWlMv/images/payment-provisioner/n-02-register.png?w=2500\u0026fit=max\u0026auto=format\u0026n=e76GE4c5Q1nkWlMv\u0026q=85\u0026s=649053a42422471274ee958ce4288a7f 2500w`})})]}),_jsx(Step,{title:`You are in`,children:_jsx(_components.p,{children:`You are signed in right away. Your license is active and your time starts now.`})})]}),`\n`,_jsx(Warning,{children:_jsxs(_components.p,{children:[`Each key works only `,_jsx(_components.strong,{children:`once`}),`. If you see “This license key is invalid or has already been used”, check the key for typos. If it still fails, ask support. Keep your key private.`]})}),`\n`,_jsx(Heading,{level:`2`,id:`2-connect-a-processor`,children:`2. Connect a processor`}),`\n`,_jsxs(_components.p,{children:[`A processor is the service that handles the crypto payment. Pick `,_jsx(_components.strong,{children:`one`}),`. You can switch later.`]}),`\n`,_jsxs(Steps,{children:[_jsx(Step,{title:`Open your license`,children:_jsxs(_components.p,{children:[`Click `,_jsx(_components.strong,{children:`Licenses`}),` at the top, then your license, then `,_jsx(_components.strong,{children:`Set up processor`}),`.`]})}),_jsx(Step,{title:`Choose a processor`,children:_jsx(Frame,{caption:`Pick NowPayments, Heleket or Cryptomus`,children:_jsx(OptimizedImage,{src:`https://mintcdn.com/echoauth/e76GE4c5Q1nkWlMv/images/payment-provisioner/n-12-swap-pick.png?fit=max\u0026auto=format\u0026n=e76GE4c5Q1nkWlMv\u0026q=85\u0026s=37c8d5376e810510e3154b83a831249d`,alt:`Choose a processor page listing Heleket, Cryptomus and NowPayments`,\"data-og-width\":`1440`,width:`1440`,\"data-og-height\":`900`,height:`900`,\"data-path\":`images/payment-provisioner/n-12-swap-pick.png`,\"data-optimize\":`true`,\"data-opv\":`3`,srcset:`https://mintcdn.com/echoauth/e76GE4c5Q1nkWlMv/images/payment-provisioner/n-12-swap-pick.png?w=280\u0026fit=max\u0026auto=format\u0026n=e76GE4c5Q1nkWlMv\u0026q=85\u0026s=03d5fb8d03a7b2097fbf5d30e98a9ff6 280w, https://mintcdn.com/echoauth/e76GE4c5Q1nkWlMv/images/payment-provisioner/n-12-swap-pick.png?w=560\u0026fit=max\u0026auto=format\u0026n=e76GE4c5Q1nkWlMv\u0026q=85\u0026s=3e5135913153bda5aab4d0f10f1666cc 560w, https://mintcdn.com/echoauth/e76GE4c5Q1nkWlMv/images/payment-provisioner/n-12-swap-pick.png?w=840\u0026fit=max\u0026auto=format\u0026n=e76GE4c5Q1nkWlMv\u0026q=85\u0026s=fd53c8e79156efae7c65010c51580759 840w, https://mintcdn.com/echoauth/e76GE4c5Q1nkWlMv/images/payment-provisioner/n-12-swap-pick.png?w=1100\u0026fit=max\u0026auto=format\u0026n=e76GE4c5Q1nkWlMv\u0026q=85\u0026s=2a1d472455f2de96be37f04c0dcabbd5 1100w, https://mintcdn.com/echoauth/e76GE4c5Q1nkWlMv/images/payment-provisioner/n-12-swap-pick.png?w=1650\u0026fit=max\u0026auto=format\u0026n=e76GE4c5Q1nkWlMv\u0026q=85\u0026s=ac85754e80ba53dffe7601f78b97c082 1650w, https://mintcdn.com/echoauth/e76GE4c5Q1nkWlMv/images/payment-provisioner/n-12-swap-pick.png?w=2500\u0026fit=max\u0026auto=format\u0026n=e76GE4c5Q1nkWlMv\u0026q=85\u0026s=e04d197f1821396ab6ff17cd3dc37fe0 2500w`})})}),_jsx(Step,{title:`Fill in the form`,children:_jsxs(_components.p,{children:[`Every form asks for your `,_jsx(_components.strong,{children:`SellAuth shop ID`}),`, your `,_jsx(_components.strong,{children:`SellAuth API key`}),` (Required Scopes: Invoice Read, Update, Process)**\\xA0**and the credentials of your processor. See the tab below.`]})}),_jsx(Step,{title:`Click the green button`,children:_jsx(_components.p,{children:`Setup takes up to a minute. Keep the page open until it finishes. Then you see your status and your two URLs.`})})]}),`\n`,_jsxs(Tabs,{children:[_jsxs(Tab,{title:`NowPayments`,id:`nowpayments`,children:[_jsxs(_components.p,{children:[`You need your `,_jsx(_components.strong,{children:`NowPayments API key`}),` and `,_jsx(_components.strong,{children:`NowPayments IPN secret`}),`.`]}),_jsx(Frame,{caption:`NowPayments setup form`,children:_jsx(OptimizedImage,{src:`https://mintcdn.com/echoauth/e76GE4c5Q1nkWlMv/images/payment-provisioner/n-07-form-nowpayments.png?fit=max\u0026auto=format\u0026n=e76GE4c5Q1nkWlMv\u0026q=85\u0026s=39fed9e70b8671401993c77d8b68de88`,alt:`NowPayments setup form with shop ID, SellAuth API key, NowPayments API key and IPN secret`,\"data-og-width\":`1440`,width:`1440`,\"data-og-height\":`900`,height:`900`,\"data-path\":`images/payment-provisioner/n-07-form-nowpayments.png`,\"data-optimize\":`true`,\"data-opv\":`3`,srcset:`https://mintcdn.com/echoauth/e76GE4c5Q1nkWlMv/images/payment-provisioner/n-07-form-nowpayments.png?w=280\u0026fit=max\u0026auto=format\u0026n=e76GE4c5Q1nkWlMv\u0026q=85\u0026s=448b775753355ee8846086bf89912c9f 280w, https://mintcdn.com/echoauth/e76GE4c5Q1nkWlMv/images/payment-provisioner/n-07-form-nowpayments.png?w=560\u0026fit=max\u0026auto=format\u0026n=e76GE4c5Q1nkWlMv\u0026q=85\u0026s=d6344d207b86f09a4b64917770075b28 560w, https://mintcdn.com/echoauth/e76GE4c5Q1nkWlMv/images/payment-provisioner/n-07-form-nowpayments.png?w=840\u0026fit=max\u0026auto=format\u0026n=e76GE4c5Q1nkWlMv\u0026q=85\u0026s=bb37fad56fef16a1cfb83a340e8de3e2 840w, https://mintcdn.com/echoauth/e76GE4c5Q1nkWlMv/images/payment-provisioner/n-07-form-nowpayments.png?w=1100\u0026fit=max\u0026auto=format\u0026n=e76GE4c5Q1nkWlMv\u0026q=85\u0026s=82ad216eb9a46487914320c12f8034ee 1100w, https://mintcdn.com/echoauth/e76GE4c5Q1nkWlMv/images/payment-provisioner/n-07-form-nowpayments.png?w=1650\u0026fit=max\u0026auto=format\u0026n=e76GE4c5Q1nkWlMv\u0026q=85\u0026s=664e0eb4e2a505f496e4ea56fda77ba6 1650w, https://mintcdn.com/echoauth/e76GE4c5Q1nkWlMv/images/payment-provisioner/n-07-form-nowpayments.png?w=2500\u0026fit=max\u0026auto=format\u0026n=e76GE4c5Q1nkWlMv\u0026q=85\u0026s=d23bda3362865f9eba0ed0bfe0ff0844 2500w`})})]}),_jsxs(Tab,{title:`Heleket`,id:`heleket`,children:[_jsxs(_components.p,{children:[`You need your `,_jsx(_components.strong,{children:`Heleket API key`}),` and `,_jsx(_components.strong,{children:`Heleket merchant ID`}),`.`]}),_jsx(Frame,{caption:`Heleket setup form`,children:_jsx(OptimizedImage,{src:`https://mintcdn.com/echoauth/e76GE4c5Q1nkWlMv/images/payment-provisioner/n-05-form-heleket.png?fit=max\u0026auto=format\u0026n=e76GE4c5Q1nkWlMv\u0026q=85\u0026s=bc33047c3633b689a025a94a80352bad`,alt:`Heleket setup form with shop ID, SellAuth API key, Heleket API key and merchant ID`,\"data-og-width\":`1440`,width:`1440`,\"data-og-height\":`900`,height:`900`,\"data-path\":`images/payment-provisioner/n-05-form-heleket.png`,\"data-optimize\":`true`,\"data-opv\":`3`,srcset:`https://mintcdn.com/echoauth/e76GE4c5Q1nkWlMv/images/payment-provisioner/n-05-form-heleket.png?w=280\u0026fit=max\u0026auto=format\u0026n=e76GE4c5Q1nkWlMv\u0026q=85\u0026s=ea420b80c932c67f3ad76da75877e673 280w, https://mintcdn.com/echoauth/e76GE4c5Q1nkWlMv/images/payment-provisioner/n-05-form-heleket.png?w=560\u0026fit=max\u0026auto=format\u0026n=e76GE4c5Q1nkWlMv\u0026q=85\u0026s=71f7025372509aec89b8d3e8dc0f8a24 560w, https://mintcdn.com/echoauth/e76GE4c5Q1nkWlMv/images/payment-provisioner/n-05-form-heleket.png?w=840\u0026fit=max\u0026auto=format\u0026n=e76GE4c5Q1nkWlMv\u0026q=85\u0026s=007087533678c0f382bfa28a27533e45 840w, https://mintcdn.com/echoauth/e76GE4c5Q1nkWlMv/images/payment-provisioner/n-05-form-heleket.png?w=1100\u0026fit=max\u0026auto=format\u0026n=e76GE4c5Q1nkWlMv\u0026q=85\u0026s=17b24b48748c0f727cb2bc0e6c9d8abe 1100w, https://mintcdn.com/echoauth/e76GE4c5Q1nkWlMv/images/payment-provisioner/n-05-form-heleket.png?w=1650\u0026fit=max\u0026auto=format\u0026n=e76GE4c5Q1nkWlMv\u0026q=85\u0026s=e0cee351479d64b6efa313d805d8ab2a 1650w, https://mintcdn.com/echoauth/e76GE4c5Q1nkWlMv/images/payment-provisioner/n-05-form-heleket.png?w=2500\u0026fit=max\u0026auto=format\u0026n=e76GE4c5Q1nkWlMv\u0026q=85\u0026s=9de021f8390cb11d3d07657f3cfd7ca3 2500w`})})]}),_jsxs(Tab,{title:`Cryptomus`,id:`cryptomus`,children:[_jsxs(_components.p,{children:[`You need your `,_jsx(_components.strong,{children:`Cryptomus API key`}),` and `,_jsx(_components.strong,{children:`Cryptomus merchant ID`}),`.`]}),_jsx(Frame,{caption:`Cryptomus setup form`,children:_jsx(OptimizedImage,{src:`https://mintcdn.com/echoauth/e76GE4c5Q1nkWlMv/images/payment-provisioner/n-06-form-cryptomus.png?fit=max\u0026auto=format\u0026n=e76GE4c5Q1nkWlMv\u0026q=85\u0026s=be948733d2644f3232a5e31bb93118e2`,alt:`Cryptomus setup form with shop ID, SellAuth API key, Cryptomus API key and merchant ID`,\"data-og-width\":`1440`,width:`1440`,\"data-og-height\":`900`,height:`900`,\"data-path\":`images/payment-provisioner/n-06-form-cryptomus.png`,\"data-optimize\":`true`,\"data-opv\":`3`,srcset:`https://mintcdn.com/echoauth/e76GE4c5Q1nkWlMv/images/payment-provisioner/n-06-form-cryptomus.png?w=280\u0026fit=max\u0026auto=format\u0026n=e76GE4c5Q1nkWlMv\u0026q=85\u0026s=8befb118c24d4a9b2b444aadf6c4a2fa 280w, https://mintcdn.com/echoauth/e76GE4c5Q1nkWlMv/images/payment-provisioner/n-06-form-cryptomus.png?w=560\u0026fit=max\u0026auto=format\u0026n=e76GE4c5Q1nkWlMv\u0026q=85\u0026s=fa1c7765d1d0e4e1b8a21131bc588063 560w, https://mintcdn.com/echoauth/e76GE4c5Q1nkWlMv/images/payment-provisioner/n-06-form-cryptomus.png?w=840\u0026fit=max\u0026auto=format\u0026n=e76GE4c5Q1nkWlMv\u0026q=85\u0026s=a357a123484ebc4cad3ae9a6e36450e0 840w, https://mintcdn.com/echoauth/e76GE4c5Q1nkWlMv/images/payment-provisioner/n-06-form-cryptomus.png?w=1100\u0026fit=max\u0026auto=format\u0026n=e76GE4c5Q1nkWlMv\u0026q=85\u0026s=f36b94d19bf4d64ceb36f8b21454500c 1100w, https://mintcdn.com/echoauth/e76GE4c5Q1nkWlMv/images/payment-provisioner/n-06-form-cryptomus.png?w=1650\u0026fit=max\u0026auto=format\u0026n=e76GE4c5Q1nkWlMv\u0026q=85\u0026s=39a1b1baf8236028286259385a5629e3 1650w, https://mintcdn.com/echoauth/e76GE4c5Q1nkWlMv/images/payment-provisioner/n-06-form-cryptomus.png?w=2500\u0026fit=max\u0026auto=format\u0026n=e76GE4c5Q1nkWlMv\u0026q=85\u0026s=702654cfce566d0b877dd1d45a792622 2500w`})})]})]}),`\n`,_jsx(Info,{children:_jsxs(_components.p,{children:[`Find your API credentials in your processor’s own dashboard. Menu names can look different from time to time. The SellAuth shop ID is `,_jsx(_components.strong,{children:`locked to your license`}),` after the first setup, so use the shop you really want to sell on.`]})}),`\n`,_jsxs(Warning,{children:[_jsxs(_components.p,{children:[_jsx(_components.strong,{children:`Common mistakes:`}),` a typo in the SellAuth API key or shop ID, mixing up the API key and the merchant ID (or IPN secret), and spaces copied at the start or end of a key. If setup fails you see a red message and the form keeps what you typed. Enter your secret keys again.`]}),_jsx(Frame,{caption:`Example error: the SellAuth key was wrong`,children:_jsx(OptimizedImage,{src:`https://mintcdn.com/echoauth/e76GE4c5Q1nkWlMv/images/payment-provisioner/n-08-setup-error.png?fit=max\u0026auto=format\u0026n=e76GE4c5Q1nkWlMv\u0026q=85\u0026s=4651d603206104f9347e9b7a7cad394d`,alt:`Setup form with a red error message about the SellAuth shop key`,\"data-og-width\":`1440`,width:`1440`,\"data-og-height\":`900`,height:`900`,\"data-path\":`images/payment-provisioner/n-08-setup-error.png`,\"data-optimize\":`true`,\"data-opv\":`3`,srcset:`https://mintcdn.com/echoauth/e76GE4c5Q1nkWlMv/images/payment-provisioner/n-08-setup-error.png?w=280\u0026fit=max\u0026auto=format\u0026n=e76GE4c5Q1nkWlMv\u0026q=85\u0026s=d6a1313934299f13521db2058e41be5b 280w, https://mintcdn.com/echoauth/e76GE4c5Q1nkWlMv/images/payment-provisioner/n-08-setup-error.png?w=560\u0026fit=max\u0026auto=format\u0026n=e76GE4c5Q1nkWlMv\u0026q=85\u0026s=8b43ae0af275aa8d4b95d5bc35c5cfb4 560w, https://mintcdn.com/echoauth/e76GE4c5Q1nkWlMv/images/payment-provisioner/n-08-setup-error.png?w=840\u0026fit=max\u0026auto=format\u0026n=e76GE4c5Q1nkWlMv\u0026q=85\u0026s=60b711219c28f531693610520b3c6b07 840w, https://mintcdn.com/echoauth/e76GE4c5Q1nkWlMv/images/payment-provisioner/n-08-setup-error.png?w=1100\u0026fit=max\u0026auto=format\u0026n=e76GE4c5Q1nkWlMv\u0026q=85\u0026s=59d021f3a928af1b319d640db5dc8863 1100w, https://mintcdn.com/echoauth/e76GE4c5Q1nkWlMv/images/payment-provisioner/n-08-setup-error.png?w=1650\u0026fit=max\u0026auto=format\u0026n=e76GE4c5Q1nkWlMv\u0026q=85\u0026s=c71de9a0c6fac5a280b07cac3b983413 1650w, https://mintcdn.com/echoauth/e76GE4c5Q1nkWlMv/images/payment-provisioner/n-08-setup-error.png?w=2500\u0026fit=max\u0026auto=format\u0026n=e76GE4c5Q1nkWlMv\u0026q=85\u0026s=cfa5fa6b4c8f6693b26758e594f093f1 2500w`})})]}),`\n`,_jsx(Heading,{level:`2`,id:`3-your-two-urls-and-test-payment`,children:`3. Your two URLs and test payment`}),`\n`,_jsxs(_components.p,{children:[`This is the last step. Your license page shows `,_jsx(_components.strong,{children:`two URLs`}),`. Each one goes in a different place.`]}),`\n`,_jsx(Frame,{caption:`Use the Copy buttons`,children:_jsx(OptimizedImage,{src:`https://mintcdn.com/echoauth/e76GE4c5Q1nkWlMv/images/payment-provisioner/n-10-urls.png?fit=max\u0026auto=format\u0026n=e76GE4c5Q1nkWlMv\u0026q=85\u0026s=d99a12e3fa909c00b4e3b5d9d9ece4b3`,alt:`Your URLs card with a pay URL and a webhook URL, each with a Copy button`,\"data-og-width\":`740`,width:`740`,\"data-og-height\":`379`,height:`379`,\"data-path\":`images/payment-provisioner/n-10-urls.png`,\"data-optimize\":`true`,\"data-opv\":`3`,srcset:`https://mintcdn.com/echoauth/e76GE4c5Q1nkWlMv/images/payment-provisioner/n-10-urls.png?w=280\u0026fit=max\u0026auto=format\u0026n=e76GE4c5Q1nkWlMv\u0026q=85\u0026s=46c5c7c0d1a57f4f43280c9e49fb16de 280w, https://mintcdn.com/echoauth/e76GE4c5Q1nkWlMv/images/payment-provisioner/n-10-urls.png?w=560\u0026fit=max\u0026auto=format\u0026n=e76GE4c5Q1nkWlMv\u0026q=85\u0026s=35ee6dc0ab2b584c5040ee9ee6695e05 560w, https://mintcdn.com/echoauth/e76GE4c5Q1nkWlMv/images/payment-provisioner/n-10-urls.png?w=840\u0026fit=max\u0026auto=format\u0026n=e76GE4c5Q1nkWlMv\u0026q=85\u0026s=d8e7fdbb394baa44c9bfeecab9a8160a 840w, https://mintcdn.com/echoauth/e76GE4c5Q1nkWlMv/images/payment-provisioner/n-10-urls.png?w=1100\u0026fit=max\u0026auto=format\u0026n=e76GE4c5Q1nkWlMv\u0026q=85\u0026s=c99f5eb4b3860f0f2c8aad7046b0913f 1100w, https://mintcdn.com/echoauth/e76GE4c5Q1nkWlMv/images/payment-provisioner/n-10-urls.png?w=1650\u0026fit=max\u0026auto=format\u0026n=e76GE4c5Q1nkWlMv\u0026q=85\u0026s=725e10c7f704c727644917b1441f540f 1650w, https://mintcdn.com/echoauth/e76GE4c5Q1nkWlMv/images/payment-provisioner/n-10-urls.png?w=2500\u0026fit=max\u0026auto=format\u0026n=e76GE4c5Q1nkWlMv\u0026q=85\u0026s=090346611f8033ad2cc053284a155b0a 2500w`})}),`\n`,_jsxs(Table,{children:[_jsx(_components.thead,{children:_jsxs(_components.tr,{children:[_jsx(_components.th,{children:`URL`}),_jsx(_components.th,{children:`What it does`}),_jsx(_components.th,{children:`Where to paste it`})]})}),_jsxs(_components.tbody,{children:[_jsxs(_components.tr,{children:[_jsx(_components.td,{children:_jsx(_components.strong,{children:`Pay URL`})}),_jsx(_components.td,{children:`Sends your buyer to the crypto checkout.`}),_jsx(_components.td,{children:`SellAuth, as the redirect URL of the payment method`})]}),_jsxs(_components.tr,{children:[_jsx(_components.td,{children:_jsx(_components.strong,{children:`Webhook URL`})}),_jsx(_components.td,{children:`Tells the processor when a payment is done, so the order is marked as paid.`}),_jsx(_components.td,{children:`Your processor’s dashboard, as the callback or IPN URL`})]})]})]}),`\n`,_jsxs(Steps,{children:[_jsx(Step,{title:`Paste the pay URL into SellAuth`,children:_jsxs(_components.p,{children:[`Click `,_jsx(_components.strong,{children:`Copy`}),` next to `,_jsx(_components.strong,{children:`Pay URL`}),`. In SellAuth, open your payment methods and set the redirect URL to it. Your dashboard says: `,_jsx(_components.em,{children:`SellAuth, Payment methods, redirect URL`}),`.`]})}),_jsx(Step,{title:`Paste the webhook URL into your processor`,children:_jsxs(_components.p,{children:[`Click `,_jsx(_components.strong,{children:`Copy`}),` next to `,_jsx(_components.strong,{children:`Webhook URL`}),`. In your processor’s dashboard, set the callback or IPN URL to it. Your dashboard says for example: `,_jsx(_components.em,{children:`NowPayments dashboard, callback / IPN URL`}),`.`]})}),_jsxs(Step,{title:`Check the status`,children:[_jsxs(_components.p,{children:[`The processor card on your license page shows a green `,_jsx(_components.strong,{children:`running`}),` badge.`]}),_jsx(Frame,{caption:`A running processor`,children:_jsx(OptimizedImage,{src:`https://mintcdn.com/echoauth/e76GE4c5Q1nkWlMv/images/payment-provisioner/n-11-status.png?fit=max\u0026auto=format\u0026n=e76GE4c5Q1nkWlMv\u0026q=85\u0026s=2e12cc1d83c2ff0ab711fe0c9c175f1f`,alt:`Active processor card with a green running badge and the Swap processor, Start, Stop and Restart buttons`,\"data-og-width\":`740`,width:`740`,\"data-og-height\":`208`,height:`208`,\"data-path\":`images/payment-provisioner/n-11-status.png`,\"data-optimize\":`true`,\"data-opv\":`3`,srcset:`https://mintcdn.com/echoauth/e76GE4c5Q1nkWlMv/images/payment-provisioner/n-11-status.png?w=280\u0026fit=max\u0026auto=format\u0026n=e76GE4c5Q1nkWlMv\u0026q=85\u0026s=c97724e04d755e44dd30845307666a62 280w, https://mintcdn.com/echoauth/e76GE4c5Q1nkWlMv/images/payment-provisioner/n-11-status.png?w=560\u0026fit=max\u0026auto=format\u0026n=e76GE4c5Q1nkWlMv\u0026q=85\u0026s=089fc3b2663df31abe725cc0d9afc9a0 560w, https://mintcdn.com/echoauth/e76GE4c5Q1nkWlMv/images/payment-provisioner/n-11-status.png?w=840\u0026fit=max\u0026auto=format\u0026n=e76GE4c5Q1nkWlMv\u0026q=85\u0026s=bfd1019179f42f8a359f234526abf62d 840w, https://mintcdn.com/echoauth/e76GE4c5Q1nkWlMv/images/payment-provisioner/n-11-status.png?w=1100\u0026fit=max\u0026auto=format\u0026n=e76GE4c5Q1nkWlMv\u0026q=85\u0026s=4f29c5d2ab63c0d01226dc25665015b0 1100w, https://mintcdn.com/echoauth/e76GE4c5Q1nkWlMv/images/payment-provisioner/n-11-status.png?w=1650\u0026fit=max\u0026auto=format\u0026n=e76GE4c5Q1nkWlMv\u0026q=85\u0026s=7a2f2bc4a35eb368bbe28f1cb239eb0f 1650w, https://mintcdn.com/echoauth/e76GE4c5Q1nkWlMv/images/payment-provisioner/n-11-status.png?w=2500\u0026fit=max\u0026auto=format\u0026n=e76GE4c5Q1nkWlMv\u0026q=85\u0026s=1449cc4bc0c5043efe85391e53c006ec 2500w`})})]}),_jsx(Step,{title:`Make a small test order`,children:_jsxs(_components.p,{children:[`Buy one of your own products with crypto, with a small amount. Scroll to `,_jsx(_components.strong,{children:`Logs`}),` on your license page. New lines appear live when a payment request comes in. After the payment is confirmed, the order is marked as paid and delivered.`]})})]}),`\n`,_jsx(Note,{children:_jsx(_components.p,{children:`Menu names in SellAuth and in your processor’s dashboard may look slightly different from what is written here. Look for the redirect URL and the callback or IPN URL.`})}),`\n`,_jsx(Warning,{children:_jsxs(_components.p,{children:[`Keep `,_jsx(_components.code,{children:`{unique_id}`}),` `,_jsx(_components.strong,{children:`exactly as written`}),` in the pay URL. SellAuth fills it in for every order.`]})}),`\n`,_jsxs(_components.p,{children:[`If something seems stuck, try `,_jsx(_components.strong,{children:`Restart`}),` on your license page first.`]}),`\n`,_jsx(Heading,{level:`2`,id:`4-switch-processor`,children:`4. Switch processor`}),`\n`,_jsxs(_components.p,{children:[`You can use `,_jsx(_components.strong,{children:`one processor at a time`}),` per license and switch whenever you want, for example from NowPayments to Heleket.`]}),`\n`,_jsxs(_components.ul,{children:[`\n`,_jsxs(_components.li,{children:[_jsx(_components.strong,{children:`Stays the same:`}),` your license, your expiry date, your SellAuth shop ID and key.`]}),`\n`,_jsxs(_components.li,{children:[_jsx(_components.strong,{children:`Changes:`}),` you enter the credentials of the new processor, and you get `,_jsx(_components.strong,{children:`new URLs`}),` to paste again.`]}),`\n`]}),`\n`,_jsxs(Steps,{children:[_jsx(Step,{title:`Click Swap processor`,children:_jsxs(_components.p,{children:[`Open your license, click `,_jsx(_components.strong,{children:`Swap processor`}),` and pick the new one.`]})}),_jsxs(Step,{title:`Fill in the new form`,children:[_jsx(_components.p,{children:`The form warns you that your current checkout stops when the new one is live. Enter the new credentials and tick the box to confirm.`}),_jsx(Frame,{caption:`Swapping from NowPayments to Heleket`,children:_jsx(OptimizedImage,{src:`https://mintcdn.com/echoauth/e76GE4c5Q1nkWlMv/images/payment-provisioner/cust-08-swap-heleket-form.png?fit=max\u0026auto=format\u0026n=e76GE4c5Q1nkWlMv\u0026q=85\u0026s=0b1ba849c6addc55ea760a6675ffc7b2`,alt:`Heleket setup form with a swap warning and a confirmation checkbox`,\"data-og-width\":`1440`,width:`1440`,\"data-og-height\":`900`,height:`900`,\"data-path\":`images/payment-provisioner/cust-08-swap-heleket-form.png`,\"data-optimize\":`true`,\"data-opv\":`3`,srcset:`https://mintcdn.com/echoauth/e76GE4c5Q1nkWlMv/images/payment-provisioner/cust-08-swap-heleket-form.png?w=280\u0026fit=max\u0026auto=format\u0026n=e76GE4c5Q1nkWlMv\u0026q=85\u0026s=11ec2791fe32e6cae47d34c49ce86ecc 280w, https://mintcdn.com/echoauth/e76GE4c5Q1nkWlMv/images/payment-provisioner/cust-08-swap-heleket-form.png?w=560\u0026fit=max\u0026auto=format\u0026n=e76GE4c5Q1nkWlMv\u0026q=85\u0026s=5015568af3b2cec99aad0a645566e9fc 560w, https://mintcdn.com/echoauth/e76GE4c5Q1nkWlMv/images/payment-provisioner/cust-08-swap-heleket-form.png?w=840\u0026fit=max\u0026auto=format\u0026n=e76GE4c5Q1nkWlMv\u0026q=85\u0026s=d99555e65eea2ad9373d380963f65104 840w, https://mintcdn.com/echoauth/e76GE4c5Q1nkWlMv/images/payment-provisioner/cust-08-swap-heleket-form.png?w=1100\u0026fit=max\u0026auto=format\u0026n=e76GE4c5Q1nkWlMv\u0026q=85\u0026s=e1b824db2ab10fcb516f5b86cc876b7e 1100w, https://mintcdn.com/echoauth/e76GE4c5Q1nkWlMv/images/payment-provisioner/cust-08-swap-heleket-form.png?w=1650\u0026fit=max\u0026auto=format\u0026n=e76GE4c5Q1nkWlMv\u0026q=85\u0026s=a6f963e60116db7f9ee64176979d24f5 1650w, https://mintcdn.com/echoauth/e76GE4c5Q1nkWlMv/images/payment-provisioner/cust-08-swap-heleket-form.png?w=2500\u0026fit=max\u0026auto=format\u0026n=e76GE4c5Q1nkWlMv\u0026q=85\u0026s=f92d7d3be29e78ec77b85c6605402f37 2500w`})})]}),_jsx(Step,{title:`Paste the new URLs`,children:_jsxs(_components.p,{children:[`You see `,_jsx(_components.em,{children:`Swap complete`}),`. Update the redirect URL in SellAuth and the callback or IPN URL in the new processor.`]})})]}),`\n`,_jsx(Warning,{children:_jsxs(_components.p,{children:[`After a swap, the `,_jsx(_components.strong,{children:`old URLs stop working right away`}),`. Update SellAuth quickly so buyers do not hit a dead link.`]})}),`\n`,_jsx(Check,{children:_jsxs(_components.p,{children:[`It is safe. The new checkout starts first and has to work before anything changes. If the swap fails, you see a message that your old checkout `,_jsx(_components.strong,{children:`is still active`}),`. Nothing is lost. Fix the problem and try again.`]})}),`\n`,_jsx(Heading,{level:`2`,id:`5-add-another-license`,children:`5. Add another license`}),`\n`,_jsxs(_components.p,{children:[`Each license gives you `,_jsx(_components.strong,{children:`one processor slot`}),`. Add another license for a `,_jsx(_components.strong,{children:`second SellAuth shop`}),` or a `,_jsx(_components.strong,{children:`second processor`}),` at the same time.`]}),`\n`,_jsxs(Steps,{children:[_jsxs(Step,{title:`Click Add license`,children:[_jsxs(_components.p,{children:[`Use `,_jsx(_components.strong,{children:`Add license`}),` in the top menu. Paste the new key and choose `,_jsx(_components.strong,{children:`Add as new license`}),`.`]}),_jsx(Frame,{caption:`Add a license (placeholder key)`,children:_jsx(OptimizedImage,{src:`https://mintcdn.com/echoauth/e76GE4c5Q1nkWlMv/images/payment-provisioner/n-13-add-license.png?fit=max\u0026auto=format\u0026n=e76GE4c5Q1nkWlMv\u0026q=85\u0026s=14b2d3b92a2864aae399a966fdd550e0`,alt:`Add license form with a placeholder key and options to add as new license or extend an existing one`,\"data-og-width\":`1440`,width:`1440`,\"data-og-height\":`900`,height:`900`,\"data-path\":`images/payment-provisioner/n-13-add-license.png`,\"data-optimize\":`true`,\"data-opv\":`3`,srcset:`https://mintcdn.com/echoauth/e76GE4c5Q1nkWlMv/images/payment-provisioner/n-13-add-license.png?w=280\u0026fit=max\u0026auto=format\u0026n=e76GE4c5Q1nkWlMv\u0026q=85\u0026s=9af9082fd6380964f67ae25d7b36d487 280w, https://mintcdn.com/echoauth/e76GE4c5Q1nkWlMv/images/payment-provisioner/n-13-add-license.png?w=560\u0026fit=max\u0026auto=format\u0026n=e76GE4c5Q1nkWlMv\u0026q=85\u0026s=704eef7fdbd747f29bc728e218199302 560w, https://mintcdn.com/echoauth/e76GE4c5Q1nkWlMv/images/payment-provisioner/n-13-add-license.png?w=840\u0026fit=max\u0026auto=format\u0026n=e76GE4c5Q1nkWlMv\u0026q=85\u0026s=2e23182010f42f6f6a5994df5e9aa199 840w, https://mintcdn.com/echoauth/e76GE4c5Q1nkWlMv/images/payment-provisioner/n-13-add-license.png?w=1100\u0026fit=max\u0026auto=format\u0026n=e76GE4c5Q1nkWlMv\u0026q=85\u0026s=1d6b345cdccc082cbbcc3ef12070aac4 1100w, https://mintcdn.com/echoauth/e76GE4c5Q1nkWlMv/images/payment-provisioner/n-13-add-license.png?w=1650\u0026fit=max\u0026auto=format\u0026n=e76GE4c5Q1nkWlMv\u0026q=85\u0026s=fe5b0f0eee231b0178c9ad0fa68c8469 1650w, https://mintcdn.com/echoauth/e76GE4c5Q1nkWlMv/images/payment-provisioner/n-13-add-license.png?w=2500\u0026fit=max\u0026auto=format\u0026n=e76GE4c5Q1nkWlMv\u0026q=85\u0026s=baa7c4bcd9561ef6d755475b644b0dd0 2500w`})})]}),_jsxs(Step,{title:`Set it up`,children:[_jsx(_components.p,{children:`Your dashboard lists every license with its own status and expiry date. Open the new one and connect a processor. Each license has its own shop and its own URLs.`}),_jsx(Frame,{caption:`Dashboard with several licenses`,children:_jsx(OptimizedImage,{src:`https://mintcdn.com/echoauth/e76GE4c5Q1nkWlMv/images/payment-provisioner/n-14-dashboard.png?fit=max\u0026auto=format\u0026n=e76GE4c5Q1nkWlMv\u0026q=85\u0026s=af3a32d6459ba6339956c335debd28e1`,alt:`Dashboard listing two crypto licenses with status and expiry`,\"data-og-width\":`1440`,width:`1440`,\"data-og-height\":`900`,height:`900`,\"data-path\":`images/payment-provisioner/n-14-dashboard.png`,\"data-optimize\":`true`,\"data-opv\":`3`,srcset:`https://mintcdn.com/echoauth/e76GE4c5Q1nkWlMv/images/payment-provisioner/n-14-dashboard.png?w=280\u0026fit=max\u0026auto=format\u0026n=e76GE4c5Q1nkWlMv\u0026q=85\u0026s=b9786b73b33fc3e16e3f485dc1ebba4e 280w, https://mintcdn.com/echoauth/e76GE4c5Q1nkWlMv/images/payment-provisioner/n-14-dashboard.png?w=560\u0026fit=max\u0026auto=format\u0026n=e76GE4c5Q1nkWlMv\u0026q=85\u0026s=065d632cf0f71ed52481191b49999bb4 560w, https://mintcdn.com/echoauth/e76GE4c5Q1nkWlMv/images/payment-provisioner/n-14-dashboard.png?w=840\u0026fit=max\u0026auto=format\u0026n=e76GE4c5Q1nkWlMv\u0026q=85\u0026s=007c3d1ad3a96601e06a055f6b422ffd 840w, https://mintcdn.com/echoauth/e76GE4c5Q1nkWlMv/images/payment-provisioner/n-14-dashboard.png?w=1100\u0026fit=max\u0026auto=format\u0026n=e76GE4c5Q1nkWlMv\u0026q=85\u0026s=597c726da02e3142cb934cbfa71a6288 1100w, https://mintcdn.com/echoauth/e76GE4c5Q1nkWlMv/images/payment-provisioner/n-14-dashboard.png?w=1650\u0026fit=max\u0026auto=format\u0026n=e76GE4c5Q1nkWlMv\u0026q=85\u0026s=45f387021ea118ae339a7e221ef6ca32 1650w, https://mintcdn.com/echoauth/e76GE4c5Q1nkWlMv/images/payment-provisioner/n-14-dashboard.png?w=2500\u0026fit=max\u0026auto=format\u0026n=e76GE4c5Q1nkWlMv\u0026q=85\u0026s=a4496ca918eb8a11c4a11dc33aec85c4 2500w`})})]})]}),`\n`,_jsxs(_components.p,{children:[`Today licenses are for `,_jsx(_components.strong,{children:`crypto`}),` payments. Other categories, like skins and card payments, are shown as `,_jsx(_components.strong,{children:`coming soon`}),` and can’t be used yet.`]}),`\n`,_jsx(Heading,{level:`2`,id:`6-renewals-and-expiry`,children:`6. Renewals and expiry`}),`\n`,_jsxs(_components.p,{children:[`Licenses come in `,_jsx(_components.strong,{children:`1, 3, 6 or 12 months`}),`. The time starts when `,_jsx(_components.strong,{children:`you register or redeem the key`}),`, not when you buy it. You get `,_jsx(_components.strong,{children:`2 bonus days`}),` on top of every redemption, for setup and testing. Your expiry date is shown at the top of your license page and in your dashboard.`]}),`\n`,_jsx(_components.p,{children:`When a license expires:`}),`\n`,_jsxs(_components.ul,{children:[`\n`,_jsxs(_components.li,{children:[`Your checkout `,_jsx(_components.strong,{children:`pauses`}),`. Buyers can’t pay with crypto until you renew.`]}),`\n`,_jsxs(_components.li,{children:[_jsx(_components.strong,{children:`Nothing is deleted.`}),` Your settings and logs are kept.`]}),`\n`]}),`\n`,_jsx(Frame,{caption:`An expired license with a renewal prompt`,children:_jsx(OptimizedImage,{src:`https://mintcdn.com/echoauth/e76GE4c5Q1nkWlMv/images/payment-provisioner/cust-16-expired.png?fit=max\u0026auto=format\u0026n=e76GE4c5Q1nkWlMv\u0026q=85\u0026s=97ca7e9f755a852e93465194003b0691`,alt:`License page with an expired badge and a message to redeem a renewal key`,\"data-og-width\":`1440`,width:`1440`,\"data-og-height\":`1043`,height:`1043`,\"data-path\":`images/payment-provisioner/cust-16-expired.png`,\"data-optimize\":`true`,\"data-opv\":`3`,srcset:`https://mintcdn.com/echoauth/e76GE4c5Q1nkWlMv/images/payment-provisioner/cust-16-expired.png?w=280\u0026fit=max\u0026auto=format\u0026n=e76GE4c5Q1nkWlMv\u0026q=85\u0026s=e20894be043995e16238047e98cffb87 280w, https://mintcdn.com/echoauth/e76GE4c5Q1nkWlMv/images/payment-provisioner/cust-16-expired.png?w=560\u0026fit=max\u0026auto=format\u0026n=e76GE4c5Q1nkWlMv\u0026q=85\u0026s=65d9372459605abb5da94b4594d60ea6 560w, https://mintcdn.com/echoauth/e76GE4c5Q1nkWlMv/images/payment-provisioner/cust-16-expired.png?w=840\u0026fit=max\u0026auto=format\u0026n=e76GE4c5Q1nkWlMv\u0026q=85\u0026s=6f982a8dbed1b12e2f1d846376ab20a9 840w, https://mintcdn.com/echoauth/e76GE4c5Q1nkWlMv/images/payment-provisioner/cust-16-expired.png?w=1100\u0026fit=max\u0026auto=format\u0026n=e76GE4c5Q1nkWlMv\u0026q=85\u0026s=85e47f87611293ffe5ffae9ee29d7fe6 1100w, https://mintcdn.com/echoauth/e76GE4c5Q1nkWlMv/images/payment-provisioner/cust-16-expired.png?w=1650\u0026fit=max\u0026auto=format\u0026n=e76GE4c5Q1nkWlMv\u0026q=85\u0026s=378098ad793257f63123e25ccb1f88e6 1650w, https://mintcdn.com/echoauth/e76GE4c5Q1nkWlMv/images/payment-provisioner/cust-16-expired.png?w=2500\u0026fit=max\u0026auto=format\u0026n=e76GE4c5Q1nkWlMv\u0026q=85\u0026s=bb697725c42837fbee1de2c771385837 2500w`})}),`\n`,_jsxs(Steps,{children:[_jsx(Step,{title:`Get a renewal key`,children:_jsx(_components.p,{children:`Buy a new license key.`})}),_jsx(Step,{title:`Redeem it`,children:_jsxs(_components.p,{children:[`Click `,_jsx(_components.strong,{children:`Redeem a renewal key`}),`, or `,_jsx(_components.strong,{children:`Extend with a new key`}),` on your license page, and paste the key.`]})}),_jsx(Step,{title:`Done`,children:_jsx(_components.p,{children:`Your license is active again and your checkout starts again. Your URLs stay the same.`})})]}),`\n`,_jsx(Tip,{children:_jsxs(_components.p,{children:[`You can renew `,_jsx(_components.strong,{children:`before`}),` it expires. The new time is added to your current end date, so you lose nothing.`]})}),`\n`,_jsx(Warning,{children:_jsxs(_components.p,{children:[`Treat a license key like a password. Don’t post it in public. Your dashboard shows only the last 4 characters. You can change your password under `,_jsx(_components.strong,{children:`Settings`}),`.`]})}),`\n`,_jsx(Heading,{level:`2`,id:`faq`,children:`FAQ`}),`\n`,_jsxs(AccordionGroup,{children:[_jsx(Accordion,{title:`My license key is invalid or already used`,id:`my-license-key-is-invalid-or-already-used`,children:_jsxs(_components.p,{children:[`Check for typos and extra spaces. Each key works `,_jsx(_components.strong,{children:`once`}),`. If you already registered with it, sign in instead. If you are sure it is new, ask Echo.`]})}),_jsx(Accordion,{title:`Setup shows a red error`,id:`setup-shows-a-red-error`,children:_jsx(_components.p,{children:`Most often a wrong SellAuth API key, shop ID or processor credentials. Check each field, remove spaces and try again. The form shows the last log lines of the failed attempt to help.`})}),_jsx(Accordion,{title:`The order stays unpaid after the buyer paid`,id:`the-order-stays-unpaid-after-the-buyer-paid`,children:_jsxs(_components.p,{children:[`Check the `,_jsx(_components.strong,{children:`webhook URL`}),` in your processor’s dashboard. It must be exactly the one on your license page. Then look at the `,_jsx(_components.strong,{children:`Logs`}),` on your license page for errors.`]})}),_jsx(Accordion,{title:`Buyers land on an error page at checkout`,id:`buyers-land-on-an-error-page-at-checkout`,children:_jsxs(_components.p,{children:[`Check the `,_jsx(_components.strong,{children:`redirect URL`}),` in SellAuth. It must be your pay URL, with `,_jsx(_components.code,{children:`{unique_id}`}),` kept as written. Also check that your license is active and the badge says `,_jsx(_components.strong,{children:`running`}),`.`]})}),_jsx(Accordion,{title:`I switched processors and checkout stopped`,id:`i-switched-processors-and-checkout-stopped`,children:_jsxs(_components.p,{children:[`Paste the `,_jsx(_components.strong,{children:`new URLs`}),` after a swap. The old ones stop working.`]})}),_jsx(Accordion,{title:`My swap failed`,id:`my-swap-failed`,children:_jsxs(_components.p,{children:[`Your old setup is `,_jsx(_components.strong,{children:`kept and still active`}),`. Read the red message, fix the credentials and try again.`]})}),_jsx(Accordion,{title:`I can't sign in`,id:`i-cant-sign-in`,children:_jsxs(_components.p,{children:[`After several wrong passwords you are blocked for a while. `,_jsx(_components.strong,{children:`Wait about 15 minutes`}),` and try again. Check your username or email.`]})}),_jsx(Accordion,{title:`I see a message to try again later`,id:`i-see-a-message-to-try-again-later`,children:_jsx(_components.p,{children:`There is a limit on how often you can set up, swap or change credentials per hour. Wait a bit and try again.`})}),_jsx(Accordion,{title:`I want to change my SellAuth shop`,id:`i-want-to-change-my-sellauth-shop`,children:_jsx(_components.p,{children:`The shop is locked to the license after the first setup. Ask support to change it, or use another license for the other shop.`})}),_jsx(Accordion,{title:`I forgot my password`,id:`i-forgot-my-password`,children:_jsxs(_components.p,{children:[`No email is sent. Ask support for a password reset. You can change your password later in `,_jsx(_components.strong,{children:`Settings`}),`.`]})}),_jsx(Accordion,{title:`My license expired`,id:`my-license-expired`,children:_jsxs(_components.p,{children:[`Your checkout is paused and nothing is lost. Redeem a renewal key. See `,_jsx(_components.a,{href:`#6-renewals-and-expiry`,children:`Renewals and expiry`}),`.`]})})]}),`\n`,_jsxs(_components.p,{children:[`Still stuck? Open a ticket in my `,_jsx(_components.a,{href:`https://discord.echoauth.dev`,children:`support server`}),`.`]})]})}function MDXContent(props={}){const{wrapper:MDXLayout}={..._provideComponents(),...props.components};return MDXLayout?_jsx(MDXLayout,{...props,children:_jsx(_createMdxContent,{...props})}):_createMdxContent(props)}return{default:MDXContent};function _missingMdxReference(id,component){throw new Error(`Expected `+(component?`component`:`object`)+\" `\"+id+\"` to be defined: you likely forgot to import, pass, or provide it.\")}","frontmatter":{},"scope":{"config":{},"pageMetadata":{"title":"SellAuth Payment Automation","sidebarTitle":"SellAuth Payment Automation","description":"Accept more crypto coins with your SellAuth shop in about 5 minutes with NowPayments, Heleket or Cryptomus.","icon":"coins","keywords":["crypto payments","sellauth","nowpayments","heleket","cryptomus","license key"],"href":"/sellauth-payment-automation"}}},"mdxSourceWithNoJs":null},"mdxExtracts":{"tableOfContents":[{"title":"It takes 3 steps","slug":"it-takes-3-steps","depth":2,"children":[]},{"title":"What you need","slug":"what-you-need","depth":2,"children":[]},{"title":"1. Create your account","slug":"1-create-your-account","depth":2,"children":[]},{"title":"2. Connect a processor","slug":"2-connect-a-processor","depth":2,"children":[]},{"title":"3. Your two URLs and test payment","slug":"3-your-two-urls-and-test-payment","depth":2,"children":[]},{"title":"4. Switch processor","slug":"4-switch-processor","depth":2,"children":[]},{"title":"5. Add another license","slug":"5-add-another-license","depth":2,"children":[]},{"title":"6. Renewals and expiry","slug":"6-renewals-and-expiry","depth":2,"children":[]},{"title":"FAQ","slug":"faq","depth":2,"children":[]}],"codeExamples":{}},"jsLinks":[],"subdomain":"echoauth","siteName":"EchoAuth","title":"SellAuth Payment Automation - EchoAuth","navMaps":{"firstHrefInVersion":{},"firstHrefInLanguage":{"en":{"href":"/sellauth-payment-automation","matchLevel":0},"de":{"href":"/de/sellauth-payment-automation","matchLevel":1},"fr":{"href":"/fr/sellauth-payment-automation","matchLevel":1},"es":{"href":"/es/sellauth-payment-automation","matchLevel":1},"fi":{"href":"/fi/sellauth-payment-automation","matchLevel":1},"nl":{"href":"/nl/sellauth-payment-automation","matchLevel":1},"pt":{"href":"/pt/sellauth-payment-automation","matchLevel":1},"ar":{"href":"/ar/sellauth-payment-automation","matchLevel":1},"cn":{"href":"/cn/sellauth-payment-automation","matchLevel":1},"jp":{"href":"/jp/sellauth-payment-automation","matchLevel":1},"hi":{"href":"/hi/sellauth-payment-automation","matchLevel":1}}},"lastModified":"2026-11-14T13:14:09.721Z","originalFileLocation":"sellauth-payment-automation.mdx","locale":"en"},"headHtml":"\u003cscript data-mint-head>(function(){var d=document.documentElement,p=null;if(!p){try{p=localStorage.getItem(\"isDarkMode\")}catch(e){}if(p==='true')p='dark';else if(p==='false')p='light';if(p!=='light'\u0026\u0026p!=='dark'\u0026\u0026p!=='system')p=\"system\"}var r=p==='system'?(matchMedia(\"(prefers-color-scheme: dark)\").matches?'dark':'light'):p;d.classList.remove(r==='dark'?'light':'dark');d.classList.add(r);d.setAttribute(\"data-theme-preference\",p)})();\u003c/script>\u003cmeta data-mint-head name=\"description\" content=\"Accept more crypto coins with your SellAuth shop in about 5 minutes with NowPayments, Heleket or Cryptomus.\">\u003cmeta data-mint-head name=\"application-name\" content=\"EchoAuth\">\u003cmeta data-mint-head name=\"generator\" content=\"Mintlify\">\u003clink data-mint-head rel=\"icon\" type=\"image/png\" sizes=\"192x192\" href=\"/mintlify-assets/_mintlify/favicons/echoauth/TpHGpJMuwmeWyROQ/_generated/favicon/android-chrome-192x192.png\" media=\"(prefers-color-scheme: light)\">\u003clink data-mint-head rel=\"apple-touch-icon\" type=\"image/png\" sizes=\"180x180\" href=\"/mintlify-assets/_mintlify/favicons/echoauth/TpHGpJMuwmeWyROQ/_generated/favicon/apple-touch-icon.png\">\u003clink data-mint-head rel=\"icon\" type=\"image/png\" sizes=\"16x16\" href=\"/mintlify-assets/_mintlify/favicons/echoauth/TpHGpJMuwmeWyROQ/_generated/favicon/favicon-16x16.png\" media=\"(prefers-color-scheme: light)\">\u003clink data-mint-head rel=\"icon\" type=\"image/png\" sizes=\"32x32\" href=\"/mintlify-assets/_mintlify/favicons/echoauth/TpHGpJMuwmeWyROQ/_generated/favicon/favicon-32x32.png\" media=\"(prefers-color-scheme: light)\">\u003clink data-mint-head rel=\"shortcut icon\" type=\"image/x-icon\" href=\"/mintlify-assets/_mintlify/favicons/echoauth/TpHGpJMuwmeWyROQ/_generated/favicon/favicon.ico\" media=\"(prefers-color-scheme: light)\">\u003clink data-mint-head rel=\"icon\" type=\"image/png\" sizes=\"192x192\" href=\"/mintlify-assets/_mintlify/favicons/echoauth/TpHGpJMuwmeWyROQ/_generated/favicon-dark/android-chrome-192x192.png\" media=\"(prefers-color-scheme: dark)\">\u003clink data-mint-head rel=\"icon\" type=\"image/png\" sizes=\"16x16\" href=\"/mintlify-assets/_mintlify/favicons/echoauth/TpHGpJMuwmeWyROQ/_generated/favicon-dark/favicon-16x16.png\" media=\"(prefers-color-scheme: dark)\">\u003clink data-mint-head rel=\"icon\" type=\"image/png\" sizes=\"32x32\" href=\"/mintlify-assets/_mintlify/favicons/echoauth/TpHGpJMuwmeWyROQ/_generated/favicon-dark/favicon-32x32.png\" media=\"(prefers-color-scheme: dark)\">\u003clink data-mint-head rel=\"shortcut icon\" type=\"image/x-icon\" href=\"/mintlify-assets/_mintlify/favicons/echoauth/TpHGpJMuwmeWyROQ/_generated/favicon-dark/favicon.ico\" media=\"(prefers-color-scheme: dark)\">\u003cmeta data-mint-head property=\"og:title\" content=\"SellAuth Payment Automation - EchoAuth\">\u003cmeta data-mint-head property=\"og:description\" content=\"Accept more crypto coins with your SellAuth shop in about 5 minutes with NowPayments, Heleket or Cryptomus.\">\u003cmeta data-mint-head property=\"og:site_name\" content=\"EchoAuth\">\u003cmeta data-mint-head property=\"og:url\" content=\"https://docs.echoauth.dev/sellauth-payment-automation\">\u003cmeta data-mint-head property=\"og:type\" content=\"website\">\u003cmeta data-mint-head property=\"og:image\" content=\"https://echoauth.mintlify.site/_mintlify/api/og/v2?division=Getting+Started\u0026amp;title=SellAuth+Payment+Automation\u0026amp;description=Accept+more+crypto+coins+with+your+SellAuth+shop+in+about+5+minutes+with+NowPayments%2C+Heleket+or+Cryptomus.\u0026amp;theme=0ea26bea7f628e7af21dfa30\u0026amp;signature=d97977fb8ba4bbfd06d69191432d2ee80345e71e77696353325f1c1d1da75ab5\">\u003cmeta data-mint-head property=\"og:image:width\" content=\"1200\">\u003cmeta data-mint-head property=\"og:image:height\" content=\"630\">\u003cmeta data-mint-head name=\"twitter:card\" content=\"summary_large_image\">\u003cmeta data-mint-head name=\"twitter:title\" content=\"SellAuth Payment Automation - EchoAuth\">\u003cmeta data-mint-head name=\"twitter:description\" content=\"Accept more crypto coins with your SellAuth shop in about 5 minutes with NowPayments, Heleket or Cryptomus.\">\u003cmeta data-mint-head name=\"twitter:image\" content=\"https://echoauth.mintlify.site/_mintlify/api/og/v2?division=Getting+Started\u0026amp;title=SellAuth+Payment+Automation\u0026amp;description=Accept+more+crypto+coins+with+your+SellAuth+shop+in+about+5+minutes+with+NowPayments%2C+Heleket+or+Cryptomus.\u0026amp;theme=0ea26bea7f628e7af21dfa30\u0026amp;signature=d97977fb8ba4bbfd06d69191432d2ee80345e71e77696353325f1c1d1da75ab5\">\u003cmeta data-mint-head name=\"twitter:image:width\" content=\"1200\">\u003cmeta data-mint-head name=\"twitter:image:height\" content=\"630\">\u003cmeta data-mint-head name=\"msapplication-config\" content=\"/mintlify-assets/_mintlify/favicons/echoauth/TpHGpJMuwmeWyROQ/_generated/favicon/browserconfig.xml\">\u003cmeta data-mint-head name=\"apple-mobile-web-app-title\" content=\"EchoAuth\">\u003cmeta data-mint-head name=\"msapplication-TileColor\" content=\"#16A34A\">\u003clink data-mint-head rel=\"canonical\" href=\"https://docs.echoauth.dev/sellauth-payment-automation\">\u003clink data-mint-head rel=\"alternate\" type=\"application/xml\" href=\"/sitemap.xml\">\u003clink data-mint-head rel=\"alternate\" type=\"text/markdown\" href=\"/sellauth-payment-automation.md\">\u003clink data-mint-head rel=\"alternate\" hreflang=\"en\" href=\"https://docs.echoauth.dev/sellauth-payment-automation\">\u003clink data-mint-head rel=\"alternate\" hreflang=\"de\" href=\"https://docs.echoauth.dev/de/sellauth-payment-automation\">\u003clink data-mint-head rel=\"alternate\" hreflang=\"fr\" href=\"https://docs.echoauth.dev/fr/sellauth-payment-automation\">\u003clink data-mint-head rel=\"alternate\" hreflang=\"es\" href=\"https://docs.echoauth.dev/es/sellauth-payment-automation\">\u003clink data-mint-head rel=\"alternate\" hreflang=\"fi\" href=\"https://docs.echoauth.dev/fi/sellauth-payment-automation\">\u003clink data-mint-head rel=\"alternate\" hreflang=\"nl\" href=\"https://docs.echoauth.dev/nl/sellauth-payment-automation\">\u003clink data-mint-head rel=\"alternate\" hreflang=\"pt\" href=\"https://docs.echoauth.dev/pt/sellauth-payment-automation\">\u003clink data-mint-head rel=\"alternate\" hreflang=\"ar\" href=\"https://docs.echoauth.dev/ar/sellauth-payment-automation\">\u003clink data-mint-head rel=\"alternate\" hreflang=\"zh\" href=\"https://docs.echoauth.dev/cn/sellauth-payment-automation\">\u003clink data-mint-head rel=\"alternate\" hreflang=\"ja\" href=\"https://docs.echoauth.dev/jp/sellauth-payment-automation\">\u003clink data-mint-head rel=\"alternate\" hreflang=\"hi\" href=\"https://docs.echoauth.dev/hi/sellauth-payment-automation\">\u003clink data-mint-head rel=\"alternate\" hreflang=\"x-default\" href=\"https://docs.echoauth.dev/sellauth-payment-automation\">\u003cscript data-mint-head type=\"application/ld+json\">{\"@context\":\"https://schema.org\",\"@graph\":[{\"@type\":\"Organization\",\"@id\":\"https://docs.echoauth.dev/#organization\",\"name\":\"EchoAuth\",\"url\":\"https://docs.echoauth.dev\",\"logo\":{\"@type\":\"ImageObject\",\"url\":\"https://mintcdn.com/echoauth/lwHXnAPLdMSP1I-Q/logo/echoauth-light.svg?fit=max\u0026auto=format\u0026n=lwHXnAPLdMSP1I-Q\u0026q=85\u0026s=10210fced308dfc7415178a798ba0bd7\"}},{\"@type\":\"WebSite\",\"@id\":\"https://docs.echoauth.dev#website\",\"name\":\"EchoAuth\",\"url\":\"https://docs.echoauth.dev\",\"publisher\":{\"@id\":\"https://docs.echoauth.dev/#organization\"}},{\"@type\":\"WebPage\",\"@id\":\"https://docs.echoauth.dev/sellauth-payment-automation#webpage\",\"url\":\"https://docs.echoauth.dev/sellauth-payment-automation\",\"name\":\"SellAuth Payment Automation\",\"description\":\"Accept more crypto coins with your SellAuth shop in about 5 minutes with NowPayments, Heleket or Cryptomus.\",\"dateModified\":\"2026-11-14T13:14:09.721Z\",\"isPartOf\":{\"@id\":\"https://docs.echoauth.dev#website\"},\"breadcrumb\":{\"@id\":\"https://docs.echoauth.dev/sellauth-payment-automation#breadcrumb\"}},{\"@type\":\"BreadcrumbList\",\"@id\":\"https://docs.echoauth.dev/sellauth-payment-automation#breadcrumb\",\"itemListElement\":[{\"@type\":\"ListItem\",\"position\":1,\"name\":\"Getting Started\",\"item\":\"https://docs.echoauth.dev\"},{\"@type\":\"ListItem\",\"position\":2,\"name\":\"SellAuth Payment Automation\",\"item\":\"https://docs.echoauth.dev/sellauth-payment-automation\"}]},{\"@type\":[\"Article\",\"TechArticle\"],\"@id\":\"https://docs.echoauth.dev/sellauth-payment-automation#article\",\"headline\":\"SellAuth Payment Automation\",\"name\":\"SellAuth Payment Automation\",\"description\":\"Accept more crypto coins with your SellAuth shop in about 5 minutes with NowPayments, Heleket or Cryptomus.\",\"url\":\"https://docs.echoauth.dev/sellauth-payment-automation\",\"mainEntityOfPage\":{\"@id\":\"https://docs.echoauth.dev/sellauth-payment-automation#webpage\"},\"dateModified\":\"2026-11-14T13:14:09.721Z\",\"keywords\":\"crypto payments, sellauth, nowpayments, heleket, cryptomus, license key\",\"publisher\":{\"@id\":\"https://docs.echoauth.dev/#organization\"},\"isPartOf\":{\"@id\":\"https://docs.echoauth.dev#website\"}}]}\u003c/script>\u003cscript data-mint-head type=\"application/ld+json\">{\"@context\":\"https://schema.org\",\"@type\":\"WebSite\",\"name\":\"EchoAuth\",\"publisher\":{\"@type\":\"Organization\",\"name\":\"EchoAuth\"},\"provider\":{\"@type\":\"Organization\",\"name\":\"Mintlify\",\"url\":\"https://mintlify.com\"}}\u003c/script>","agentPointerHref":"/sellauth-payment-automation.md","siteName":"EchoAuth","nav":{"global":null,"languages":[{"language":"en","default":true,"pages":[{"group":"Getting Started","pages":[{"title":"EchoAuth Documentation","sidebarTitle":"Welcome","icon":"house","href":""},{"title":"SMM Panel Automation Setup guide","sidebarTitle":"SMM Panel Automation","icon":"rocket","href":"/smm-setup"},{"title":"Ticket bot setup guide","sidebarTitle":"Discord Ticket Bot","icon":"ticket","href":"/ticket-bot-setup"},{"title":"AI Agent setup guide","sidebarTitle":"Discord AI Agent","icon":"robot","href":"/ai-agent-setup"},{"title":"Discord Bot Hosting Setup guide","sidebarTitle":"Discord Bot Hosting","description":"Register, redeem a license, and get a Node.js or Python Discord bot running and receiving webhooks on EchoAuth Bothosting.","icon":"server","href":"/bothosting-setup"},{"title":"SellAuth Payment Automation","sidebarTitle":"SellAuth Payment Automation","icon":"coins","href":"/sellauth-payment-automation"},{"title":"FAQ \u0026 Troubleshooting","sidebarTitle":"FAQ","description":"Quick answers to the most common questions about licenses, payments and setup across all EchoAuth products.","icon":"circle-question","href":"/faq"}]}]},{"language":"de","pages":[{"title":"de","href":"/de/sellauth-payment-automation"}]},{"language":"fr","pages":[{"title":"fr","href":"/fr/sellauth-payment-automation"}]},{"language":"es","pages":[{"title":"es","href":"/es/sellauth-payment-automation"}]},{"language":"fi","pages":[{"title":"fi","href":"/fi/sellauth-payment-automation"}]},{"language":"nl","pages":[{"title":"nl","href":"/nl/sellauth-payment-automation"}]},{"language":"pt","pages":[{"title":"pt","href":"/pt/sellauth-payment-automation"}]},{"language":"ar","pages":[{"title":"ar","href":"/ar/sellauth-payment-automation"}]},{"language":"cn","pages":[{"title":"cn","href":"/cn/sellauth-payment-automation"}]},{"language":"jp","pages":[{"title":"jp","href":"/jp/sellauth-payment-automation"}]},{"language":"hi","pages":[{"title":"hi","href":"/hi/sellauth-payment-automation"}]}]},"basePath":"","title":"SellAuth Payment Automation - EchoAuth","buildId":"dpl_Fyv1NbzwP68g2bEH2Roy98uY1zmE","deploymentId":"dpl_Fyv1NbzwP68g2bEH2Roy98uY1zmE","dynamics":["07c022d89b","a74be98ba7"],"chunks":["Frame-D2acuaLg.js","DynamicMarkdown-Co5nikxh.js","zoom-image-lightbox-BbK2OBGL.js","lightbox-handle-r17bVUz3.js"]}